OAuth Dance sounds like such a romantic term in the otherwise boring IT landscape. The term also helps dazzle many beginners who are trying to grasp the essence of this seemingly magical new security mechanism. Although plenty has been said about OAuth2, I still find it is valuable to walk through all four OAuth grant types using CURL in one place.
Why Mule? Well, firstly, I’m working with Mule now. Secondly, Mule external OAuth provider project source is available online. For those inquisitive minds, it allows some insight into the OAuth provider side. You may use the CURL scripts with other OAuth2 servers, such as Salesforce. But keep in mind that each server may have some subtle variations with their URL and parameters.
Why CURL? There are OAuth2 examples using various tools, including Java, PHP, browser and postman among others. I chose CURL because it is a platform independent tool you can run directly from command line. Also because it can show exactly what is going on in each step of the OAuth dance. Postman, for example, hides part of the steps when doing Authorization Code grant.
This is a long post. Part I can be dry to read. If you feel comfortable with OAuth2 concepts, you can jump to Part II directly. If you want to work with OAuth server other than Mule, you can jump to Part III curl scripts directly.
Part I – OAuth2 in a Nutshell
OAuth2 is a framework defined by https://tools.ietf.org/html/rfc6749. It’s not a protocol, because the RFC doesn’t contain enough implementation specifics. I say this with the understanding that the line between protocol and framework is a blurry one.
The RFC first defines four roles:
- Resource owner – person who owns the resource
- Resource server – the server where the resource (such as API service) resides
- Client – an application requesting access to the resource (as you will see later in the post, a client will have a client-id)
- Authorization server – issues the access token if authenticated. In many cases, this server may reside on the same physical server as the resource server.
OAuth2 framework (RFC) then defines four grant types (and an extension, see note further below):
- Authorization Code
- Implicit
- Username & password
- Client Credential
The RFC describes each grant type with a flow chart. That’s why sometimes people also loosely referring the grant types as OAuth flows. Each flow describes the steps involved for the grant type. Hence, the term OAuth dance.
This might be a good time to clarify some misconceptions of OAuth2. Many people merely equate “OAuth dance” to the single “Authorization Code” flow. If you head into the OAuth world and straightly look for “the single OAuth dance” (like good O’ ws-security, basic authentication), then you will be in for a surprise: there are actually four different dances.
This is how I would summarize OAuth2:
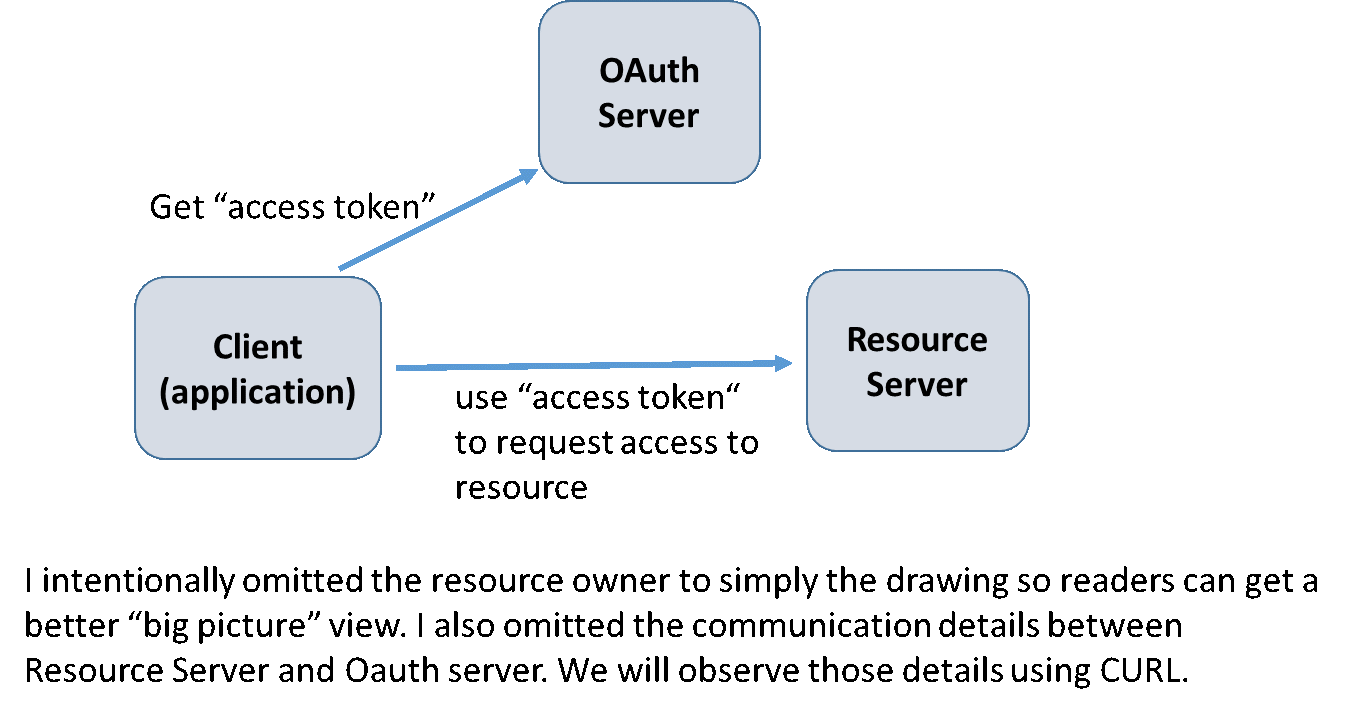
- When a client accesses a protected resource, it needs to provide an access token to the resource server.
- The client obtains the access token from OAuth server using one of the four ways (grant types, flows, dances whatever you want to call it)
- Once the client (application) gets the access token, the client will supply the token to the resource server and gain access to the resources (Web services, web pages API’s and what not).
- All grant types can get the access token in a single step, except “Authorization Code” which requires 3 steps and involves the interactive login from the resource owner as well.
Oh, Wait, There is More …
The RFC also defines an extension mechanism. There are two extensions I am aware of: the SAML and the JWT bearer token. We will not discuss the extensions here.
Auth2 has its fair share of controversy since the inception, see here. Some people see OAuth2 as inherently more secure than other authentication protocols. That is not true at all without the proper context. The main goal of OAuth2 is to provide a way for resource owner to share resources with a diverse of applications without sharing owner’s username and password (hence the reference to valet key of the internet). However, at the end of this post, you can draw your own conclusion whether all four grant types have achieved that goal (hint, there is one grant type called “username & password”).
Also, as stated here, “this specification is likely to produce a wide range of non-interoperable implementations”. That has unfortunately proven to be true. You can’t merely pickup your OAuth2 enabled solution on one platform, and seamlessly plug it in to another platform and expect it just work.
Some people look at OAuth2 as the be-all-end-all for internet security. In this post, we’ll lay it bare out there. You can literally see byte-by-byte what’s going on under the hood, you’ll be your own judge whether OAuth2 is what you need.
Finally, OAuth2 is incompatible with OAuth1. When people say OAuth nowadays, they refer to OAuth2.
Part II – Tools and Mule OAuth2 External Provider Installation
I assume you have installed CURL and latest Anypoint studio, and you have access to Anypoint platform (you can create a 30-day trail account from here), and you know the basics of Mule application.
Follow these steps to set up the Mule OAuth2 external provider:
Step 1 – download oauth provider project and import into studio
Go to here and follow the link to download the Mule OAuth external project: https://docs.mulesoft.com/api-manager/_attachments/OAuthProviderStudioArchive.zip
Import the project into studio, if you want to understand more about the Mule OAuth provider, you can also read the README.adoc in the project folder.
Step 2 – In your mule-app.properties, put in your organization client-id
When you login to Anypoint account online, under Access Management, you will see your account organization. Clicking on the organization, you will see the Client-ID / secret for the organization. Copy the client-id/secret and place them in mule-app.properties:
# Org ID from Anypoint cloud account
anypoint.platform.client_id=f3***e4ae
anypoint.platform.client_secret=f******8812
Please note the organization client ID is a concept unique to Mule. It is not part of the OAuth spec!
Step 3 – update the grant type configuration:
The project came with only one grant type, we are adding in all four. Update config.properties under src/main/resources folder as shown below:
#oauth.supported.grant.types=RESOURCE_OWNER_PASSWORD_CREDENTIALS
oauth.supported.grant.types=AUTHORIZATION_CODE RESOURCE_OWNER_PASSWORD_CREDENTIALS CLIENT_CREDENTIALS IMPLICIT

Once you start the project, the OAuth2 provider is ready. It should be running on localhost SSL port 8082, or in cloudhub running on port 443, depends where you deployed your project.
Client-IDs
In the OAuth2 and API world, there are client-ID’s everywhere. In step 2 of previous section, we have seen the organization client-id / secret.
Since OAuth2 policy is used to secure API here, we need create/register a “client application” (RFC’s terminology) and assign the client-id / secret to it.
If you don’t already have an API, go ahead create one from the API manager console. The API manager main page has three areas.
- Left area: API definition, this is where you create an API
- Midle area: API portal, this is where you manage the API portal.
- Right Area: API status, this is where you deploy and monitor the API / Proxy.
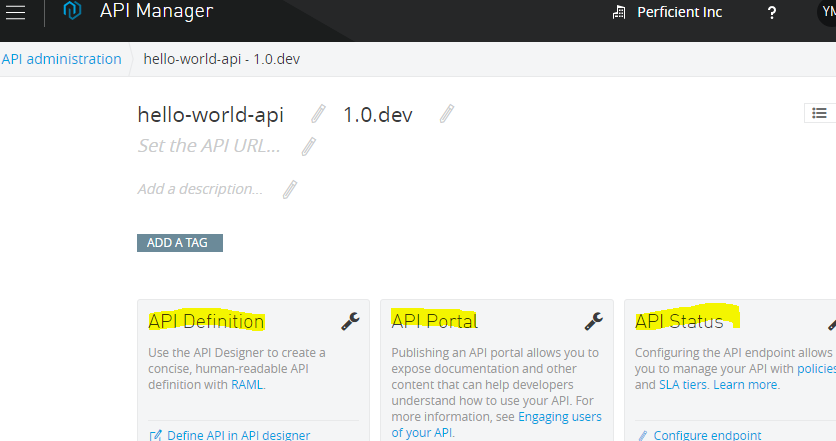
After you create the API, make sure the API is configured with an endpoint (use the right side area). If the API endpoint is not configured, your next step will not work!
If you have a functional API running, that’s great. If you don’t, you can just put “foo-api.cloudhub.io” as the endpoint. You can still trace each grant type and see how they get the access tokens, you just can’t call the actual API in the last step. But that’s the last step we don’t care as much in this post.
Now let’s get back to the web page, in the middle area, click on “view live portal”, on the top right of the page, click on “Request API Access”, you can either create a new client, or use an existing one for the testing purpose. Leave “redirect URI” blank (more explanation later).

Copy and save the client ID and secret from the above step.
Just to make the concept clear, this is the “client application”, or simply “application client-id and secret”. This is different from your organization client-id we mentioned earlier.
Part III – Let’s Dance
Oh, one last thing, in all examples, we use a blank “scope”. Although it’s a relative easier OAuth2 concept, the “OAuth scope” is outside the scope of this post.
Whew, a ton of baloney to go through before we come to here…
Assuming your OAuth2 provider is running locally or in cloudhub, now let’s do the dance!
We’ll do the simple ones first. Please note that even if you are running the Mule external provider locally, it still needs to access anypoint.mulesoft.com website, so you do need internet connection for any tests to work!
Grant type #4: client credentials
As you can see, there is not a whole lot of dance here. It’s single step to supply your client-id/secrete to OAuth provider and you get the access token back right away.
curl -i -X POST -H "Content-Type: application/x-www-form-urlencoded" -H "Authorization: Basic OTQ2OTk1MDllZWFxxxxxxxxxxxxxxxx3ODlGRERENDZDMTM5MjI2NTA=" -d "grant_type=client_credentials&scope=" "https://localhost:8082/external/access_token" -k
HTTP/1.1 200
Content-Length: 145
MULE_ENCODING: windows-1252
Content-Type: application/json; charset=windows-1252
Date: Wed, 15 Mar 2017 19:25:55 GMT
{"access_token":"pNzdKwgqvzeKbWlmUTTIAmtCzgGeoayRi83mB4D7zhlfHU9seUu48hlFBqkBMgZhAf2wM7KiqBFMmzs-bHLmBg","token_type":"bearer","expires_in":1799}
Grant type #3, Username & Password
Again, it’s an one-step to obtain the access token. As you can see, “curl” (emulating the client) actually is in possession of the “username & password”. This is where I have a hard time to swallow the universal claim that OAuth2 is the valet key of internet. In this case, somebody else (the client) is holding the real car key (username & password), so much for the valet key claim!
curl -i -X POST -H "Content-Type: application/x-www-form-urlencoded" -H "Authorization: Basic OTQ2OTk1MDllZWFhNDViM2xxxxxxxjk3NDM3ODlGRERENDZDMTM5MjI2NTA="  -d "grant_type=password&username=max&password=mule" "https://localhost:8082/external/access_token" -k
HTTP/1.1 200
Content-Length: 250
MULE_ENCODING: windows-1252
Content-Type: application/json; charset=windows-1252
Date: Wed, 15 Mar 2017 19:28:27 GMT
{"access_token":"F1HN9sK5xW48tPVsaLTuQbNJL4QiWGzgbZsz3tIRbw2rNNMKLLDYvDRdknyfCV4moF2IKcPYomIrQwAO-cgQPg","refresh_token":"GjuT5__5Yt5x1qe1NZX4QCDLV62PRjo0wAH29Pn69eiNSeZoKSD7Ry9yHx3QsnXGp-AxAso0pjKObCqJfCy-Vw","token_type":"bearer","expires_in":1800}
Grant Type #2, Implicit
This is an implied or implicit Authorization Code grant type. The client doesn’t need the authorization code and will get the access token in one shot. You may notice, unlike the previous two cases, it doesn’t even bother to specify “grant_type” in the request. It simply says I want the access token (reponse_type=token). Hmm, as far as dancing is concerned, this is kind of rude :). No wonder the RFC comes with plenty of warning on this grant type. Also, you can see the token is returned as part of URI not the json as you see in other grant types.
You may have noticed that we provided a “redirect_uri” that points to nowhere. We don’t have anything running on that endpoint. In the real world, you are supposed to have a service running on the endpoint ready to accept the return code. You can see the HTTP return code 302. That’s telling HTTP session to forward to the redirect_uri to get the token. Since we are running CURL, we will just collect the code manually.
I found there is a “feature” with Mule OAuth2 provider: remember when you were generating the application client id, I reminded you not to fill in redirect_uri? Here is what happens based on my observation: if you never set the URI on the server side, then the CURL request will work no matter what value you put in the redirect_uri. However, if you put a URI on the server, then the server will verify that your supplied redirect_uri matches that value.
curl -i -X POST -H "Content-Type: application/x-www-form-urlencoded"  -d "username=max&password=mule&client_id=94699509eexxxxxxx0f1a49249a&response_type=token&redirect_uri=http://localhost:8080/oauth/handler&scope=" "https://localhost:8082/external/authorize" -k
HTTP/1.1 302
Content-Length: 0
MULE_ENCODING: windows-1252
Content-Type: application/x-www-form-urlencoded
Location: http://localhost:8080/oauth/handler#access_token=T3C556SaIB4TdrkdNF5lfWOmiqKA854JN0Kahqxs7R9kpPsf2kbCB66MbmXfnR7bbMa7LaEdMGbqXTyDt7J_fg&token_type=bearer&expires_in=1800
Date: Wed, 15 Mar 2017 19:31:03 GMT
Grant type #1: Authorization Code
We have saved the best to the last. Authorization Code grant type is the only one that involves three dancing steps before the access token is given out! It involves all four parties (roles) as well. This is the only grant type that wins the OAuth dance accolade in my book!
Let’s look at this grant type closely. There are quite some subtleties here.
- In step (1) below, CURL is emulating the client trying to access protected resource, which will result in an interactive login page.
- In step (2) below, CURL is emulating you, the resource owner, to interactively fill in the username and password. In no time the client (application) can see the username & password of the resource owner! The OAuth server will produce an Authorization Code, not the access-token in this step. The authorization code will be forwarded to redirect_uri that’s supplied in step (1) (see earlier discussion on redirect_uri).
- In step (3) – after step (1), the client will listen/wait on the redirect_uri endpoint, when the Authorization code arrives, it collects this code and use it to go beg the OAuth server for the access token.
As you can see with this grant type, the client (application) is never in possession of owner’s username & password!
Yay, we finally found the holy grail of OAuth2 – the valet key of the internet!
Wait, before you go out celebrating, please note this grant type involves interactive user login, it will not work in the traditional system integration scenario where a “service account” is needed. For most integration API, interactive login with each API call is not an option, so the integration API can only use “#4 – client credential” or “#3 – username & password”. Sorry, no valet key for you!
**** Step (1) emulating the client getting the login page
curl -i "https://localhost:8082/external/authorize?client_id=94699509exxxxf1a49249a&scope=&state=5675388&redirect_uri=http://localhost:8080/oauth/handler&response_type=code" -k HTTP/1.1 200 Content-Length: 2700 Content-Type: text/html Date: Wed, 15 Mar 2017 19:42:14 GMT <!--(c) 2003-2016 MuleSoft, Inc. This software is ..--> <!DOCTYPE html> <html> <head> <meta http-equiv="content-type" content="text/html; charset=ISO-8859-1"> <title>helloworld-client | Login</title> … <link href="/www-static/css/login-signup.css" rel="stylesheet"> </head> <body class="val-tooltip"> <div class="page-container"> <div class="container"> <header> <h1>CustomProvider</h1> <small>You can use your CustomProvider account to sign-in to helloworld-client.</small> </header> <br/><br/><br/> <div id="authorize-main" class="login"> <div id="login-block"> <h2>Authorize helloworld-client to use your account?</h2> <form id="login-form" method="post" class="form-horizontal"> <div class="control-group"> <label for="username" class="control-label">Username</label> <div class="controls"><input id="username" name="username" type="text"></div> </div> <div class="control-group"> <label for="password" class="control-label">Password</label> <div class="controls"><input id="password" name="password" type="password"></div> </div> <div class="control-group"> <div class="controls"> <input id="login-button" class="btn btn-primary" value="Login and Authorize" type="submit"> <a href="http://localhost:8080/oauth/handler?error=access_denied&error_description=User%20denied%20access"><button id="cancel-button" type="button" class="btn">Cancel</button></a> </div> </div> <input type="hidden" name="client_id" value="94699509eeaa45b3b08ebe0f1a49249a"> <input type="hidden" name="response_type" value="code"> <input type="hidden" name="redirect_uri" value="http://localhost:8080/oauth/handler"> <input type="hidden" name="scope" value=""> </form> ... </body> </html>
**** Step (2) Emulating resource owner (the user) posting login form with the user/pass, returns the Auth Code. Please note that step (1) produces a static HTML page, once you know the page, you can post the following HTML form without going through step (1) each time.
curl -i -X POST -H "Content-Type: application/x-www-form-urlencoded"  -d "username=max&password=mule&client_id=94699509eeaa45b3b08ebe0f1a49249a&response_type=code&redirect_uri=http://localhost:8080/oauth/handler&scope=" "https://localhost:8082/external/authorize" -k
HTTP/1.1 302
Content-Length: 0
MULE_ENCODING: windows-1252
Content-Type: application/x-www-form-urlencoded
Location: http://localhost:8080/oauth/handler?code=iHD4eU9kysJ3sKCAikrbc_fPaQyDZjn4y1YLJiF8ImFFeydsqME-Z-LWp5KfSqmBWXzSsiVBy3OvvvQm_qrgyw
Date: Wed, 15 Mar 2017 19:46:40 GMT
**** Step (3) emulating the client getting the access token (using the Auth Code from step above) from the OAuth server.
As you can see, the response also contains a refresh token. We won’t discuss that in this post though.
curl -i -X POST -H "Content-Type: application/x-www-form-urlencoded"  -d "https://localhost:8082/external/access_token&grant_type=authorization_code&client_id=94699509eeaaxxxxxxx249a&client_secret=5c96892xxxxxx922650&redirect_uri=http://localhost:8080/oauth/handler&scope=&code=iHD4eU9kysJ3sKCAikrbc_fPaQyDZjn4y1YLJiF8ImFFeydsqME-Z-LWp5KfSqmBWXzSsiVBy3OvvvQm_qrgyw" "https://localhost:8082/external/access_token" -k
HTTP/1.1 200
Content-Length: 250
MULE_ENCODING: windows-1252
Content-Type: application/json; charset=windows-1252
Date: Wed, 15 Mar 2017 19:50:13 GMT
{"access_token":"IEn_O8Ox5fdHuMiEBWuVLXxkjk1oY6tRUczy7tnLKnwZaK2Bi2kLbt0JhHvZbMd-2OzitzeS2WUPJoplaUuZOw","refresh_token":"aIGdgpwjQBa6NnnA7dp91AXu0d18JV0i61SI7VD0VSn0C3H4qTKQIppzRrMB1EoB09R8FYObAeQUzKVNSMVCBA","token_type":"bearer","expires_in":1800}
Two Ways to Call the Service
Either way you go, whichever dance you did, when we arrive here, we finally got our precious access token. With this access token, you can now access the protected resource. In this case, it’s the hello world API! (again, I assume you know how to create Mule API and apply OAuth2 policy to it)
You can provide the access token in one of the two ways to access the API: use HTTP Authorization header, or use the “access-token” query parameter.
HTTP Authorization header:
curl -i -X GET -H "Authorization: Bearer VQN36poM3xBOYT2gb4hE_YeFFTXb5CKDGYBHtJwAB7yyBvsBLpSWLYGwF0H3bnBTXxSobuGZoticU46I4VG1Bw" "http://your-precious-hello-api.cloudhub.io/hello/foo"
HTTP/1.1 200 OK
Content-Type: application/json
Date: Wed, 15 Mar 2017 20:37:06 GMT
Server: nginx
Transfer-Encoding: chunked
{ "greeting": "hello foo"}
“access-token” query parameter:
curl -i -X GET "http://your-precious-hello-api.cloudhub.io/hello/foo?access_token= VQN36poM3xBOYT2gb4hE_YeFFTXb5CKDGYBHtJwAB7yyBvsBLpSWLYGwF0H3bnBTXxSobuGZoticU46I4VG1Bw "
Final Thoughts
It is challenging to enumerate all four grant types in one post. Internet is filled with OAuth2 information. I believe the information overflow is part of the reasons why it’s so hard to figure out OAuth2. Ironically, I’m contributing more noises with this post. I hope I have covered it in a better way with a “bigger picture” view, as well as specific steps of each flow (grant type).
Anyway, I could yap away on the subject forever. Let’s wrap it up with one more recap:
- To access the protected resource by OAuth2, the client (application) needs to supply an “access token”.
- The client obtains the access token by using one of the four grant types (dances)
- Only “Authorization code” grant type can fit the bill of “valet key for internet”. However, this grant type requires interactive user login. It works perfectly for some online resource sharing apps. But it may not work in place of the “service account” in the traditional system integration scenario. When APIs are used in the integration scenario where interactive user login is not an option, “client-credential” grant type is the most used choice.
Hi, Thank you for this article as it was very very useful. But I am confused in the redirect URI thing. I followed the mechanism & tried using the Auhtorization mode of POSTman that automatically brings in the Access token just by specifying all details into its form like dialog. I copied the URL & pasted in the redirect URI field while registering new application, But nothing happened when i ran the process. There was no response to Postman to put your login credentials in it, whereas the same happens when I use other API (External world). SO do you have any idea on how this 2 ways process (Grant_type=Authorization code) will b e automated, i.e a access-code comes without doing manual task ?
You got more than questions here. 1) To answer your question on “automate” Authorization code, the simple answer is no. It was designed as the “valet parking”, you need the owner to enter user/pass interactively in order to issue the Authorization code. The owner is supposed to be different from the calling client. If it’s the same one, you can just use the other grant types (implicit or user&pass). 2) as for postman not working, that can be any reasons. If you are running the server locally, you need to check the box “Request access token locally”. It has been a while since I tested with postman, i believe you can just leave redirect URI blank when setting up the client application. If you set it, it must be https://www.getpostman.com/oauth2/callback if use postman.