In this series, I’m showing how Portals don’t have to be heavyweight. In Part 1, I wrote about how to make the infrastructure lighter by using cloud or IBM’s Pure System. In Part 2, I introduced the concept of using IBM’s Web Content Manager system to build very simple portlets.
Now in this final installment, I am going to extend the concepts introduced in Part 2 to show how we can build more complex portlets, but still keep everything lightweight. To review quickly, in Part 2, I avoided the build and deploy cycle of building Java portlets by using the built-in content management system – WCM. In that example, I used WCM to display a Reuter’s news feed from a simple Javascript widget supplied by Reuters.
In this blog, I want to implement a more complex portlet using Knockout, which is a popular Javascript framework. My example is to display in a portlet a list of my Doctor Appointments pulled from a REST service. Our goal is still to keep this lightweight, so I shouldn’t see a lot of code. The first screen shot shows you what the final version looks like in Portal 8.
A typical web page or application consists of several sections:
- CSS
- Links to external files
- HTML body
- Javascript
In WCM, we can create an authoring template that contains four HTML fields, one for each of the sections described above. The authoring template also has a workflow associated with it so we can control the publishing of our code.
We also need a corresponding presentation template to display the page. In the second screen shot I show the presentation template I built. The template includes the four fields (Element tags). And to help the author out, I included the <style> and <script> tags in the right places. As a reminder, the presentation template will display the raw HTML to the browser.
Just as I did in part 2, I mapped the presentation template to the authoring template in my content site area. This way whenever Portal displays my code, it formats it correctly via the presentation template.
Now on to the actual code using Knockout. To enter the code for my portlet, I navigate to the site area and create a new content item using the authoring template I built. In this example, I called the authoring template “ComplexPortlet”. The third screen shot shows the content item I created with the four fields collapsed.
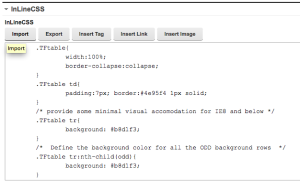
In the CSS field,I entered in the styles I need for alternating row colors and formatting the table. If this was a real example, I might take the CSS and include it in my theme, or I might put it into a WCM component that I could reference here. Both of these options would make the CSS reusable.
To use Knockout, I need to include its Javascript code in my portlet. I could copy it into a separate field, add it to my theme, or include it in a reusable WCM component. But I decided to just link to a version of Knockout stored on a public content distribution network. By doing this, I don’t have to maintain any Knockout libraries.
I put the link to Knockout in the HTMLHead field. I could add other items here that would normally go in and <head> section of a page.
In the body of my portlet, I want to create a table using a Knockout model for data. This makes by portlet lightweight because Knockout takes care of the heavy lifting for me.
You can see in the HTMLBody screenshot, the HTML code is a very simple table that “binds” to an AppointmentModel, which I define in the Javascript section below. The TBODY tag uses Knockout’s data-bind attribute to tell KO which object to use for the data. The rest of the code you can’t see here is just a couple more <td>’s and then the closing tags.
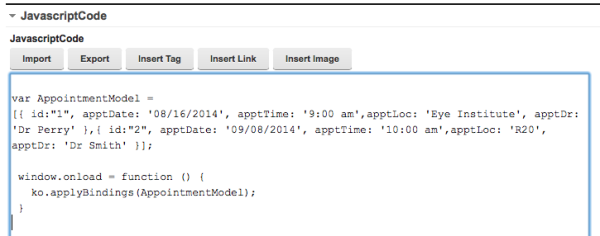
Finally we get to the JavascriptCode field on my form. This is the field we use to get the AppointmentModel data and then instantiate Knockout to do its job. In the JavascriptCode screen shot, you can see there isn’t a whole lot of code. It’s very lightweight!
In the first line I get the data for the table. Since this is an example, I didn’t want to create a REST service. So I just included some JSON data that would normally be returned from a service. If I had the REST service available, I could use Knockout’s REST interface to retrieve the data. The JSON data contains information about two appointments.
The final line runs Knockout’s applyBindings code when the page finishes loading. This function takes the AppointmentModel object we created from JSON and Knockout fills in the table correctly.
There you have it: a pretty nice looking portlet created through WCM and uses sophisticated Knockout features. Since the WCM portlet is already built and deployed I avoided those steps and got my business application running quickly.
You can get even fancier in WCM by taking advantage of the content management system. For example, I made the author manually enter the <script> link to load Knockout. I could create a WCM Component with that script tag in it and just include that component in the presentation template. Or I could ask the author which Javascript Framework they want to use in a field and then insert the right tag based on their selection. WCM offers a lot of other possible enhancements too.
You can use other javascript libraries besides Knockout too. I created another sample using AngularJS and you could try out others.
IBM has built a Script Portlet that works very similar to what I’ve shown here. The script portlet has some added features like an editor that will format your HTML and Javascript as you work on it. The HTML Field that I used above does not provide any formatting. One limitation to the current Script Portlet is that you can’t control where your code is stored in WCM, though. In my example, you can put the code anywhere because it is just plain content.
I have one caution to bring up to you. Knockout and Dojo don’t get along. If you try to display this portlet on a portal page that uses Dojo, your table will be empty. In version 8.5, IBM did away with having Dojo required in the default theme. In 8.5 you can pick the standard portal theme and the ‘Lightweight” style and this Knockout example works great. In version 7 and 8, you will likely have to create a custom theme that eliminates Dojo to get this to work correctly.


