Azure Resource Manager (ARM) is the new set of APIs for deploying and managing Microsoft Azure services. A previous article in this series defines what Azure Resource Manager (ARM) means for Developers, IT Pros and DevOps. This article will dive into the details of using Azure Resource Manager, ARM Templates, Visual Studio 2015, and the Azure SDK to author an ARM Template that deploys an ASP.NET Web Application as an Azure App Service Web App within a Resource Group.
Requirements
There are a few prerequisites that need to be installed before the steps that follow in this article can be followed. Here’s a list of the minimum requirements that will need to be met:
- Azure Subscription – An active Azure Subscription to use. If you don’t have one yet, you can sign up for Microsoft Azure completely Free and get $200 to spend as an added bonus.
- Visual Studio 2015 – The latest version of Visual Studio is necessary as this is the primary IDE used.
- Azure SDK – The Azure SDK for Visual Studio 2015 will install the necessary tools within the IDE that will be necessary.
- Azure PowerShell – The Azure PowerShell tools are required for ARM Template deployment.
Once these prerequisites are installed and an Azure Subscription has been created, everything will be prepared to continue along with the rest of this article.
Create Web App to Deploy
The first thing necessary is to define a Web App to deploy to Azure. This can either be an existing ASP.NET Web Application or even a completely new project.
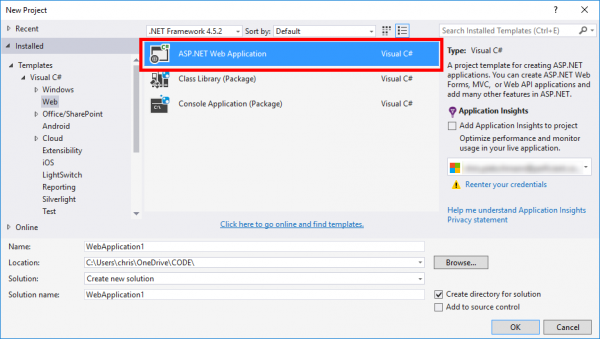
In an effort to keep this article simple to follow, we’ll create a new ASP.NET Web Application within a new Solution. To do this, just open Visual Studio 2015 and go to “File – New – Project”. Then select the “ASP.NET Web Application” project template and create the new solution.
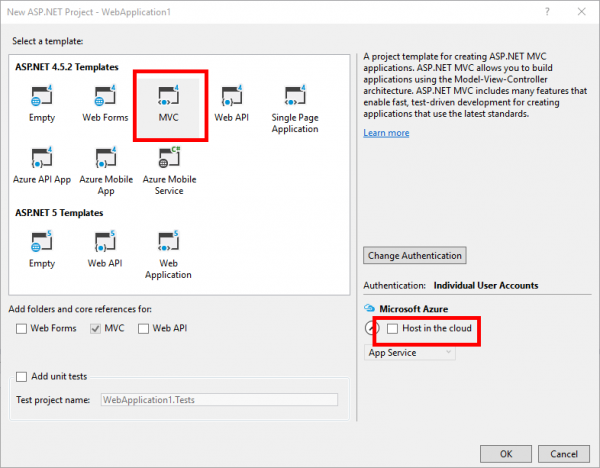
In this example we’ll just select the standard MVC template, and make sure the “Host in the cloud” checkbox is Unchecked. We don’t want Visual Studio setting up our Web App for deployment into Azure since we’ll be configuring that ourselves using an Azure Resource Group project with an ARM Template.
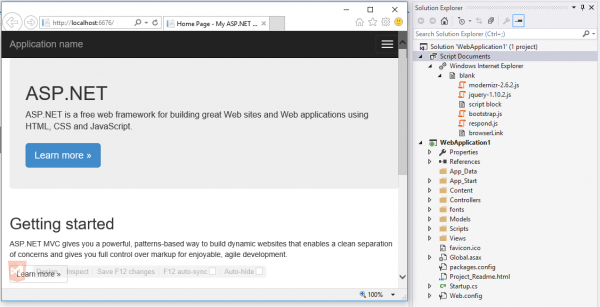
Now that we have a simple ASP.NET Web Application created using the base template, we have an application that can now be deployed to Azure as an App Service Web App.
Create Azure Resource Group Project
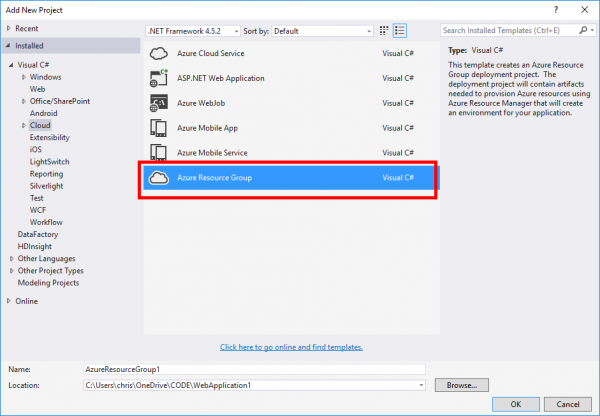
The ability to author and manage ARM Templates within Visual Studio 2015 is contained within the “Azure Resource Group” project template. The next step is to add a new “Azure Resource Group” project to the ASP.NET Web Application Solution that was previously created. To do this, just go to the “File – Add – New Project…” menu so you can bring up the dialog to add a new project to the current Solution. Then select the “Azure Resource Group” project template listed under “Visual C# – Cloud”.
After creating the new “Azure Resource Group” project, you will then need to select a template of what Azure Resources you will be deploying. For this article, we will just be deploying the ASP.NET Web Application and no other services, so you will want to select the “Web app” template.
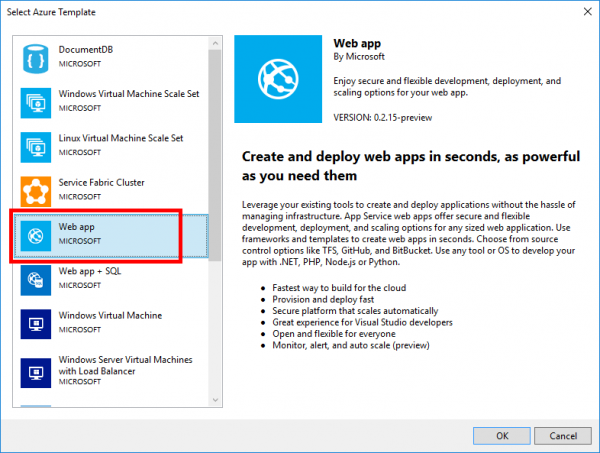
Upon clicking “OK” the new “Azure Resource Group” project will be created and the template files necessary for an ARM Template and Azure PowerShell script to deploy an Azure App Service Web App will be added to the project.

Anatomy of Resource Group Projects

Now that we have created a new “Azure Resource Group” project within the Solution, it’s a good time to step back for a minute and define what the different files within this project are. Once we’ve defined what the various files are and what they are for, we’ll continue along the process of modifying them to setup the ARM Template Deployment.
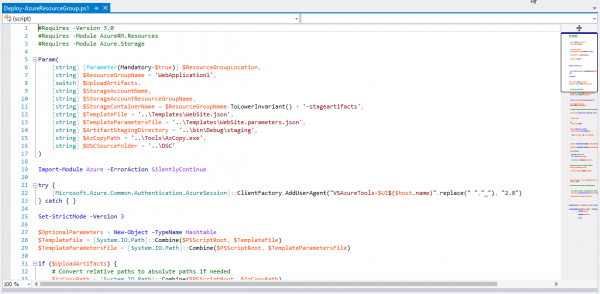
/Scripts/Deploy-AzureResourceGroup.ps1
This is the Azure PowerShell script that’s run when performing the deployment. You do NOT need to edit this script, it is setup with everything necessary for the ARM Template Deployment to work.
/Templates/WebSite.json
This JSON file is the Azure Resource Manager (ARM) Template that declaratively defines the Azure Resources necessary for the desired deployment. At this point it’s been generated from the project template, and we will modify this ARM Template JSON a little later as necessary for our deployment. While the JSON can be edited directly, there are GUI tools within Visual Studio 2015 that allow for a more user-friendly method.

/Templates/WebSite.parameters.json
This JSON file is the declaration of any deployment parameters. The “WebSite.json” ARM Template contains the declaration of what Azure Resources are needed and how they are to be setup. This JSON parameters file allows for different parameters to be passed in to the ARM Template deployment process depending on the environment or other deployment settings necessary. Initially, the project template creates this file, but multiple versions could be created to support deploying to multiple environments.
For ASP.NET developers, it’s a good analogy to think of this JSON file as being similar to the web.config transforms that can be used to specify certain override values to a web.config file based on the Build Configuration they are associated with. While this file doesn’t actually function the same as a web.config transforms, the basic premise is still the same. Deployment parameters can be given a default value within the “WebSite.json” file, and then overridden by setting a different value for the same parameter within this file.
/Tools/AzCopy.exe
The “AzCopy” utility is used to upload the Web App Artifacts (a .ZIP file of the compiled web application) into an Azure Storage account where they will be accessed by Azure when actually deploying the Web App out to the App Service Web App. This .EXE is necessary, but you don’t need to change anything with it, just make sure to keep it part of the solution as it will be needed to perform the actual ARM deployment.
Setup Azure Storage Account for Deployment Staging
Before we can proceed with configuring the ARM Template to deploy the Web App, a small requirement within your Azure Subscription needs to be met. An Azure Storage Account needs to be created so that the ARM Template can point “AzCopy.exe” to it for uploading the Web App Artifacts. This Storage Account provides a simple staging area for the Web App “Artifacts” (compiled .ZIP file of the Web App being deployed) to be temporarily stored during the ARM Template deployment process.
Basically, the ARM deployment process within Azure can not access files on your local file system, so the Storage Account gives it a place in the Cloud to access the necessary files for deployment.
Note: We wont go over the process of creating a new Azure Storage Account, since this is outside the scope of this article.
Add Web App for Deployment
Currently, the ARM Template that was newly created from the Azure Resource Group project template contains a placeholder definition for a “Website” resource. This definition isn’t linked to the ASP.NET Web Application within the Solution yet. To link the ARM Template to the Web App, a couple steps need to be followed to set this up.
The first step is to add a Reference in the Azure Resource Group project to the ASP.NET Web Application project. This can be done by right-clicking on “References” within the Solution Explorer on the Azure Resource Group project.

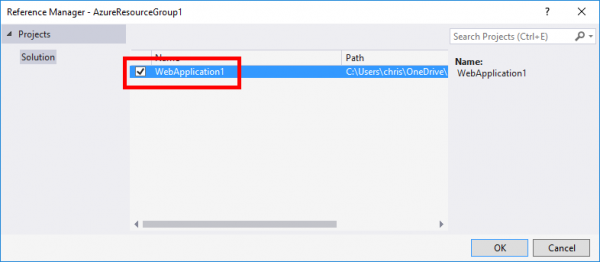
The next step is to select the ASP.NET Web Application project in the Reference Manager dialog, and click ‘OK’.
Once the reference to the ASP.NET Web Application has been added to the Azure Resource Group project it will be setup to compile the Web App Artifacts. This is done by compiling the ASP.NET Web Application project and packaging up its files into a “package.zip” file that will get uploaded for deployment once everything is configure.
Now that the reference to the ASP.NET Web Application has been added to the Azure Resource Group project, the next step is to add a new “Web Deploy for Web Apps” resource to the Website within the ARM Template. To do this, open the “WebSite.json” file in the solution, then navigate to the “resources / Website” node within the JSON Outline window. Once the “Website” node is selected, either click the “Add Resource” ![]() button or right-click “Website” and select “Add New Resource”.
button or right-click “Website” and select “Add New Resource”.

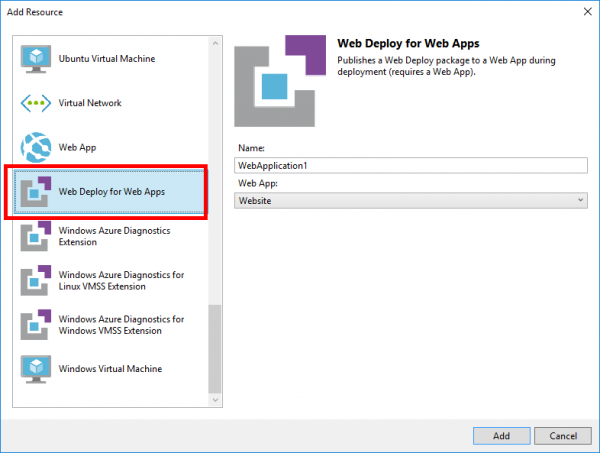
After clicking “Add Resource” the Add Resource dialog will be displayed allowing for the selection of the desired Resource to be added. Navigate down the list and select the “Web Deploy for Web Apps” resource, type in a name, and click “OK”
After the “Web Deploy for Web Apps” resource has been added to the ARM Template, the Web App with the specified name will be listed in the JSON Outline window. Two new parameters for the ARM Template will also be added to specify the Package Folder and Package File Name for the Web App Artifacts .ZIP package that will contain the files for the Web App to be deployed.

The Package Folder (WebApplication1PackageFolder as shown above) and Package File Name (WebApplication1PackageFileName as shown above) parameters will still need to be setup to use the .ZIP package for the ASP.NET Web Application that was previously added as a Reference to the Azure Resource Group project.
Set Package Folder and File Name
After following all the previous steps in this article, an Azure Resource Group project will be created with a Reference to the ASP.NET Web Application project. Even though the “Web Deploy for Web Apps” resource has been added to the project, it isn’t linked up to deploy any Web App artifacts (or files) just yet. This will need to be manually setup by configuring the Package Folder and File Name parameters on the ARM Template to reference the location of the Web App Artifacts .ZIP file package.
To setup these parameters, the location of the Web App Artifacts package file needs to be defined. This can be done by opening the “Properties” window for the reference to the ASP.NET Web Application within the Azure Resource Group project. The value for the Package Folder and File Name will be contained within the “Include File Path” property of the ASP.NET Web Application projects reference within the Azure Resource Group project.

In the above screenshot the values to be used for the parameters are as follows:
- WebApplication1PackageFolder = “WebApplication1”
- WebApplication1PackageFileName = “package.zip”
By default the Artifacts package file will always be named “package.zip”. However, the folder name will be named the same as the ASP.NET Web Application project. In the example screenshots for this article, the name of the ASP.NET Web Application has been set to “WebApplication1”.
Now that the necessary values for the Web App Artifacts package parameters have been defined, the “WebSite.parameters.json” file needs to be updated with these values. Initially, the JSON file will not contain a definition for the parameters since their values have not been set. The necessary JSON needs to be added to the file along with the value.
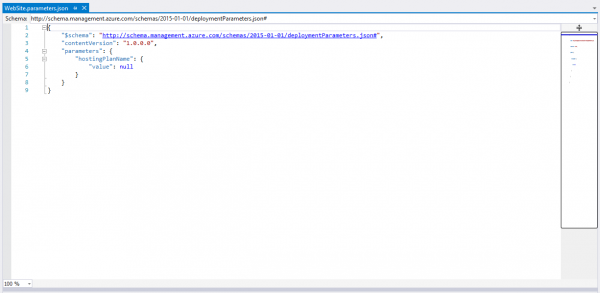
Here’s an example of the “WebSite.parameters.json” file that’s already been updated with the defined parameter values above:
{
    "$schema": "http://schema.management.azure.com/schemas/2015-01-01/deploymentParameters.json#",
    "contentVersion": "1.0.0.0",
    "parameters": {
        "hostingPlanName": {
            "value": null
        },
        "WebApplication1PackageFolder": {
            "value": "WebApplication1"
        },
        "WebApplication1PackageFileName": {
            "value": "package.zip"
        }
    }
}
Deploy the Web App
After following all the previous steps, an Azure Resource Group project has been created and configured to automatically deploy the ASP.NET Web Application project as an Azure App Service Web App. The final step is to actually run the ARM Template Deployment.
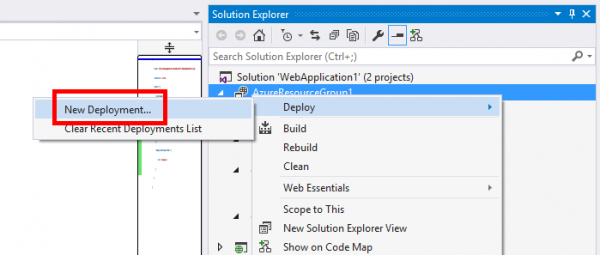
To open the Deployment dialog, just right-click on the Azure Resource Group project within the Solution Explorer, and select “Deploy”, then “New Deployment”
This will open the “Deploy to Resource Group” dialog. Within this dialog, you will need to first login to your Azure Subscription. Once logged in, it will automatically detect a few details about your Subscription and prepopulate some of the dropdowns.
The first step when creating a new Deployment is to define a “Resource Group” in Azure that you will be deploying all the Resources defined within the ARM Template into. To do this, open the “Resource group” dropdown, and select “<Create new…>”. This will open a dialog for creating the new Resource group. Fill in the details and click “Create”.

Once the new resource group has been created, the “Resource group” dropdown will now be populated to select it. The next step is to set the “Artifact storage account” to use for the staging of the Web App Artifacts package file. For this you’ll need to select an existing Azure Storage Account to use. This is the reason we created one earlier in this article. You’ll want to select the Azure Storage Account that you created.

Once these values have been defined, simply click “Deploy” and it will kick off the ARM Template Deployment using Azure PowerShell.
Upon clicking deploy, you might get a popup to “Edit Parameters”. The reason for this is that the “hostingPlanName” parameter still needs to be set. Just type in a name to use, click “Save”, and the deployment will continue.
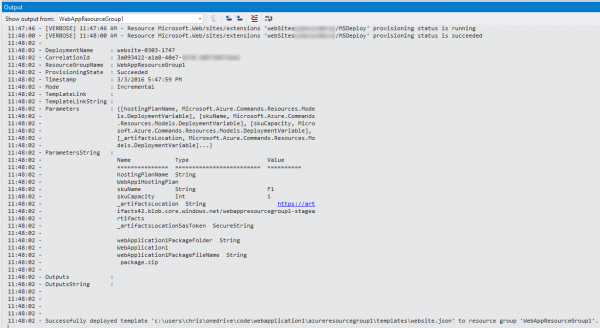
The “Output” window will display the results of the deployment. It will not be thread / GUI locking within Visual Studio 2015, as it is run in the background. Just keep an eye on the “Output” window to watch the status of the deployment as it’s run. The deployment may take a few minutes.
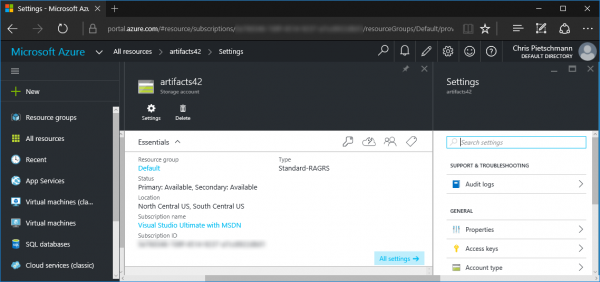
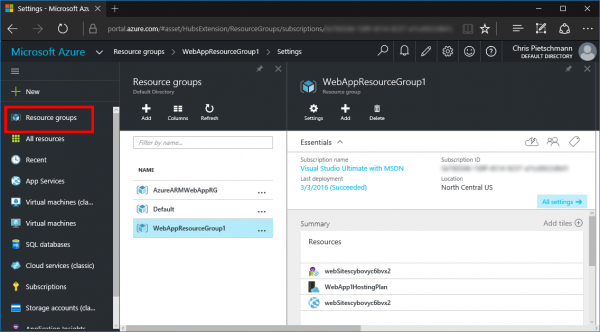
After the ARM Template has successfully deployed, the newly created Resource Group and all it’s child resources will be visible within the Azure Portal. To view this new Resource Group, open the portal and navigate to “Resource groups”. Selecting a specific Resource Group will open another page that will display all the child Resources within that Group.
Editing Deployment Parameters
Previously we set the Package Folder and Package File Name by editing the “WebSite.parameters.json” file directly. Within the “Deploy to Resource Group” dialog there is a simple UI available that makes editing these parameters easier. Just make sure the “WebSite.parameters.json” file you want to edit is selected in the “Template parameters file” dropdown, then click the “Edit Parameters…” button. This will bring up the “Edit Parameters” dialog that will give a nice GUI for editing the parameter values.

This GUI could be used to edit the Package Folder and Package File Name parameters instead of editing the JSON manually. The end result is the same, and the GUI is a little bit easier to use.
Next Steps
The previous article covers what Azure Resource Manager is, while this article dives deep into what it takes to setup an ARM Template and Azure Resource Group project within Visual Studio 2015 for deploying an Azure App Services Web App into a Resource Group. There are obviously many other resources that can be managed and deployed using ARM Templates, as well as many features not covered in this article. Future articles will go into some of these additional features and build on top of the base foundation created by these past articles in the series.
Thanks for the detailed steps
keep getting ‘The specified blob does not exist’ error
Does asps.net core support deployment this way, I just tried it but unfortunately it seems to fail.
Hi,
The same way can we do AngularJS application deployment in Azure app service.
Can you give me any links or URL ?
Raj