In my many years of writing Web Content Management sites, a number of clients have discussed migrating content from an old site into a new site via some kind of automatic migration, but always ended up doing a manual migration. This past spring, we finally had a client who decided to use Kapow as the migration tool to move content from their current Sharepoint site into their new Sitecore site.
 In Part 1, I’ll give an overview of Kapow by asking and answering questions about its use. In Parts 2 and 3, we’ll dip into more technical topics.
What is Kapow?
Kapow is a migration/integration tool that can extract data from many different sources, transform that data, and move it to a new platform. In my case, I extracted data from a Sharepoint site, adjusted link and image paths, and inserted the transformed data into our Sitecore system.
When should I consider using Kapow?
As a rule of thumb, you should consider using Kapow when you have more than 10,000 pages to migrate. However, this decision is ultimately up to the client. Costs of the software and the setup of the migration process have to be weighed against the time involved in a manual migration and the extended migration period and content freeze involved in a manual process. I should also note that Kapow isn’t necessarily just for one-time migrations. It can also be used on an ongoing basis whenever there are multiple disparate data sources. A good example of this is a monthly report with data that must be gathered from several different sources.
How is Kapow installed?
An msi is downloaded from Kapow’s site and installed. Although Kapow comes with a development database (an Apache Derby based database), we were using SQL Server, so that had to be configured. At this point, the Management Console service is started. This checks your license and allows access to Kapow’s suite of tools. Overall, a very easy install.
How do I use Kapow?
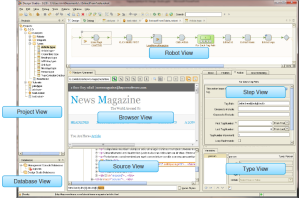
The answer to this question is that it depends what your needs are. Kapow has an extensive suite of tools. My needs on this project were limited, so I used only the Design Studio tool, and occasionally the Management Console. Design Studio is used to develop, debug, and run robots, which extract and transform content. It has a powerful interface, a little reminiscent of Visual Studio.

Robots can also be uploaded to the Management Console and run from there. This provides scheduling and automation capabilities. Other tools in the suite give further automation and flexibility (RoboServer) and allow user input into processes (Kapplets).
What are the steps in a site-to-site migration?
Inventory. Determine which pages will be migrated. Classify them by type. One migration robot is written for each type of page. In our case, we loaded the URLs of each page type into different spreadsheets
Extraction. Kapow works by crawling the HTML of each page. It reads the URL into a browser and provides extraction tools to parse through the data and save it to a database table. An example is helpful here. I have a plain FAQ page. I can use Kapow’s looping mechanism to iterate the questions and answers, saving each pair into a database table. Locating the questions and answers within the page can be done by finding some constant in the HTML, e.g. a CSS class associated with the question/answer pair.
Transformation. Data from an old site cannot usually be imported into a new site without some cleanup. Link and image paths are obvious examples of content that will most likely need to be changed. Again, a simple example will help. For this site, videos needed to be changed from their old .f4v format to their new .mp4 format. So one step in my transformation process looked like this:
![]()
The first step is a loop that extracts URLs. I then tested the URL for the .f4v extension, transformed it to the .mp4 extension and replaced the new URL in the page text. The cleaned-up data is placed back into the database.
Upload. This step takes the data and loads it into the new site. My target site was Sitecore, so I was advised to use the Sitecore Item Web API to upload the data. If my target site had been extremely simple, this might have worked, but because it was a fairly complex site, this Web API didn’t come close to answering the need. See Part 3, coming shortly, for my solution.
Did you find any “gotchas” in using Kapow?
Overall, I found the tools I used to be more than enough for getting the job done. I don’t think I scratched the surface in what could be done. I did find a bit of occasional flakiness in the extraction process. Especially when extracting images and files or complex pages, I’d find that Kapow “missed” some extractions, even after I had run the extraction multiple times to take advantage of caching. I worked with Kapow Support on this and received good advice, but never achieved 100% correct extraction. That’s why I’m adding one more step to the previous question:
Verification. Check the target site to be sure extraction, transformation, and uploading were done correctly.
