
SFTP? Isn’t that old?
It is an oldie, but a goodie. 🙂
With Data Cloud we can send data to a lot of external data sources like Marketing Cloud Engagement or Amazon S3 through Activation Targets. But there are times we are working with a destination system like Eloqua or Marketo that has solid support for SFTP. SFTP and Data Cloud work well together!
Even with Marketing Cloud Engagement you might want to get data flowing into Automation Studio instead of pushing directly to a Data Extension or Journey. SFTP would allow that CSV file to flow into Automation Studio where a SSJS script for example could loop through those rows and send mass SMS messages.
Is it secure?
Yes, as we will see in this blog post the SFTP setup through Data Cloud supports both a SSH Key with a Passphrase and a Password on the SFTP site itself.
Let’s connect to Marketing Cloud Engagement through SFTP!
There are five main pieces to setup and test this.
- Create a new SSH Key
- Configure the SFTP Site in Marketing Cloud Engagement
- Test the SFTP Connection using a tool like FileZilla
- Configure that SFTP Activation Target in Data Cloud
- Build a Segment and Activation to leverage that SFTP Activation Target
This will feel like a lot of steps, but it really does not take that long to do. Leveraging these out of the box Activation Targets, like this SFTP one, is going to save tons of time in the long run.
1. Create the new SSH Key
Here is a good blog post to introduce you to what a SSH Key is and how it works. https://www.sectigo.com/resource-library/what-is-an-ssh-key
Here are a couple of good articles on how to generate a SSH Key.
- https://www.purdue.edu/science/scienceit/ssh-keys-windows.html
- https://www.ssh.com/academy/ssh/keygen
Very important note that Marketing Cloud only accepts SSH keys generated a certain way… https://help.salesforce.com/s/articleView?id=000380791&type=1
I am on a Windows machine so I am going to open a command prompt and use the OpenSSH command.
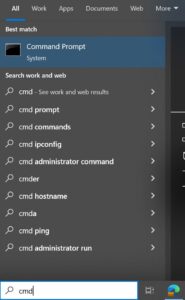
Once in the command prompt type the ssh-keygen command.

Now enter your filename.
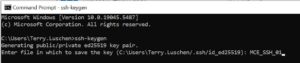
Now enter your passphrase. This is basically a password that is tied to your SSH Key to make it harder to break. This is different than your SFTP password that will be set on the Marketing Cloud Engagement side.

Now that your passphrase was entered twice correctly the SSH Key is generated.
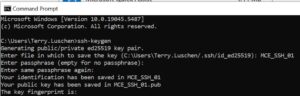
When using the command prompt the files were automatically created in my C:\Users\Terry.Luschen directory.
![]()
Now in the command prompt as stated in #3 in the Salesforce documentation above you need to do one final command.
Change the key to an RFC4716 (SSH2) key format
- ssh-keygen -e -f originalfilename.pub > newfilename
- So in our example above my command was
- ssh-keygen -e -f MCE_SSH_01.pub > MCE_SSH_01b

- ssh-keygen -e -f MCE_SSH_01.pub > MCE_SSH_01b
The three files will look something like:
- MCE_SSH_01.pub – This is the Public Key file to be loaded into Marketing Cloud Engagement.
- MCE_SSH_01 – This is the Private Key file which we will use to load into Data Cloud and FileZilla
- MCE_SSH_01b – This is another Public Key file that can be used to load into Marketing Cloud Engagement

I opened the .pub file and removed the comment.
I also added a file extension of .txt to the MCE_SSH_01b file so it is now named MCE_SSH_01b.txt
Now that we have generated our SSH files we can upload the Public Key to Marketing Cloud Engagement.
2. Configure the SFTP Site in Marketing Cloud Engagement
Log into Marketing Cloud Engagement
Go to Setup, Administration, Data Management, Key Management

Click ‘Create’ on the ‘Key Management’ page

Fill out the ‘New Key’ details.
Make sure SSH is selected.
Select the ‘Public’ Key file you created earlier which has the .pub extension.
Check the ‘Public Key’ checkbox.
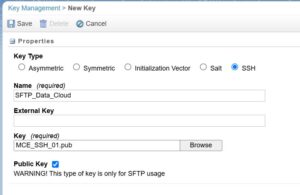
Save the Key
Now go to Setup, Administration, Data Management, FTP Accounts

Use the ‘Create User’ button to create a new User.
![]()
Fill out the new FTP User page by entering an email address and password. Note this is different than the passphrase create above that was tied to the SSH Key. Click on Next.

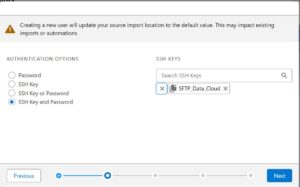
Select the ‘SSH Key and Password’ radio button. Use the file picker to select the Marketing Cloud Key you just created above. Click on Next.
Select the type of security you need. In this screen shot everything is selected but typically you should only select the checkboxes that are absolutely necessary. Click on Next.

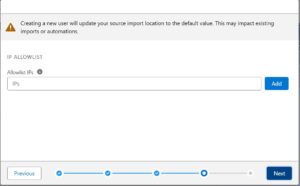
If you are trying to restrict to certain IPs fill out this screen. In our example we are not trying to restrict to just Data Cloud IPs for example. Click on Next.
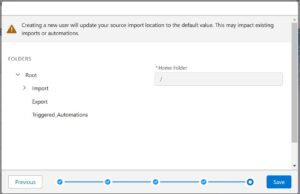
Typically you would leave this screen as is. It allows the Root folder as the default and then when you configure the tool that will send data to the SFTP site you can select the exact folder to use. Click on Save.
Yeah! You now have configured our destination SFTP site.
Now we can test this!
3. Test the SFTP Connection using a tool like FileZilla
- I like to test using FileZilla, but you could use other SFTP tools.
- Download the FileZilla and install it on your computer.
- Choose Edit, Settings…
- Select SFTP under Connection and choose ‘Add key file..’ button
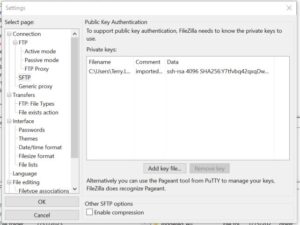
- You can either pick the original private key file and FileZilla will produce another file for you. Or you can use the SSH2 file that was produced in the CMD prompt, which was named MCE_SSH_01b.txt in our example above.
- Depending on which file is uploaded you might have to enter the Passphrase.
- Select SFTP under Connection and choose ‘Add key file..’ button
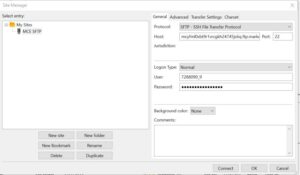
- Open FileZilla and choose File, Site Manager…
- Click ‘New Site’ and fill out the information on the right. Save it by clicking on OK.
- Open up your Site and click on the ‘Connect’ on the bottom of the screen.
- You will be prompted to enter your Passphrase that is connected to your SSH Key.
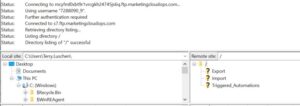
- Success! FileZilla shows you the folders on the Marketing Cloud Engagement SFTP Site!
4. Configure the SFTP Activation Target in Data Cloud
- Now let’s do the same connection in Data Cloud
- In Data Cloud Setup go to Data Cloud, External Integrations, Other Connectors
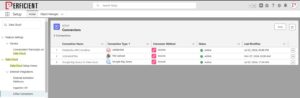
- Choose the ‘Target’ tab and ‘Secure File Transfer (SFTP)’. Click on Next

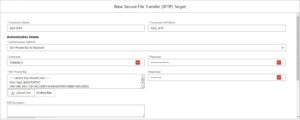
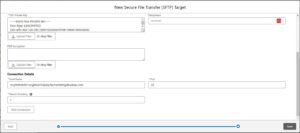
- Fill out the connection information.
- The connection Name and API Name can be anything you want it to be
- The ‘Authentication Method’ is ‘SSH Private Key & Password’
- The Username and Password are the values from the Marketing Cloud SFTP User.
- The SSH Private Key is the first file created in the CMC prompt. It was the MCE_SSH_03 file for us with no file extension.
- The Passphrase is the passphrase entered in the CMD prompt when generating your Key.
- No need to put anything in the ‘PGP Encryption’ field.
- It should look like this now…
- In the Connection Details’ section…
- Host Name and Port are from the Marketing Cloud SFTP Screen

- It should look like this now…
- You can ‘Test’ your connection before saving it.
- Host Name and Port are from the Marketing Cloud SFTP Screen
- Now you need to create an Activation Target
- Open Data Cloud App
- Go to the Activation Targets tab, Click on New

- Select ‘Secure File Transfer (SFTP)’ and click on ‘Next’

- Fill in the ‘New Activation Target’ screen.
- Select the SFTP Connector that you created earlier in the ‘Select SFTP Connector’ drop-down.

- Click on Next
- Select the SFTP Connector that you created earlier in the ‘Select SFTP Connector’ drop-down.
- Fill out the final page selecting your File Format and other options.
- Note the maximum File size is 500MB.
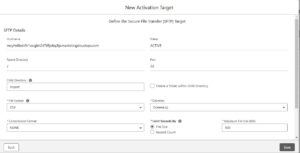
- If you leave the ‘File Name Type’ as Predetermined then you should always get a unique filename since it will be appended with a ‘Date/Time Suffix’.

- Note the maximum File size is 500MB.
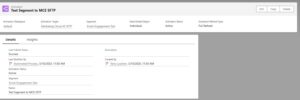
5. Build a Segment and Activation to leverage that SFTP Activation Target
- Open up the Data Cloud App
- Create your Segment from the Segment Tab
- Go to the Activations tab and click on ‘New’
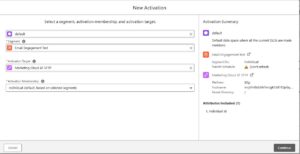
- Select your Segment and the ‘Activation Target’ we created above which in your SFTP site. Click on Continue.
- Add ‘Email’ or ‘SMS’ fields as necessary for your Activation. Click on Next.

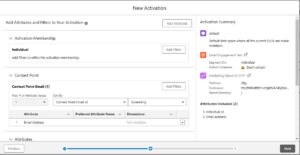
- Fill out the ‘Add Attributes and Filters to Your Activation’ as necessary. Click on Next.
- Give your Activation a name and finalize Schedule and Refresh Type. Click on Save.

- You should now have your new Activation.
- Go back to your Segment and choose ‘Publish Now’ if that is how you need to test your Segment

Conclusion
After you publish your segment, it should run and your file should show up on your Marketing Cloud Engagement STFP site. You can test this by opening FileZilla, connecting and looking in the proper folder.

That is it! SFTP and Data Cloud work well together!
We see with just clicks and configuration we can send Segment data created in Data Cloud to a SFTP site! We are using the standard ‘Activation Target’ and ‘Activation’ setup screens in Data Cloud.
If you are brainstorming about use cases for Agentforce, please read on with this blog post from my colleague Darshan Kukde!
Here is another blog post where I discuss using unstructured data in Salesforce Data Cloud so your Agent in Agentforce can help your customers in new ways!
If you want a demo of this in action or want to go deeper please reach out and connect!