
As part of security and compliance best practices, it is essential to enhance data protection by transitioning from AWS-managed encryption keys to Customer Managed Keys (CMK).
Business Requirement
During database migration or restoration, it is not possible to directly change encryption from AWS-managed keys to Customer-Managed Keys (CMK).
During migration, the database snapshot must be created and re-encrypted with CMK to ensure a secure and efficient transition while minimizing downtime. This document provides a streamlined approach to saving time and ensuring compliance with best practices.
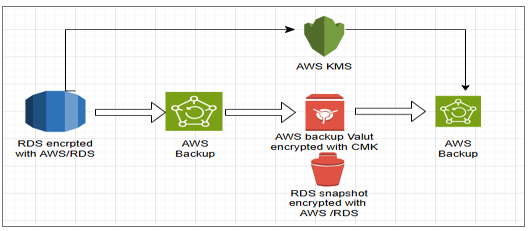
Fig: RDS Snapshot Encrypted with AWS-Managed KMS Key
Objective
This document aims to provide a structured process for creating a database snapshot, encrypting it with a new CMK, and restoring it while maintaining the original database configurations. This ensures minimal disruption to operations while strengthening data security.
- Recovery Process
- Prerequisites
- Configuration Overview
- Best Practices
Prerequisites

Before proceeding with the snapshot and restoration process, ensure the following prerequisites are met:
- AWS Access: You must have the IAM permissions to create, copy, and restore RDS snapshots.
- AWS KMS Key: Ensure you have a Customer-Managed Key (CMK) available in the AWS Key Management Service (KMS) for encryption.
- Database Availability: Verify that the existing database is healthy enough to take an accurate snapshot.
- Storage Considerations: Ensure sufficient storage is available to accommodate the snapshot and the restored instance.
- Networking Configurations: Ensure appropriate security groups, subnet groups, and VPC settings are in place.
- Backup Strategy: Have a backup plan in case of any failure during the process.
Configuration Overview
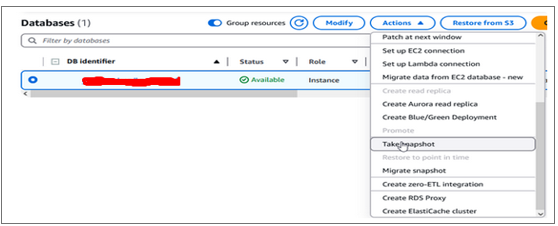
Step 1: Take a Snapshot of the Existing Database
- Log in to the AWS console with your credentials.
- Navigate to the RDS section where you manage database instances.
- Select the existing database for which you want to create the snapshot.
- Click on the Create Snapshot button.
- Provide a name and description for the snapshot, if necessary.
- Click Create Snapshot to initiate the snapshot creation process.
- Wait for the snapshot creation to complete before proceeding to the next step.
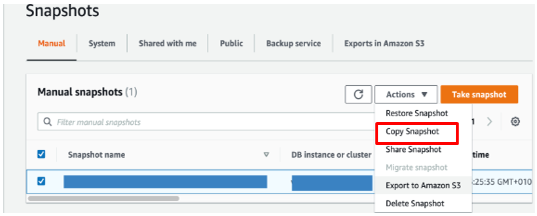
Step 2: Copy Snapshot with New Encryption Keys
- Navigate to the section where your snapshots are stored.
- Locate the newly created snapshot in the list of available snapshots.
- Select the snapshot and click the Copy Snapshot option.
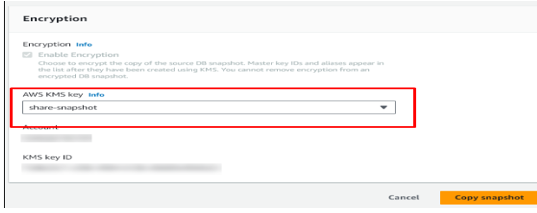
- In the encryption settings, choose New Encryption Key (this will require selecting a new Customer Managed Key (CMK)).
- Follow the prompts to copy the snapshot with the new encryption key. Click Next to continue.
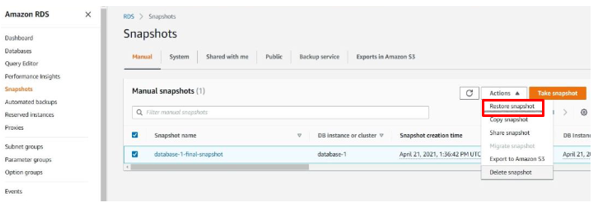
Step 4: Navigate to the Newly Created Snapshot, Action to Restore
- Once the new snapshot is successfully created, navigate to the list of available snapshots.
- Locate the newly created snapshot.
- Select the snapshot and choose the Restore or Action → Restore option.
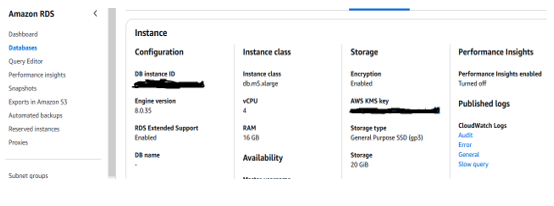
Step 5: Fill in the Details as Old One
- When prompted to restore the snapshot, fill in the details using the same configuration as the old database. This includes:
Instance size, Database configurations, Networking details, Storage options
- Ensure all configurations match the old setup to maintain continuity.
Step 6: Create the Restored Database Output
- After filling in the necessary details, click Create to restore the snapshot to a new instance.
- Waiting for the process to be completed.
- Verify that the new database is restored successfully.
Best Practices for RDS Encryption
- Enable automated backups and validate snapshots.
- Secure encryption keys and monitor storage costs.
- Test restored databases before switching traffic.
- Ensure security groups and CloudWatch monitoring are set up.
- This ensures a secure and efficient RDS snapshot process.
Conclusion
Following these steps ensures a secure, efficient, and smooth process for taking, encrypting, and restoring RDS snapshots in AWS. Implementing best practices such as automated backups, encryption key management, and proactive monitoring can enhance data security and operational resilience. Proper planning and validation at each step will minimize risks and help maintain business continuity.