
Need For Robot Class:
Selenium normally allows file uploads using the send Keys () method for file input fields. However, if the input field is not of type “file,” it might run into problems and here comes the Robot class.
The Robot class, part of the java.awt package, helps you perform system-level events, pressing keys, moving the cursor, and clicking. This makes it a powerful tool, especially when you need to interact with system-level components that Selenium alone cannot handle.
When is the Robot Class Suitable for File Uploads?
Use the Robot class for file uploads in cases where:
- The file input field is hidden or otherwise inaccessible.
- The input field is not of type “file,” meaning send Keys () cannot be used.
- The file upload dialog is customized and does not respond to standard Selenium commands.
How to perform a file upload operation through the Robot Class?
Precondition: Whenever we use the press method, we must also use the release method. If the release method is not used, the keyboard press action will remain active. To stop the pressing action, the release method must be invoked.
Now, let’s look at a step-by-step example of how to upload a file using the Robot class.
- Trigger the File Upload Dialog
First, navigate to the page where you need to upload the file. Click the button that opens the file chooser dialog. - Use the Robot Class to Interact with the Dialog
After the dialog opens, use the Robot class to input the file path and handle the upload process through simulated keyboard events.

Here’s an example of Java code that demonstrates this process.
Explanation of the Code:
- Trigger the File Upload Dialog
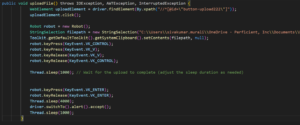
The first step is locating the upload button using Selenium’s FindElement() method and clicking it to open the file upload dialog. - Simulating Keyboard Actions Using the Robot Class
- Create a Robot object to simulate the required keyboard actions.
- Use String Selection and Toolkit to copy the file path to the clipboard.
- The Robot class then simulates pressing Ctrl + v to paste the file path into the file chooser.
- Finally, simulate pressing the Enter key to upload the file.
- Adding Delays
Delays between actions ensure that each step is completed before moving on to the next, which helps to avoid timing issues.
Final Thoughts:
Pros of Robot Class:
- Simulates keyboard and mouse actions easily.
- Can handle pop-ups and system-level tasks.
- Useful for automating tasks outside of the browser.
Cons of Robot Class:
- Limited to basic interactions (no complex web actions).
- Difficult to test dynamic web elements.
- Not ideal for cross-browser testing.
When facing challenges with hidden input fields or custom dialogs, consider using the Robot class in your automation strategy.
For more information, you can refer to this website: https://www.guru99.com/using-robot-api-selenium.htmlConclusion
Similar tools:
-
AutoIt – https://www.autoitscript.com/site/
-
Sikuli – https://www.sikuli.org/
-
AWT Event Queue (Java) – https://docs.oracle.com/javase/7/docs/api/java/awt/EventQueue.html