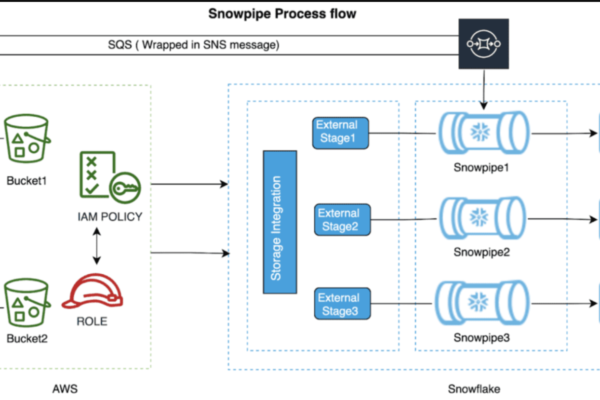
SNOWFLAKE’S SNOWPIPE
Snow pipe:
snow pipe is a one of the data loading strategies in snowflake , for continuous data loading, will create a snow pipe to load the data from any data source or storage or any cloud to snowflake tables, its an event trigger ideology whenever a file came to the source immediately it will trigger and notify to the particular external stage in snowflake and load the data to the table immediately
procedure of snow pipe:

S3 bucket setup for snow pipe:
Create a s3 bucket in AWS and a folder in that:
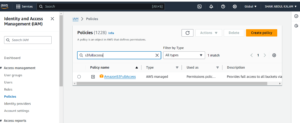
Creating an IAM policy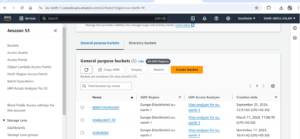
- From the home dashboard, search for and select IAM.
- From the left-hand navigation pane, select Account settings.
- Under Security Token Service (STS) in the Endpoints list, find the Snowflake region where your account is located. If the STS status is inactive, move the toggle to Active.
- From the left-hand navigation pane, select Policies.
- Select Create Policy.
- For Policy editor, select JSON.
- Add a policy document that will allow Snowflake to access the S3 bucket and folder.
The following policy (in JSON format) provides Snowflake with the required permissions to load or unload data using a single bucket and folder path.
Copy and paste the text into the policy editor:
{
“Version”: “2012-10-17”,
“Statement”: [
{
“Effect”: “Allow”,
“Action”: [
“s3:GetObject”,
“s3:GetObjectVersion”
],
“Resource”: “arn:aws:s3:::<bucket>/<prefix>/*”
}
- Note that AWS policies support a variety of different security use cases.
- Select Next.
- Enter a Policy name (for example, snowflake_integration)
- Select Create policy.
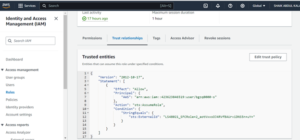
Step 2: Create the IAM Role in AWS
To configure access permissions for Snowflake in the AWS Management Console, do the following:
- From the left-hand navigation pane in the Identity and Access Management (IAM) Dashboard, select Roles.
- Select Create role.
- Select AWS account as the trusted entity type.
- In the Account ID field, enter your own AWS account ID temporarily. Later, you modify the trust relationship and grant access to Snowflake.
- Select the Require external ID option. An external ID is used to grant access to your AWS resources (such as S3 buckets) to a third party like Snowflake.
Enter a placeholder ID such as 0000. In a later step, you will modify the trust relationship for your IAM role and specify the external ID for your storage integration.
- Select Next.
- Select the policy you created in Step 1: Configure Access Permissions for the S3 Bucket(in this topic).
- Select Next.
- Enter a name and description for the role, then select Create role.
You have now created an IAM policy for a bucket, created an IAM role, and attached the policy to the role.
- On the role summary page, locate and record the Role ARN value. In the next step, you will create a Snowflake integration that references this role.
Note
Snowflake caches the temporary credentials for a period that cannot exceed the 60 minute expiration time. If you revoke access from Snowflake, users might be able to list files and access data from the cloud storage location until the cache expires.
Step 3: Create a Cloud Storage Integration in Snowflake

A storage integration is a Snowflake object that stores a generated identity and access management (IAM) user for your S3 cloud storage, along with an optional set of allowed or blocked storage locations (i.e. buckets). Cloud provider administrators in your organization grant permissions on the storage locations to the generated user. This option allows users to avoid supplying credentials when creating stages or loading data.
CREATE or replace STORAGE INTEGRATION bowiya_inte
TYPE = EXTERNAL_STAGE
STORAGE_PROVIDER = ‘S3’
ENABLED = TRUE
STORAGE_AWS_ROLE_ARN = ‘arn:aws:iam::151364773749:role/manojrole’
STORAGE_ALLOWED_LOCATIONS = (‘s3://newbucket1.10/sample.csv’);
The following will create an integration that allows access to all buckets in the account.
Additional external stages that also use this integration can reference the allowed buckets and paths:
Step 4: Retrieve the AWS IAM User for your Snowflake Account
- To retrieve the ARN for the IAM user that was created automatically for your Snowflake account, use:
desc integration bowiya_inte;
Step 5: Grant the IAM User Permissions to Access Bucket Objects
The following step-by-step instructions describe how to configure IAM access permissions for Snowflake in your AWS Management Console so that you can use a S3 bucket to load and unload data:
- Log in to the AWS Management Console.
- Select IAM.
- From the left-hand navigation pane, select Roles.
- Select the role you created
- Select the Trust relationships tab.
- Select Edit trust policy.
- Modify the policy document with the DESC STORAGE INTEGRATION Policy document for IAM role
Step 6: CREATE A STAGE IN SNOWFLAKE :
A stage is an object where files can be stored temporarily from a local storage or cloud storage, using the stage we can load the data into tables.
CREATE or replace STAGE mystage
URL = ‘s3://newbucket1.10/sample.csv’
STORAGE_INTEGRATION = bowiya_inte;
Step 7: CREATE A SNOW PIPE IN SNOWFLAKE:
CREATE or replace PIPE mypipe
AUTO_INGEST = TRUE
AS
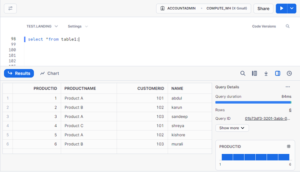
COPY INTO table1
FROM @mystage
FILE_FORMAT = (type = ‘CSV’ SKIP_HEADER = 1);
Step 7: CREATE A EVENT NOTIFICATION IN S3:
Event notification will notify when an object is changed or added into the bucket.
In s3 go to properties and create one notification event.
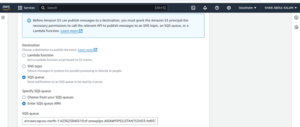
STEP 8: Get the SQS queue id from your snowflake pipe.
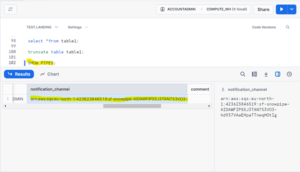
Once the notification event is created the snow pipe will load the data whenever the file is added or changed in s3 bucket.
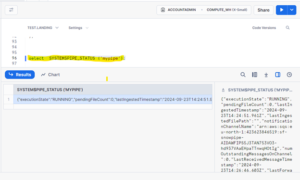
STEP 9: MONITOR THE SNOW PIPE STATUS.
NOTE: Snow pipe won’t load the same file again, because the SQS queue is reading the file name read the file and the metadata was captured. If we upload the same file again then the SQS queue will not get any notification so snow pipe can’t load the same file again.