
About eight years ago, I was introduced to Docker during a meetup at a restaurant with a coworker. He was so engrossed in discussing the Docker engine and containers that he barely touched the hors d’oeuvres. I was skeptical.
I was familiar with Virtual Machines (VMs) and appreciated the convenience of setting up application servers without worrying about hardware. I wanted to know what advantages Docker could offer that VMs couldn’t. He explained that instead of virtualizing the entire computer, Docker only virtualizes the OS, making containers much slimmer than their VM counterparts. Each container shares the host OS kernel and often binaries and libraries.
Curious, I wondered how AEM would perform inside Docker—a Java application running within the Java Virtual Machine, inside a Docker container, all on top of a desktop PC. I expected the performance to be terrible. Surprisingly, the performance was comparable to running AEM directly on my desktop PC. In hindsight, this should not have been surprising. The Docker container shared my desktop PC’s kernel, RAM, CPUs, storage, and network allowing the container to behave like a native application.
I’ve been using Docker for my local AEM development ever since. I love how I can quickly spin up a new author, publish, or dispatch environment whenever I need it and just as easily tear it down. Switching to a new laptop or PC is a breeze — I don’t have to worry about installing the correct version of Java or other dependencies to get AEM up and running.
In this blog, we’ll discuss running AEM author, publisher, and dispatcher within Docker and the setup process.
Setup Requirements
The AEM SDK, which includes the Quickstart JAR and Dispatcher tools, is necessary for this setup. Additionally, Apache Maven must be installed. For the Graphical User Interface, we will use Rancher Desktop by SUSE, which operates on top of Docker’s command-line tools. While the Docker engine itself is open source, Docker Desktop, the GUI distributed by Docker, is not.
Step One: Installing Rancher Desktop
Download and Install Rancher Desktop by SUSE. Installing Racker Desktop will provide the Docker CLI (command line interface). If you wish to install the Docker CLI without Rancher Desktop, run the following command:
Windows
Install WinGet via the Microsoft store.
winget install --id=Docker.DockerCLI -e
Mac
Install Homebrew:
/bin/bash -c "$(curl -fsSL https://raw.githubusercontent.com/Homebrew/install/master/install.sh)

brew cask install docker
Step Two: Creating the “AEM in Docker” folder
Create a folder named “aem-in-docker”. Unzip the contents of the AEM SDK into this folder. Copy your AEM “license.properties” file to this directory.
Step Three: Creating the subfolders to contain the Docker Image instructions
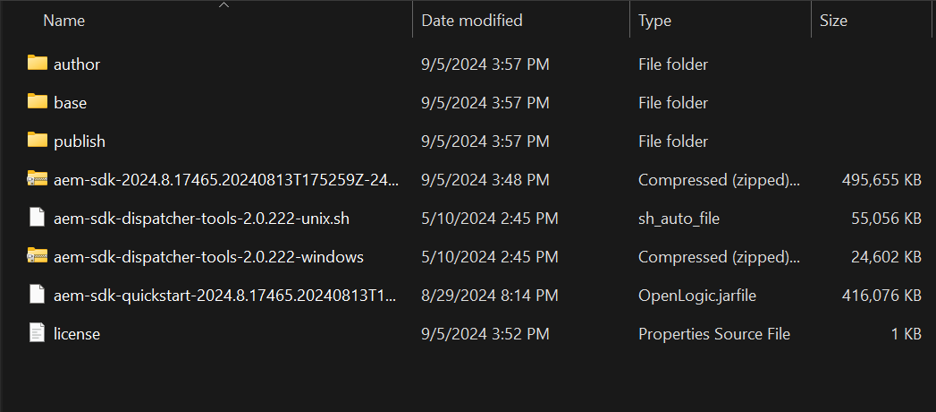
Make three subfolders within your “aem-in-docker” folder named “base”, “author”, and “publish”.
Your “aem-in-docker” folder should look something like this:
Step Four: Creating the Base Docker Image instruction (Dockerfile)
Create a file named “Dockerfile” within the “base” subdirectory.
Ensure the file does not have an extension. Set the contents of the file to the following:
FROM ubuntu
# Setting the working directory
WORKDIR /opt/aem
# Copy the license file
COPY license.properties .
# Copy Quickstart jar file
COPY aem-sdk-quickstart-2024.8.17465.20240813T175259Z-240800.jar cq-quickstart.jar
# Install Java, Vim, and Wget.  Install Dynamic Media dependencies.
RUN apt-get update && \
    apt-get install -y curl && \
    apt-get install -y software-properties-common && \
    add-apt-repository ppa:openjdk-r/ppa && \
    apt-get update && \
    apt-get install -y openjdk-11-jdk vim ca-certificates gnupg wget imagemagick ffmpeg fontconfig expat freetype2-demos
# Unack the Jar file
RUN java -jar cq-quickstart.jar -unpack
# Set the LD_LIBRARY_PATH environmental variable
ENV LD_LIBRARY_PATH=/usr/local/lib
This file directs Docker to build a new image using the official Ubuntu image as a base. It specifies the working directory, copies the license file and the quickstart file into the image (note that your quickstart file might have a different name), installs additional packages (like Java, Vim, Wget, and some Dynamic Media dependencies), unpacks the quickstart file, and sets some environment variables.
Step Five: Create the Base Docker Image
Run the following command from within the “aem-in-docker” folder.
docker build -f base/Dockerfile -t aem-base .
It should take a few minutes to run. After the command has been completed run:
docker image ls
You should see your newly created “aem-base” image.

Step Six: Creating the Author Docker Image instruction (Dockerfile)
Create a file named “Dockerfile” within the “author” subdirectory.
Set the contents of the file to the following:
# Use the previously created aem-base
FROM aem-base

# Expose AEM author in port 4502 and debug on port 5005
EXPOSE 4502
EXPOSE 5005
VOLUME ["/opt/aem/crx-quickstart/logs"]
# Make the container always start in Author mode with Port 4502.  Add additional switches to support JAVA 11: https://experienceleague.adobe.com/en/docs/experience-manager-65/content/implementing/deploying/deploying/custom-standalone-install.  Add the Dynamic Media runmode.
ENTRYPOINT ["java", "-agentlib:jdwp=transport=dt_socket,server=y,suspend=n,address=*:5005", "-XX:+UseParallelGC", "--add-opens=java.desktop/com.sun.imageio.plugins.jpeg=ALL-UNNAMED", "--add-opens=java.base/sun.net.www.protocol.jrt=ALL-UNNAMED", "--add-opens=java.naming/javax.naming.spi=ALL-UNNAMED", "--add-opens=java.xml/com.sun.org.apache.xerces.internal.dom=ALL-UNNAMED", "--add-opens=java.base/java.lang=ALL-UNNAMED", "--add-opens=java.base/jdk.internal.loader=ALL-UNNAMED", "--add-opens=java.base/java.net=ALL-UNNAMED", "-Dnashorn.args=--no-deprecation-warning", "-jar", "cq-quickstart.jar", "-Dsling.run.modes=author,dynamicmedia_scene7", "-p", "4502", "-nointeractive"]
This file instructs Docker to create a new image based on the “aem-base” image. It makes ports 4502 and 5005 available (5005 for debugging purposes), sets up a mount point at “/opt/aem/crx-quickstart/logs”, and specifies the command to run when the image is executed.
Step Seven: Create the Author Docker Image
Run the following command from within the “aem-in-docker” folder.
docker build -f author/Dockerfile -t aem-author .
After the command has been completed run:
docker image ls
You should see your newly created “aem-author” image.

Step Eight: Creating the Publisher Docker Image instruction (Dockerfile)
Create a file named “Dockerfile” within the “publish” subdirectory.
Set the contents of the file to the following:
# Use the previously created aem-base
FROM aem-base
# Expose AEM publish in port 4503 and debug on port 5006
EXPOSE 4503
EXPOSE 5006
VOLUME ["/opt/aem/crx-quickstart/logs"]
# Make the container always start in Author mode with Port 4503.  Add additional switches to support JAVA 11: https://experienceleague.adobe.com/en/docs/experience-manager-65/content/implementing/deploying/deploying/custom-standalone-install.  Add the Dynamic Media runmode.
ENTRYPOINT ["java", "-agentlib:jdwp=transport=dt_socket,server=y,suspend=n,address=*:5006", "-XX:+UseParallelGC", "--add-opens=java.desktop/com.sun.imageio.plugins.jpeg=ALL-UNNAMED", "--add-opens=java.base/sun.net.www.protocol.jrt=ALL-UNNAMED", "--add-opens=java.naming/javax.naming.spi=ALL-UNNAMED", "--add-opens=java.xml/com.sun.org.apache.xerces.internal.dom=ALL-UNNAMED", "--add-opens=java.base/java.lang=ALL-UNNAMED", "--add-opens=java.base/jdk.internal.loader=ALL-UNNAMED", "--add-opens=java.base/java.net=ALL-UNNAMED", "-Dnashorn.args=--no-deprecation-warning", "-jar", "cq-quickstart.jar", "-Dsling.run.modes=publish,dynamicmedia_scene7", "-p", "4503", "-nointeractive"]
Step Nine: Create the Publisher Docker Image
Run the following command from within the “aem-in-docker” folder.
docker build -f publish/Dockerfile -t aem-publish .
After the command has been completed run:
docker image ls
You should see your newly created “aem-publish” image.

Step Ten: Create the Adobe Network
Let’s set up a network to connect Docker containers and facilitate data sharing between them.
docker network create adobe
Step Eleven: Run the Author Docker Image
It’s time to run our Author Docker Image. First, create a local directory for the logs volume specified in the Dockerfile. Within the author subdirectory, create a directory named “logs.” Run the following command within the new logs folder:
Windows
docker run -d --name author -p 4502:4502 -p 5005:5005 --network adobe -v ${PWD}:/opt/aem/crx-quickstart/logs aem-author
macOS/Linux
docker run -d --name author -p 4502:4502 -p 5005:5005 --network adobe -v `pwd`:/opt/aem/crx-quickstart/logs aem-author
The command will return the ID of the new Docker container. It may take some time for the new AEM instance to start. To check its status, you can monitor the “error.log” file in the logs directory to check its status.
Windows
Get-Content -Path .\error.log -Wait
macOS/Linux
tail -f error.log
After AEM has finished starting up, check that everything is loading correctly by visiting: http://localhost:4502/aem/start.html.
Let’s stop the AEM container for the time being:
docker stop author
Step Twelve: Run the Publisher Docker Image
It’s time to run our Publisher Docker Image. First, create a local directory for the logs volume specified in the Dockerfile. Within the publish subdirectory, create a directory named “logs.” Run the following command within the new logs folder:
Windows
docker run -d --name publish -p 4503:4503 -p 5006:5006 --network adobe -v ${PWD}:/opt/aem/crx-quickstart/logs aem-publish
macOS/Linux
docker run -d --name publish -p 4503:4503 -p 5006:5006 --network adobe -v `pwd`:/opt/aem/crx-quickstart/logs aem-publish
The command will return the ID of the new Docker container. It may take some time for the new AEM instance to start. To check its status, you can monitor the “error.log” file in the logs directory to check its status.
Windows
Get-Content -Path .\error.log -Wait
macOS/Linux
tail -f error.log
After AEM has finished starting up, check that everything is loading correctly by visiting: http://localhost:4503/content.html. You will see a “Not Found” page. That is fine for now.
Let’s stop the AEM container for the time being:
docker stop publish
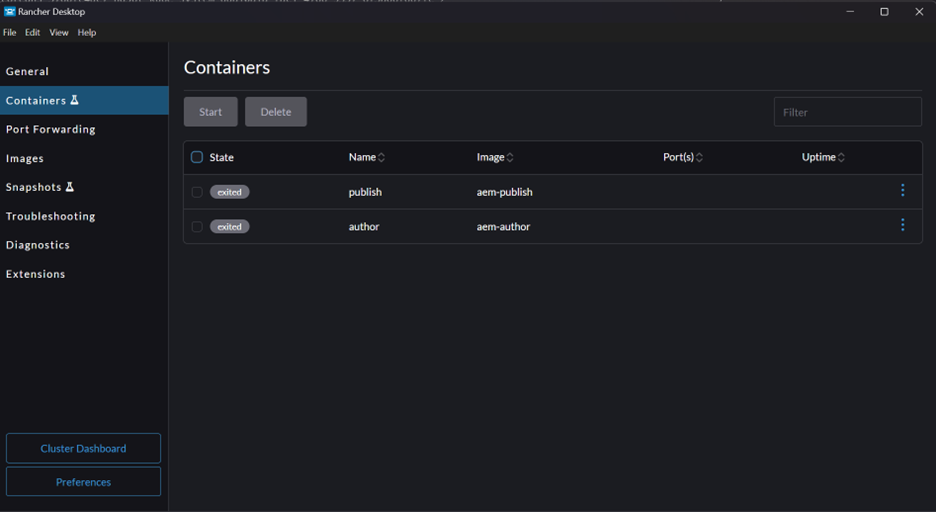
Step Thirteen: Start the Containers via Rancher Desktop
Open Rancher Desktop and go to the Containers tab in the left navigation pane. To start individual containers, check the box in the State column for each container you want to start, then click the Start button. To start all containers at once, check the box in the header row of the State column, and then click the Start button. Let’s go ahead and start all containers.
If you prefer using the command line, you can run:
docker start author
docker start publish
Step Fourteen: Create an AEM Project and install it on the Author and Publish instance
Since Docker’s mascot is a whale, I thought it would be fun to name our new AEM project after a famous fictional whale: Monstro from Pinocchio.
Run the following command from a command line (Note: you may have to run this command with elevated privileges):
mvn -B archetype:generate -D archetypeGroupId=com.adobe.aem -D archetypeArtifactId=aem-project-archetype -D archetypeVersion=50 -D aemVersion=cloud -D appTitle="Monstro" -D appId="monstro" -D groupId="com.monstro" -D frontendModule=general -D includeExamples=n
Once this project has been created, let us build and deploy it to our Author instance.
Run the following command from within the “Monstro” project:
mvn clean install -PautoInstallSinglePackage
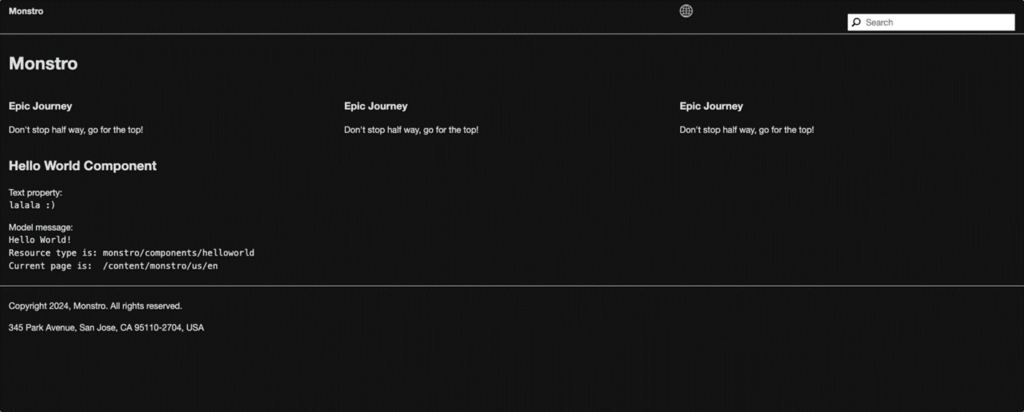
Check that the project is installed by visiting the following URL to view the results: http://localhost:4502/editor.html/content/monstro/us/en.html. You should see the following:
Now, let us build and deploy the project to our Publish instance.
Run the following command from within the “Monstro” project:
mvn clean install -PautoInstallSinglePackagePublish
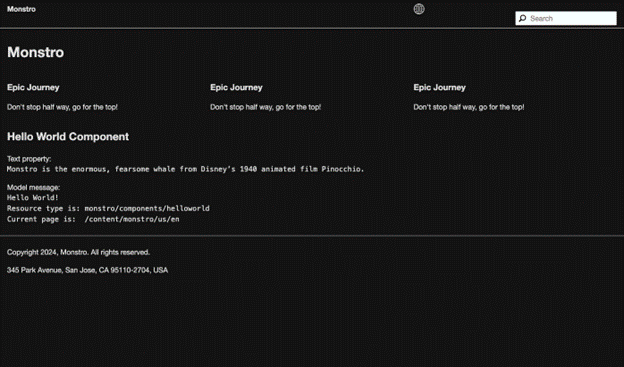
Verify that the project is installed by visiting this URL: http://localhost:4503/content/monstro/us/en.html. Installation may take up to five minutes. After this period, you should see the following:

Step Fifteen: Set up the Publish Agent on Author
It’s time to configure the publish agent on our author instance. Go to this URL: http://localhost:4502/etc/replication/agents.author/publish.html.
Click the “Edit” button (next to settings).
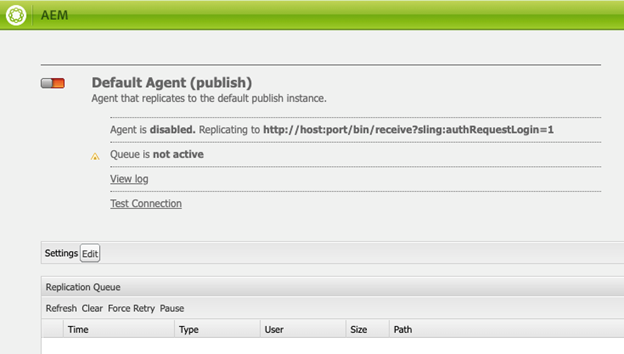
- Click the checkbox next to “Enabled”
- Enter “admin” in the “Agent User Id” field
- Navigate to the Transport tab and enter the following in the URI field: http://publish:4503/bin/receive?sling:authRequestLogin=1
- Instead of using “localhost,” the hostname for our publish instance is our container’s name, “publish”
- In the “username” field, enter “admin,” and in the “password” field, enter the admin’s password
- Click the “OK” button to save the Agent settings
- Click the “Test Connection” link, and the replication test should be successful
Step Sixteen: Publish content from the Author
Go back to http://localhost:4502/editor.html/content/monstro/us/en.html. Edit the “Hello, World” component by changing the text from “lalala :)” to “Monstro is the enormous, fearsome whale from Disney’s 1940 animated film Pinocchio.” Verify the update and publish the page. Then, check http://localhost:4503/content/monstro/us/en.html to see your changes on the Publisher as well.
Step Seventeen: Create the Dispatcher Container
Make sure the publisher instance is running before proceeding. Extract the AEM SDK Dispatcher tools.
Windows
Expand-Archive .\aem-sdk-dispatcher-tools-2.0.222-windows.zip
Rename-Item -Path .\aem-sdk-dispatcher-tools-2.0.222-windows -NewName dispatcher-sdk-2.0.222
macOS/Linux
chmod +x ./aem-sdk-dispatcher-tools-2.0.222-unix.sh
./aem-sdk-dispatcher-tools-2.0.222-unix.sh
Since we’ve set up a custom network for our AEM containers, the docker run script won’t function correctly because it doesn’t recognize this network. Let’s modify the docker run script.
Windows
Open “dispatcher-sdk-2.0.222\bin\docker_run.cmd” in your favorite editor.
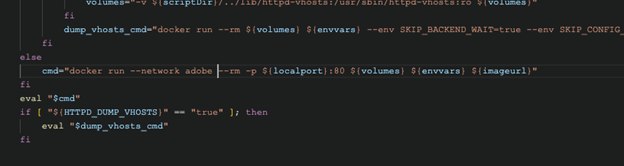
Add the “–network adobe” argument to the docker command inside the “else” statement.

macOS/Linux
Open “dispatcher-sdk-2.0.222/bin/docker_run.sh” in your favorite editor.
Add the “–network adobe” argument to the docker command inside the “else” statement.
Execute the docker run script with the following parameters. Be sure to replace the dispatcher source path with the path to your “monstro” source.
Windows
.\ dispatcher-sdk-2.0.222\bin\docker_run.cmd C:\Users\shann\Sites\monstro\dispatcher\src publish:4503 8080
macOS/Linux
./dispatcher-sdk-2.0.222/bin/docker_run.sh ~/Sites/monstro/dispatcher/src publish:4503 8080
Once the text stream in your terminal has stopped, go to http://localhost:8080/. You should see the following:
Open Rancher Desktop and navigate to the Containers tab. Locate the container with an unusual name. If you stop this container, it won’t be possible to start it again. Please go ahead and stop this container. The dispatcher code running in your terminal will also terminate. We want this container to be more permanent, so let’s make some additional changes to the docker run script.
Windows
Open “dispatcher-sdk-2.0.222\bin\docker_run.cmd” in your favorite editor.
macOS/Linux
Open “dispatcher-sdk-2.0.222/bin/docker_run.sh” in your favorite editor.
Add the “–name dispatcher” argument to the “docker” command within the “else” statement. Also, remove the “–rm” switch. According to Docker documentation, the “–rm” switch automatically removes the container and its associated anonymous volumes when it exits, which is not what we want.
Windows

macOS/Linux

Run the docker run command in your terminal again:
Windows
.\ dispatcher-sdk-2.0.222\bin\docker_run.cmd C:\Users\shann\Sites\monstro\dispatcher\src publish:4503 8080
macOS/Linux
./dispatcher-sdk-2.0.222/bin/docker_run.sh ~/Sites/monstro/dispatcher/src publish:4503 8080
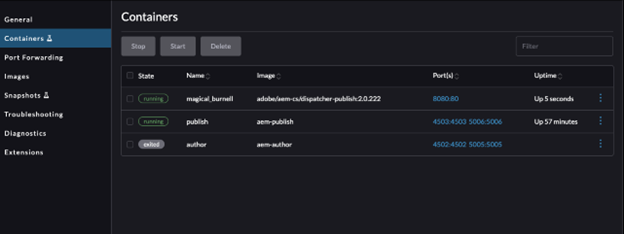
Open Rancher Desktop and go to the Containers tab. You should see a container named “dispatcher.” Stop this container. The dispatcher code running in your terminal will terminate, but the container will remain in Rancher Desktop. You can now stop and restart this container as many times as you’d like. You can also start and stop the dispatcher via the command line:
docker start dispatcher
docker stop dispatcher
Docker Provides Value and Flexibility
We have an author and publisher AEM instance running inside a Docker container. Additionally, we have a dispatcher container created using the source from the Monstro project. Although this dispatcher container isn’t very useful, the advantage of Docker is that you can easily delete and create new containers as needed.
I hope you found this blog helpful. I’ve been using Docker on my local machine for the past eight years and value the flexibility it provides. I can’t imagine going back to managing a local AEM instance or dealing with Apache configurations to get the dispatcher working. Those days are behind me.
Shannon, thanks for posting this. Will try setting it up in a week or so. I’m really surprised there are no user comments as this is a huge benefit vs manual installation.
Is this the latest info or were you planning an update in the near future? I’ll let you know how everything goes.