
Historically when performing content migration with Sitecore we used to deal with database backups. In a modern SaaS world, we do not have the luxury of neither managing cloud database backups, nor the corresponding UI for doing this. Therefore, we must find an alternative approach.
Technical Challenge
Let’s assume we have a legacy Sitecore website, in my case that was XP 9.3 and we’ve been provided with only master database backup having all the content. The objective is to perform content migration from this master database into a new and shiny XM Cloud environment(s).
Without having direct access to the cloud, we can only operate locally. In theory, there could be a few potential ways of doing this:
-
Set up a legacy XP of the desired version with the legacy content database already attached/restored to it. Then try to attach (or restore) a vanilla XM Cloud database to a local SQL Server as a recipient database in order to perform content migration into it. Unfortunately, the given approach would not work since SQL Server version incompatibility between XM Cloud and XP 9.3. Even if that was possible, running XP 9.3 with the XM Cloud database won’t work as Xз 9.3 neither knows about XM Cloud schema nor is capable of handling Items as Resource required feature which was invented later in XP 10.1. Therefore – this option is not possible.
-
Can we go the other way around by using the old database along with XM Cloud? This is not documented, but let’s assess it:
-
Definitely won’t work in the cloud since we’re not given any control of DBs and their maintenance or backups.
-
In a local environment, XM Cloud only works in Docker containers and it is not possible to use it with an external SQL Server where we have a legacy database. But what if we try to plug that legacy database inside of the local SQL Container? Sadly, there are no documented ways of achieving that.
-
- Keep two independent instances side by side (legacy XP and XM Cloud in containers) and use an external tool to connect both of them in order to migrate the content. In theory that is possible but carries on few drawbacks.
- The tool of choice is Razl, but this tool is not free, requires a paid license, and does not have a free trial to ever test this out.
- Connecting to a containerized environment may not be easy and require some additional preps
- You may need to have a high-spec computer (or at least two mid-level machines connected to the same network) to have both instances running side by side.
After some consideration, the second approach seems to be reasonable to try so let’s give it a chance and conduct a PoC.
Proof of Concept: local XM Cloud with external content database
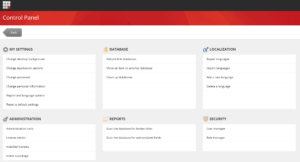
Utilize the second approach we’re going to try attaching the given external legacy database to XM Cloud running in a local containerized setup. That will allow using a built-in UI for mass-migrating the content between the databases (as pictured below) along with the Sitecore PowerShell script for finalizing and fine-tuning the migrated content.
Step 1: Ensurу SQL Server port is externally exposed
We are connecting the external SQL Server Management studio through a port of the SQL Server container that is exposed externally in order to make it possible. Luckily, that has been done for us already, just make sure docker-compose has:
    ports:
      - "14330:1433"
Step 2: Spin up an XM Cloud containers and confirm XM Cloud works fine for you
Nothing extraordinary here, as easy as running .\init.ps1 followed by .\up.ps1.
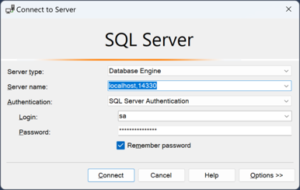
Step 3: Connect SQL Management Studio to SQL Server running in a container.
After you sound up containers, run SQL Management Studio and connect to SQL Server running in SQL container through an exposed port 14330, as we did at step 1:
Step 4: Restore the legacy database
If you have a Data-Tier “backpack” file you may want to do an extra step and convert it into a binary backup for that particular version used by XMCloud before restoring. This step is optional, but in case you want to restore the backup more than once (which is likely to happen), it would make sense to take a binary backup as soon as you restore the data-tier “backpack” first time ever. Data-tier backups process much slower than binaries, so that will definitely save time in the future.

Once connected, let’s enable contained database authentication. This step is mandatory, otherwise, that would not be possible to restore a database:
EXEC sys.sp_configure N'contained database authentication', N'1'
go
exec ('RECONFIGURE WITH OVERRIDE')
go
One more challenge ahead: when performing backup and restore operations, SQL Server shows up a path local to the server engine, and not the host machine. That means, our backup should exist “inside” of SQL container. Luckily, w have this also covered. Make sure docker-compose.override.yml contains:
  mssql:
    volumes:
      - type: bind
        source: .\docker\data\sql
        target: c:\data
That means, one can locate legacy database backups into .\docker\data\sql folder of a host machine and it will magically appear within C:\datafolder when using SQL Management Studio database backup restore tool which you can perform now.
Important! Restore legacy database using the “magic name” in a format Sitecore.<DB_NAME_SUFFIX>, further down below I will be using the value RR as DB_NAME_SUFFIX.
Once got restored database in SQL Server Management Studio under the name Sitecore.RR we need to plug this database to the system. There is a naming convention hidden from our eyes within CM containers.
Step 5: Configure connection strings
Unlike in XM/XP – there is no documented way to plug an external database. The way connection strings are mapped to the actual system is cumbersome, it uses some “magic” hidden within the container itself and obfuscated from our eyes. It only tool to reach it experimental way. Here are the steps to reproduce:
-
Add environmental variable to docker-compose record for CM:
Sitecore_ConnectionStrings_RR: Data Source=${SQL_SERVER};Initial Catalog=${SQL_DATABASE_PREFIX}.RR;User ID=${SQL_SA_LOGIN};Password=${SQL_SA_PASSWORD} -
Add new connection string record. To do so you’ll need to create a connection strings file within your customization project as .\src\platform\<SITENAME>\App_Config\ConnectionStrings.config with the content of the connection strings file from CM container with the addition of a new string:
<add name="rr" connectionString="user id=user;password=password;Data Source=(server);Database=Sitecore_RR" />
Please note the difference in the suffix format of both above records, that is totally fine. CM container still processes that correctly.
Step 6: Reinstantiating CM container
Simply restarting a CM container is not sufficient. You must remove it and re-create it, just killing/stopping is not sufficient.
For example, the below command will work for that purpose:
docker-compose restart cm
… not will this one:
docker-compose kill cm
The reason is that CM will not update environmental variables from docker-compose file upon restart. Do this instead:
docker-compose kill cm
docker-compose rm cm --force
docker-compose up cm -d
Step 7: Validating
-
Inspecting CM container for environmental variables will show you this new connection string, as added:
"Env": [ "Sitecore_ConnectionStrings_RR=Data Source=mssql;Initial Catalog=Sitecore.RR;User ID=sa;Password=6I7X5b0r2fbO2MQfwKH" - Inspecting connection string config (located at C:\inetpub\wwwroot\App_Config\ConnectionStrings.config on CM container) contains the newly added connection string.
Step 8: Register new database with XM Cloud
docker\deploy\platfo.rm\App_Config\Include\ZZZ\z.rr.config for test and later do not forget to include it in a platform customization project, so that it gets shipped with each deployment<?xml version="1.0" encoding="UTF-8"?> <configuration xmlns:patch="www.sitecore.net/.../"> <sitecore> <eventing defaultProvider="sitecore"> <eventQueueProvider> <eventQueue name="rr" patch:after="evertQueue[@name='web']" type="Sitecore.Data.Eventing.$(database)EventQueue, Sitecore.Kernel"> <param ref="dataApis/dataApi[@name='$(database)']" param1="$(name)" /> <param ref="PropertyStoreProvider/store[@name='$(name)']" /> </eventQueue> </eventQueueProvider> </eventing> <PropertyStoreProvider> <store name="rr" patch:after="store[@name='master']" prefix="rr" getValueWithoutPrefix="true" singleInstance="true" type="Sitecore.Data.Properties.$(database)PropertyStore, Sitecore.Kernel"> <param ref="dataApis/dataApi[@name='$(database)']" param1="$(name)" /> <param resolve="true" type="Sitecore.Abstractions.BaseEventManager, Sitecore.Kernel" /> <param resolve="true" type="Sitecore.Abstractions.BaseCacheManager, Sitecore.Kernel" /> </store> </PropertyStoreProvider> <databases> <database id="rr" patch:after="database[@id='master']" singleInstance="true" type="Sitecore.Data.DefaultDatabase, Sitecore.Kernel"> <param desc="name">$(id)</param> <icon>Images/database_master.png</icon> <securityEnabled>true</securityEnabled> <dataProviders hint="list:AddDataProvider"> <dataProvider ref="dataProviders/main" param1="$(id)"> <disableGroup>publishing</disableGroup> <prefetch hint="raw:AddPrefetch"> <sc.include file="/App_Config/Prefetch/Common.config" /> <sc.include file="/App_Config/Prefetch/Webdb.config" /> </prefetch> </dataProvider> </dataProviders> <!-- <proxiesEnabled>false</proxiesEnabled> --> <archives hint="raw:AddArchive"> <archive name="archive" /> <archive name="recyclebin" /> </archives> <cacheSizes hint="setting"> <data>100MB</data> <items>50MB</items> <paths>2500KB</paths> <itempaths>50MB</itempaths> <standardValues>2500KB</standardValues> </cacheSizes> </database> </databases> </sitecore> </configuration>
Step 9: Enabling Sitecore PowerShell Extension
Next, we’d want to enable PowerShell, if that is not yet done. You won’t be able to migrate the content using SPE without performing this step.
<?xml version="1.0" encoding="utf-8"?>
<configuration xmlns:patch="http://www.sitecore.net/xmlconfig/" xmlns:role="http://www.sitecore.net/xmlconfig/role/" xmlns:set="http://www.sitecore.net/xmlconfig/set/">
  <sitecore role:require="XMCloud">
    <powershell>
      <userAccountControl>
        <tokens><token name="Default"  elevationAction="Block"/>
              <token name="Console" expiration="00:55:00" elevationAction="Allow" patch:instead="*[@name='Console']"/>
              <token name="ISE" expiration="00:55:00" elevationAction="Allow" patch:instead="*[@name='ISE']"/>
              <token name="ItemSave" expiration="00:55:00" elevationAction="Allow" patch:instead="*[@name='ItemSave']"/>
            </tokens>
      </userAccountControl>
    </powershell>
  </sitecore>
</configuration>
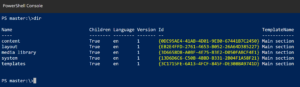
Include the above code into a platform customization project as .\docker\deploy\platform\App_Config\Include\ZZZ\z.SPE.config. If everything is done correctly, you can run SPE commands, as below:
The Result

Thank you for sharing good information.