
The official Adobe tutorial for setting up a local AEM development environment requests the reader to install Java JDK 11 for AEM 6.5 and above. It does not provide a download link for the Java JDK 11. If you were to do a quick Google search for “JDK 11 download,” you would be presented with a search results page containing links to Oracle.
Oracle Corporation acquired Sun Microsystems (the creators of the Java Programming Language) in 2010. In 2019, Oracle significantly changed its Java licensing model, impacting how businesses and developers could use Java. Oracle now requires payment for commercial use of Oracle JDK for updates and support.
Slightly lower on the Google search results page, you will see links to OpenLogic. OpenLogic offers free builds of JDK 11. OpenJDK is available free of charge and on an “as is” basis.
Installing OpenJDK
The simplest method I’ve found to install OpenJDK 11 is from this site: https://www.openlogic.com/openjdk-downloads.
From here, you are presented with a form where you select your Java version (11), operating system, architecture, and Java package (JDK). Select your preferred option, and the page will display a list of available Java versions. You can then choose to download either the installer for a quick and easy setup or a zip archive for manual installation. I recommend downloading and running the installer.
Another option is package managers. Package managers simplify OpenJDK installation across platforms. They’re especially efficient on Linux. macOS users can utilize Homebrew for easy installation and updates. Windows users now have Winget from Microsoft for managing applications like OpenJDK.
Links for installing OpenJDK via package managers:
- Installing Red Hat build of OpenJDK 11 on Red Hat Enterprise Linux: https://docs.redhat.com/en/documentation/red_hat_build_of_openjdk/11/html/installing_and_using_red_hat_build_of_openjdk_11_on_rhel/installing-openjdk11-on-rhel8#installing-openjdk11-on-rhel8
- How to Install Java on Ubuntu 24.04, Ubuntu 22.04, and Ubuntu 20.04:
https://www.tecmint.com/install-java-with-apt-on-ubuntu/
- Install Homebrew: https://brew.sh/
- Homebrew Formulae openjdk@11: https://formulae.brew.sh/formula/openjdk@11
- Use the Winget tool to install and manage applications: https://learn.microsoft.com/en-us/windows/package-manager/winget/
- Download and install OpenJDK 11 with Winget: https://winget.run/pkg/ojdkbuild/openjdk.11.jdk
Installing Maven
Installing Maven 3.9 requires a few additional steps.
Installing on MacOS
The Homebrew package manager is the best option for macOS users. Using the –ignore-dependencies flag is crucial to prevent it from installing a potentially conflicting version of OpenJDK.
brew install --ignore-dependencies maven
Once Maven has been installed, edit the Z Shell configuration file (.zshrc) to include the following directives (create the file if it doesn’t exist):
export JDK_HOME=$(/usr/libexec/java_home)

export JAVA_HOME=$(/usr/libexec/java_home)

export PATH=$PATH:${JAVA_HOME}/bin:/usr/local/bin
Open a new terminal window and verify Java and Maven are installed correctly:
java --version

mvn --version
If the output shows the location (path) and version information for both Java and Maven, congratulations! You’ve successfully installed them on your macOS system.
Installing on Linux
Download the Maven Binary Archive here: https://maven.apache.org/download.cgi.
Unpack the archive and move it to the /opt directory:
tar -zxvf apache-maven-3.9.8-bin.tar.gz

sudo mv apache-maven-3.9.8 /opt/apache-maven
Edit your shell configuration file and add the following directives:
export PATH=$PATH:/opt/apache-maven/bin
Open a new terminal window and verify Maven is installed correctly:
mvn --version
If the output shows the location (path) and version information for Maven, congratulations! You’ve successfully installed Maven on your Linux system.
Installing on Windows
Download the Maven Binary Archive here: https://maven.apache.org/download.cgi.
Run PowerShell as an administrator.
Unzip the Maven Binary Archive:
Expand-Archive .\apache-maven-3.9.8-bin.zip
Create an “Apache Maven” folder within Program Files:
New-Item 'C:\Program Files\Apache Maven' -ItemType Directory -ea 0
Move the extracted directory to the “Apache Maven” folder:
Move-Item -Path .\apache-maven-3.9.8-bin\apache-maven-3.9.8 -Destination 'C:\Program Files\Apache Maven\'
Add the Maven directory to the Path Environment Variables:
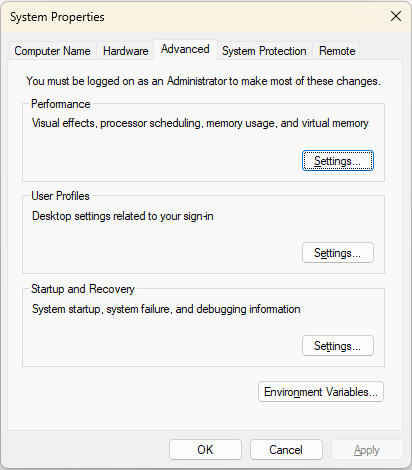
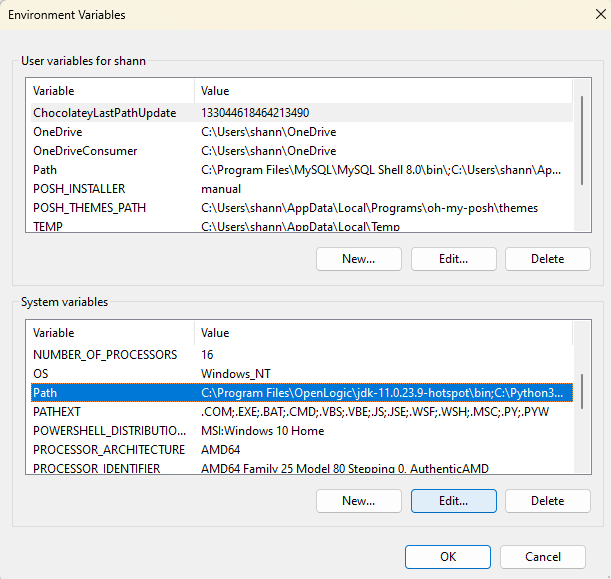
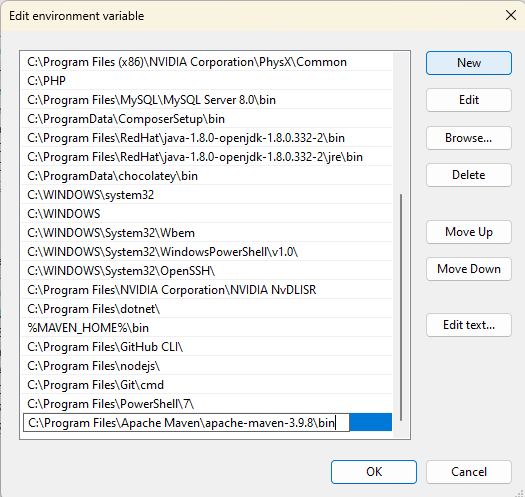
Click the “OK” button and open a new PowerShell Prompt to verify Maven is installed correctly:
mvn --version
If the output shows the location (path) and version information for Maven, congratulations! You’ve successfully installed Maven on Windows.
Additional Notes
Maven 3.9 will be the last version compatible with Adobe AEM 6.5. Future versions of Maven require JDK 17, which Adobe AEM does not yet support.
When using Java 11, Adobe recommends adding additional switches to your command line when starting AEM. See: https://experienceleague.adobe.com/en/docs/experience-manager-65/content/implementing/deploying/deploying/custom-standalone-install#java-considerations
Make sure to follow our Adobe blog for more Adobe solution tips and tricks!