Flutter is great framework for cross platform development. It allows you to make pixel perfect apps that are generated into native code, but what happens if you need to use existing code in iOS or Android directly? For situations like these, Flutter allows you to use platform channels.
Platform channels give you access to platform-specific APIs in a language that works directly with those APIs. Platform channels are available for Kotlin or Java on Android, Swift or Objective-C on iOS and macOS, C++ on Windows and C on Linux.
More information can be found on this here https://docs.flutter.dev/platform-integration/platform-channels
The platform APIs provided by Flutter work as intended, but the whole process is a bit cumbersome to set up. Pigeon allows us to use type safety and code generation to make this process a whole lot simpler.
Create a Pigeon Plugin
We will go ahead and create a simple example api.
Let’s start by creating a new plugin called pigeon_example
flutter create --org com.example --template=plugin --platforms=android,ios,linux,macos,windows -i swift pigeon_example
flutter pub add pigeon
flutter pub get
Platform Channel Types in Swift
Below is a list of supported types in Dart and their swift equivalents. We will use some of the most common types in our example
| Dart Types | Swift Types |
|---|---|
| null | nil |
| bool | NSNumber(value: Bool) |
| int | NSNumber(value: Int32) |
| int, if 32 bits not enough | NSNumber(value: Int) |
| double | NSNumber(value: Double) |
| String | String |
| Uint8List | FlutterStandardTypedData(bytes: Data) |
| Int32List | FlutterStandardTypedData(int32: Data) |
| Int64List | FlutterStandardTypedData(int64: Data) |
| Float32List | FlutterStandardTypedData(float32: Data) |
| Float64List | FlutterStandardTypedData(float64: Data) |
| List | Array |
| Map | Dictionary |
Define Our API
In order to let Pigeon know what methods we’re going to be exposing we define our API in an abstract Dart class with the @HostApi() decorator, and its methods
Let’s define our Pigeon Example API in a new directory named pigeons.
import 'package:pigeon/pigeon.dart';

@HostApi()

abstract class ExampleApi {
bool getBool();
String getString();
func toggleValue();
}
Generate Pigeon Platform Code
Now we can let the Pigeon package do it’s magic and we can generate some code
dart run pigeon \
--input pigeons/example_api.dart \
--dart_out lib/example_api.dart \
--experimental_swift_out ios/Classes/ExampleApi.swift \
--kotlin_out ./android/app/src/main/kotlin/com/example/ExampleApi.kt \
--java_package "io.flutter.plugins"
Be sure that the paths to all of the files are correct or the next steps won’t work. Generate the code with the output for the platforms needed. This is example is going to focus on using Swift.
Add Method Implementation to the Runner
Next we need to write our native implementation of our methods. When doing this we need to add our files to the runner in Xcode to ensure that they run properly.
class ExampleApiImpl : ExampleApi{
var value = true;

func getBool(){
return value;
}
func toggleValue(){
    value = !value
  }
func getString(){
return "THIS IS AN EXAMPLE";
}

}
Add Pigeon Platform Channel to AppDelegate
You will also need to add this code in your AppDelegate.swift file
@UIApplicationMain

@objc class AppDelegate: FlutterAppDelegate {

override func application(

_ application: UIApplication,

didFinishLaunchingWithOptions launchOptions: [UIApplication.LaunchOptionsKey: Any]?

) -> Bool {

GeneratedPluginRegistrant.register(with: self)

let exampleApi = ExampleApiImpl()

let controller : FlutterViewController = window?.rootViewController as! FlutterViewController

ExampleApiSetup.setUp(binaryMessenger: controller.binaryMessenger, api: exampleApi)


return super.application(application, didFinishLaunchingWithOptions: launchOptions)

}

}
Now you should be able to use your API in Dart code.
import 'package:flutter/material.dart';
import 'package:pigeon_example/example_api.dart';
import 'dart:async';

void main() {
  runApp(const MyApp());
}

class MyApp extends StatefulWidget {
  const MyApp({super.key});

  @override
  State<MyApp> createState() => _MyAppState();
}

class _MyAppState extends State<MyApp> {
  final exampleApi = ExampleApi();
  bool value = false;
  @override
  void initState() {
    super.initState();
    initPlatformState();
  }

  // Platform messages are asynchronous, so we initialize in an async method.
  Future<void> initPlatformState() async {
    // Platform messages may fail, so we use a try/catch PlatformException.
    // We also handle the message potentially returning null.
    // If the widget was removed from the tree while the asynchronous platform
    // message was in flight, we want to discard the reply rather than calling
    // setState to update our non-existent appearance.
    if (!mounted) return;
  }

  @override
  Widget build(BuildContext context) {
    return MaterialApp(
        home: Scaffold(
            appBar: AppBar(
              title: const Text('Plugin example app'),
            ),
            body:
                Column(mainAxisAlignment: MainAxisAlignment.center, children: [
              DefaultTextStyle(
                  style: Theme.of(context).textTheme.displayMedium!,
                  textAlign: TextAlign.center,
                  child: FutureBuilder<String>(
                    future: exampleApi
                        .getString(), // a previously-obtained Future<String> or null
                    builder:
                        (BuildContext context, AsyncSnapshot<String> snapshot) {
                      List<Widget> children = [];
                      if (snapshot.data!.isNotEmpty) {
                        children = <Widget>[
                          Text(snapshot.data ?? ''),
                        ];
                      }
                      return Center(
                        child: Column(
                          mainAxisAlignment: MainAxisAlignment.center,
                          children: children,
                        ),
                      );
                    },
                  )),
              Center(
                child: ElevatedButton(
                  child: const Text('Toggle Value'),
                  onPressed: () async {
                    await exampleApi.toggleValue();
                    var val = await exampleApi.getBool();
                    setState(() {
                      value = val;
                    });
                  },
                ),
              ),
              DefaultTextStyle(
                  style: Theme.of(context).textTheme.displayMedium!,
                  textAlign: TextAlign.center,
                  child: FutureBuilder<bool>(
                    future: exampleApi
                        .getBool(), // a previously-obtained Future<String> or null
                    builder:
                        (BuildContext context, AsyncSnapshot<bool> snapshot) {
                      List<Widget> children;
                      if (snapshot.data == true) {
                        children = <Widget>[
                          const Icon(
                            Icons.check_circle_outline,
                            color: Colors.green,
                            size: 60,
                          ),
                          Padding(
                            padding: const EdgeInsets.only(top: 16),
                            child: Text('Result: ${snapshot.data}'),
                          ),
                        ];
                      } else if (snapshot.data == false) {
                        children = <Widget>[
                          const Icon(
                            Icons.error_outline,
                            color: Colors.red,
                            size: 60,
                          ),
                          Padding(
                            padding: const EdgeInsets.only(top: 16),
                            child: Text('Result: ${snapshot.data}'),
                          ),
                        ];
                      } else {
                        children = const <Widget>[
                          SizedBox(
                            width: 60,
                            height: 60,
                            child: CircularProgressIndicator(),
                          ),
                          Padding(
                            padding: EdgeInsets.only(top: 16),
                            child: Text('Awaiting result...'),
                          ),
                        ];
                      }
                      return Center(
                        child: Column(
                          mainAxisAlignment: MainAxisAlignment.center,
                          children: children,
                        ),
                      );
                    },
                  ))
            ])));
  }
}
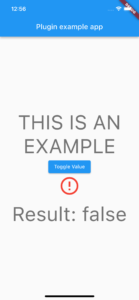
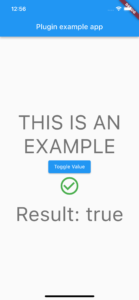
Now we can see the values from out example API in our Flutter UI. Button toggles will change our boolean value.
Pigeon simplifies the process of creating platform channels. It also speeds up the process when multiple channels are needed. This becomes very valuable when you need a package that doesn’t have an implementation in Flutter. It’s a bit tricky to set up the first time, but once your scripts are written, modifying existing channels and creating new ones is a breeze.
For more information about Perficient’s Mobile Solutions expertise, subscribe to our blog or contact our Mobile Solutions team today!