
In the realm of web automation, handling various scenarios like file upload, file download, and various Windows GUI operations can be challenging. AutoIt, a powerful scripting language and automation tool, seamlessly integrates with Selenium to tackle these challenges. This blog provides a detailed guide on installing and configuring AutoIT and demonstrates its usage with Selenium for file upload and file download.
What is AutoIT?
AutoIT is a scripting language primarily designed for automating the Windows graphical user interface (GUI) and general scripting. It provides a simple scripting language with powerful automation capabilities, making it ideal for automating repetitive tasks, interacting with GUI elements, and handling various Windows-based operations.

Below are some of the applications in Selenium and Testing:
- Handling Dialogs
- File Upload/ File Download
- GUI Testing
- Window Management
Installing AutoIT
- Download AutoIt: Visit the official AutoIT website https://www.autoitscript.com/site/autoit/downloads/ and download the AutoIT installer.
- Install AutoIt: Run the downloaded installer, select x86(default) while installing, also keep others as default. Ensure that you install both AutoIt and AutoIT Editor.
- After installation: SciTE(AutoIT editor) .exe file will be present at location “C:\Program Files (x86)\AutoIt3\SciTE” and Au3Info_x64 (Spy tool) at “C:\Program Files (x86)\AutoIt3”
Using AutoIT with Selenium: File Upload
For instance, we want to perform some test that involves uploading a file from the local system on the page. A Windows dialog box will open to select the file from the local system to upload, due to the limitation of Selenium, there is no direct method to interact with the Windows application dialog box. Here comes the role of AutoIt which helps to perform such types of actions.
How to Upload a File with AutoIT and Selenium
Follow the below steps to upload a file on a website or application from the local system:
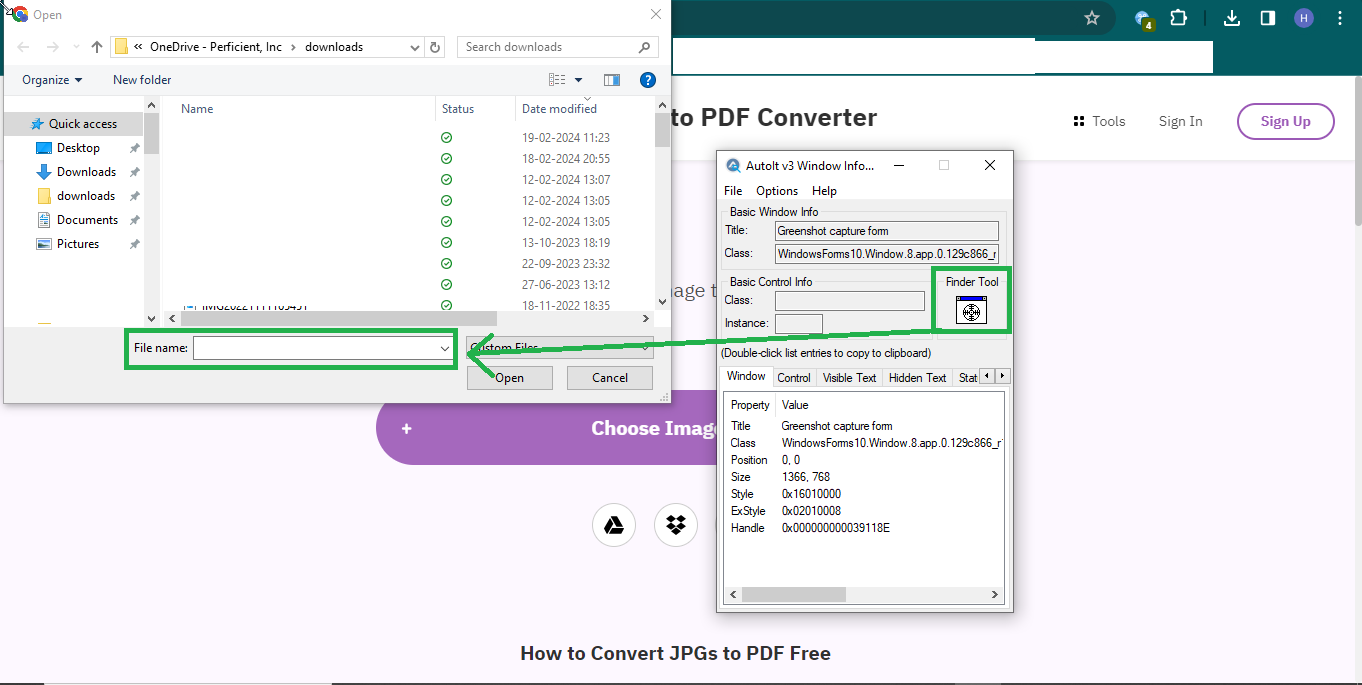
- Open Au3Info_x64 (Spy tool) and SciTE(AutoIT editor).
- Open the page where you want to upload a file; on clicking the upload button, the upload window dialog box opens.
- Using the spy tool, drag and drop the “FinderTool” icon on the “File Name” box.
- Note down the element’s Title and Control ID (Class+Instance) (File Name box).
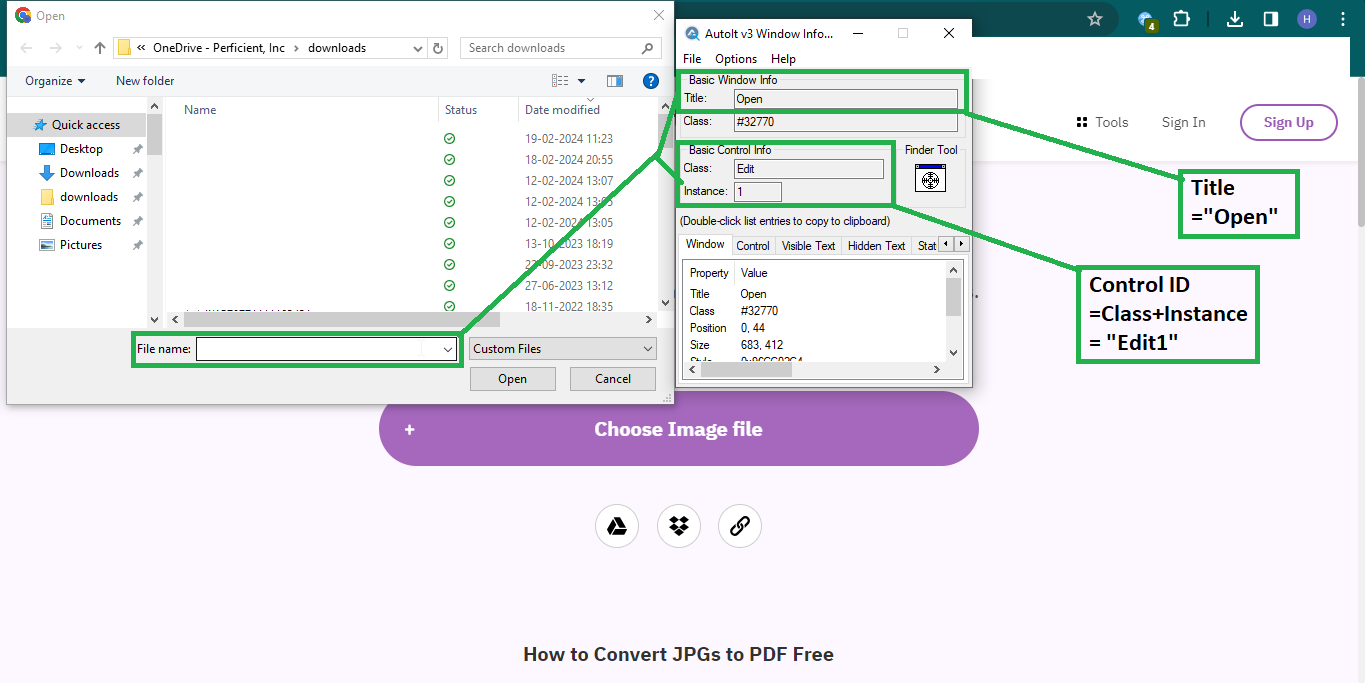
- Repeat the step for the next element i.e. “Open” Button and note down the title and Control ID.
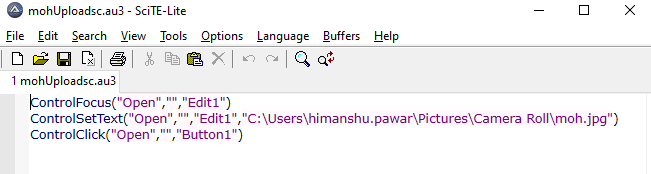
- Now, open the Editor, and we will write the script that defines the steps to perform. We are using the Control Commands here; we can also use Window commands. The below image shows the script:
- Syntax Explanation:
- ControlFocus(“Title”, “text(optional)”, “Control ID”): To focus on an element using the title and control id.
- ControlSetText(“Title”, “text(optional)”, “Control ID”, “new Text to enter”): To enter text in the selected element.
- ControlClick(“Title”, “text(optional)”, “Control ID”): To click on an element.
- You can refer to the documentation for more details: https://www.softwaretestinghelp.com/handle-windows-pop-up-in-selenium-using-autoit/
- Save the file with the ‘.au3’ extension > right-click the file and select Compile(x86) > ‘.exe’ file will be created.
- Now write the Selenium script to perform the test that requires the file upload action. We are navigating to the page > clicking the upload button > Running the AutoIt script .exe file to enter the path of the image and clicking on the open button. Below is the script:
public class FileUpload {public static voidmain(String[] args) throws InterruptedException, IOException {//chrom driver automaticallyWebDriverManager.chromedriver().setup();WebDriver driver = newChromeDriver();driver.manage().window().maximize();//Upload file//go to page and click on upload optionsdriver.get("https://www.TestPage.com/jpg-to-pdf");driver.findElement(By.cssSelector("a[class*='upload-btn'] span[class='btn-label']")).click();//Execute the .exe file using java methodsThread.sleep(3000);Runtime.getRuntime().exec("C:\\mohUploadsc.exe");}}public class FileUpload { public static void main(String[] args) throws InterruptedException, IOException { //chrom driver automatically WebDriverManager.chromedriver().setup(); WebDriver driver = new ChromeDriver(); driver.manage().window().maximize(); //Upload file //go to page and click on upload options driver.get("https://www.TestPage.com/jpg-to-pdf"); driver.findElement(By.cssSelector("a[class*='upload-btn'] span[class='btn-label']")).click(); //Execute the .exe file using java methods Thread.sleep(3000); Runtime.getRuntime().exec("C:\\mohUploadsc.exe"); } }
public class FileUpload { public static void main(String[] args) throws InterruptedException, IOException { //chrom driver automatically WebDriverManager.chromedriver().setup(); WebDriver driver = new ChromeDriver(); driver.manage().window().maximize(); //Upload file //go to page and click on upload options driver.get("https://www.TestPage.com/jpg-to-pdf"); driver.findElement(By.cssSelector("a[class*='upload-btn'] span[class='btn-label']")).click(); //Execute the .exe file using java methods Thread.sleep(3000); Runtime.getRuntime().exec("C:\\mohUploadsc.exe"); } } - Finally, run the script
We achieved the file upload operation with this integration of selenium and AutoIt.
Conclusion
AutoIT offers seamless integration with Selenium, enabling testers to easily handle complex scenarios like file upload/download, automating the Windows GUI, and general-purpose scripting. Following this guide can enhance your web automation capabilities and streamline your testing process. You can also find articles to read more about various applications of AutoIt in testing. Stay tuned for more insights on advanced web testing techniques! Happy Testing!