You may learn microservices in-depth from beginner to expert in this set of tutorials.
click here for previous blog: – Tutorial 01 – Microservices Architectural Design by using Spring Boot
Introduction: –
Netflix Eureka Server – To enable discovery and communication between microservices, it is necessary to register or publish the microservice with the R&D (Registrar and Discovery) server.
- Each R&D server is a Spring Boot project with dependencies on other R&D servers. No installation is required, unlike with Tomcat, Wildfly, and other programs.
- Registration activity is the process of storing/publishing microservice details in the R&D server.
- Discovery Operation is the process of finding/fetching microservice details from an R&D server in order to communicate with or interact with another microservice.
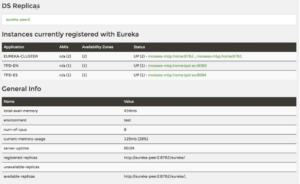
The details appear as follows when we publish several instances of various microservices to an R&D server like Eureka Server.
Diagram: – Eureka Server Internal Structure.
- Document-less servers, like Eureka Server, are known. To put it another way, the server does not contain any XML or JSON files.
- Every time, the Service ID (also known as the Service Name) is the Project name.
- Instance ID is the unique ID. For every instance one unique instance ID will be generate.
- When a single instance is present, we shall not supply the instance ID. Service ID is used as the instance ID in that case.
- During the registration and publication process, Eureka Server automatically detects the host name and port information.
Load Factor = Current Load / Max Load
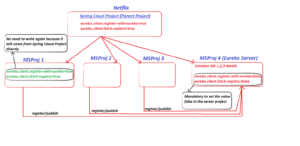
Diagram: – Eureka Server

Procedure to create Spring Boot project acting as Eureka Server
1: –
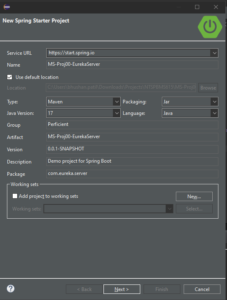
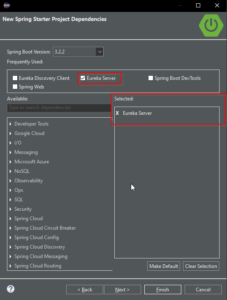
- Create Spring Boot Project adding Eureka Server as dependencies.
Note: – Do not add Spring Web Starter by mistake.


2: –
- Add @EnableEurekaServer on the top of Main class.
package com.eureka;

import org.springframework.boot.SpringApplication;
import org.springframework.boot.autoconfigure.SpringBootApplication;
import org.springframework.cloud.netflix.eureka.server.EnableEurekaServer;

@SpringBootApplication
@EnableEurekaServer
public class MsProj01EurekaServerApplication {

    public static void main(String[] args) {
        SpringApplication.run(MsProj01EurekaServerApplication.class, args);
    }

}
3: –
- Enter the following data in the application.properties that prevent the project from becoming a microservice and instead display it as an R&D server.
#Eureka Server port number
server.port=8761

#MS name
spring.application.name=MS-EurekaServer

eureka.client.fetch-registry=false       // Mandatory to make this project itself as
eureka.client.register-with-eureka=false // the Eureka Server and not as Rest API component.
- Default port number for Eureka Server 8761.
- The fetch-registry and register-with-eureka attributes have true as their default value.
Eureka Server Architecture
- Each microservice needs to be prepared in order to register with the Eureka Server. Due to the fact that Eureka Server itself cannot be registered with Eureka Server. For the “eureka.client.register-with-eureka” property, we must set the default value of “true” inherited from the Spring Cloud project to “false” in the Eureka Sever Project.
- While registering with the Eureka server, each microservice project should be kept prepared for communication and discovery. The default value of “true” for “eureka.client.fetch-registry” in the Spring Cloud Project must be changed to “false” in the Eureka Server Project since the Eureka Server project cannot be kept available for fetching or discovery.
The forthcoming tutorial will cover Eureka Server and Eureka Client development and publication.


