Insite is now Configured Commerce. In this blog, we will learn below points:
- Replacing an existing page in Spire
- Example of replacing an existing page
- Implementation in Local machine
- Replacing an existing widget in Spire
- Example of replacing an existing widget
- Implementation in Local machine
In this blog post, we will explore the process of replacing existing pages and widgets in Spire, a popular content management system. We will provide examples and step-by-step instructions for both page and widget replacements, along with details on implementing these changes on a local machine.
Replacing an Existing Page in Spire
Spire allows you to override an existing page in addition to giving predefined pages.
If a predefined page covers most of your use cases but must be modified to include additional use cases, replacing it is a viable approach.
If you add a new override version of a page while Spire is already running, you must restart Spire for the new page file to be included in the bundle. After that, the page file should make use of hot reloading.
Example of replacing an existing page
To override an existing page, perform the following steps:
- Figure out and note the location of the existing page you want to override.
- Create a directory at ~/Overrides/Pages within your blueprint directory (such as ~/blueprints/myCustomBlueprint).
- Create the directory structure that matches the existing page within that directory.
- Copy the page file with the same name as the page you want to replace. For example, CartPage.tsx.
- Modify this new.tsx file to fit your needs.
Implementation in Local Machine
In this example, we will override the signinpage page found at /modules/content-library/src/Widgets/Pages/SignInPage.tsx.
The Blueprint used for this example is located at /modules/blueprints/myCustomBlueprint. All the directory locations referenced will be relative to the /modules/blueprints/ myCustomBlueprint /src directory.
- Add the /Overrides/Pages directory within the Blueprint directory. This will store the override version of the SignInPage The /Pages portion matches the location of the existing page.
- Copy over the existing SignInPage.tsx page file into the /Overrides/Pages directory. Below is a screenshot of the example Blueprint directory structure.
- Before starting Spire, make a modification to the /Overrides/Pages/SignInPage.tsx widget file to make it easier to see that Spire is using the override version of the widget. Add the following property to the Page component: css={css` background: #e6f7ec; `}. This will change the background of the SignInPage component to a mint green color.
<Page css={css`
background: #e6f7ec;
`}
data-test-selector=”signIn”
>
<Zone contentId={id} zoneName=”Content” />
</Page>
- Start Spire.
- After Spire is up and running, browse to the SignInPage Below is a screen shot of what you may see on the SignInPage page.

Replacing an Existing Widget in Spire
In addition to providing pre-defined widgets, Spire lets you override existing widgets or create new, custom widgets.
Replacing an existing widget is a good solution if a pre-defined widget covers most of your use cases, but you need to modify it to cover new use cases.
Example of replacing an existing widget
To override an existing page, perform the following steps:
- Figure out and note the location of the existing widget you want to override.
- Create a directory at /Overrides/Widgetswithin your blueprint directory (such as /blueprints/example).
- Create the directory structure that matches the existing widget within that directory.
- Copy the page file with the same name as the page you want to replace.
- Modify this new .tsx file to fit your needs.
Implementation in Local Machine
In this example, we will override the PageTitle widget found at /modules/content-library/src/Widgets/Basic/PageTitle.tsx.
The Blueprint used for this example is located at /modules/blueprints/example. All the directory locations referenced will be relative to the
/modules/blueprints/example/src directory.
- Add the /Overrides/Widgets/Basicdirectory within the blueprint directory. This will store the override version of the PageTitle widget. The /Widgets/Basic portion matches the location of the existing widget.
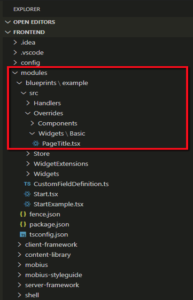
- Copy the existing PageTitle.tsx widget file into the /Overrides/Widgets/Basic directory. Below is a screenshot of the example blueprint directory structure.

- Before starting Spire, make a modification to the /Overrides/Widgets/Basic/PageTitle.tsx widget file to make it easier to see that Spire is using the override version of the widget.
Overwrite below code :
import { css } from “styled-components”;
const PageTitle: React.FunctionComponent<Props> = ({ pageTitle }) => (
<Typography variant=”h2″ as=”h1″ ellipsis css={css`
text-decoration: underline; `} >
🐶 {pageTitle}!!
</Typography>
- Start Spire.
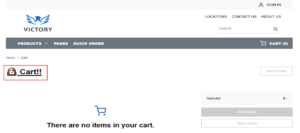
- Navigate to the Cart page after Spire is up and running. The PageTitle widget is used on this page.Cart – overriding version from example blueprint should now be the page title. The Cart page is seen in the screenshot below.

Conclusion:
Replacing existing pages and widgets in Spire can be accomplished by following a few straightforward steps. By using the provided examples and implementing these changes on a local machine, website administrators can efficiently update and customize their Spire-powered websites to meet their evolving needs.
For more information, contact our commerce experts today.


Really nice and informative blog Shashi, keep it up!
Thanks Mangesh!