
Introduction:
In this blog, we will explore how to build a RESTful API using Salesforce Apex and demonstrate how to interact with it using Postman. We will walk through the code of a sample Salesforce Apex class called “restResources” and explain each method’s purpose. Additionally, we will provide step-by-step instructions on how to test the API endpoints using Postman.
Prerequisites:
To follow along with this blog, you should have a basic understanding of Salesforce Apex, RESTful APIs, and have Postman installed on your machine.
Creating the Apex Class:
Let’s start by examining the Apex class, “restResources,” which serves as the RESTful resource endpoint. The class is annotated with @restResource(urlMapping = '/Account/*'), which defines the base URL for the API endpoints related to the “Account” object.
1. HTTP GET Request – doGet():
The doGet() method handles HTTP GET requests to retrieve account information based on the provided account ID. It extracts the account ID from the request URI and performs a SOQL query to fetch the account. The method then returns the account ID as a response.
@httpGet
global static string doGet(){
    RestRequest req = RestContext.request;
    string aId = req.requestURI.substring(req.requestURI.lastIndexof('/')+1);
    account ac = [select id from account where Id = :aId];
    return 'Account Id Is: '+ac.id;
}
2. HTTP POST Request – doPost(name, phone):
The doPost() method handles HTTP POST requests to create a new account. It expects two parameters: “name” and “phone,” which represent the account’s name and phone number, respectively. Inside the method, it creates a new Account object, sets the name and phone values, and inserts it into the Salesforce database. Finally, it returns a success message along with the newly created account’s ID.
@httpPost
global static string doPost(string name, string phone){
    account ac = new account();
    ac.name = name;
    ac.phone = phone;
    insert ac;
    return 'Account Inserted Successfully: '+ac.id;
}
3. HTTP PUT Request – doPut(name):

The doPut() method handles HTTP PUT requests to update an existing account. It extracts the account ID from the request URI and performs a SOQL query to retrieve the account. It then updates the account’s name with the provided “name” parameter and performs an update operation. The method returns the account ID as a response.
@httpput
global static string doPut(string name){
    RestRequest req = RestContext.request;
    string aid = req.requestURI.substring(req.requestURI.lastindexof('/')+1);
    account ac = [select id from account where id = :aid];
    ac.Name = name;
    update ac;
    return ac.id;
}
4. HTTP DELETE Request – doDelete():
The doDelete() method handles HTTP DELETE requests to delete an existing account. Similar to the previous methods, it extracts the account ID from the request URI, retrieves the account using a SOQL query, and deletes it from the Salesforce database. The method returns a success message along with the deleted account’s ID.
@httpDelete
global static string doDelete(){
    RestRequest req = restContext.request;
    string aid = req.requestURI.substring(req.requestURI.lastindexof('/')+1);
    account ac = [select id from account where id = :aid];
    Delete ac;
    return 'Account deleted Successfully '+ac.id;
}
Testing the API Endpoints using Postman:
Now that we understand the Apex class, let’s test the API endpoints using Postman.
1. Launch Postman:
Open Postman on your machine. If you haven’t installed it yet, you can download it from the official website.
2. Set the Base URL:
Set the base URL for your requests as ‘https://your-salesforce-instance-url/services/apexrest/Account/’ Replace ‘your-salesforce-instance-url’ with the appropriate URL for your Salesforce instance.
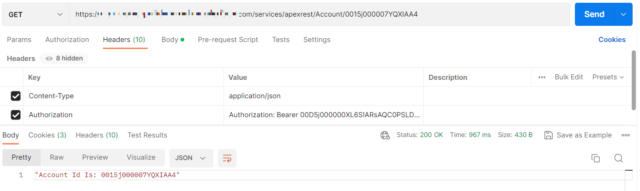
3. HTTP GET Request:
To test the GET request, append an account ID to the base URL and send a GET request to retrieve the account information. For example, if the account ID is “001XXXXXXXXXXXX”, the URL would be ‘https://your-salesforce-instance-url/services/apexrest/Account/001XXXXXXXXXXXX’. Execute the request and observe the response, which should include the account ID.
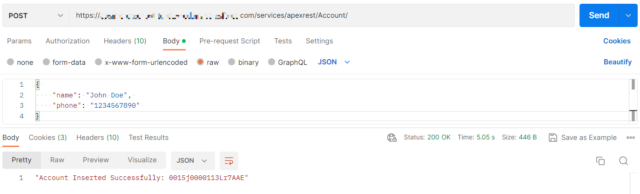
4. HTTP POST Request:
Create a new POST request and set the URL to the base URL. In the request body, provide the account’s name and phone number as JSON data. For example:
{
  "name": "John Doe",
  "phone": "1234567890"
}
Send the request and examine the response, which should include a success message along with the newly created account’s ID.
5. HTTP PUT Request:
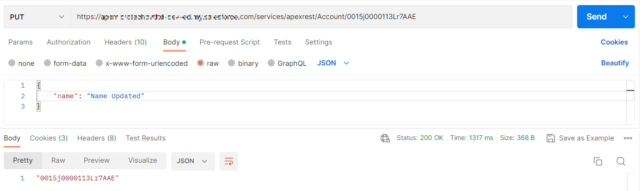
To test the PUT request, append an existing account ID to the base URL and send a PUT request. Include the updated account name in the request body as JSON data. For example, if the account ID is “001XXXXXXXXXXXX” and the new name is “Updated Account”, the URL would be ‘https://your-salesforce-instance-url/services/apexrest/Account/001XXXXXXXXXXXX’. In the request body:
{
"name": "Updated Account"
}
Execute the request and check the response, which should include the updated account’s ID.
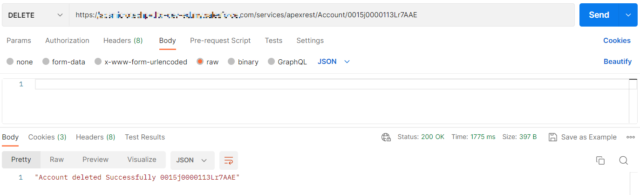
6. HTTP DELETE Request:
For the DELETE request, append the account ID you wish to delete to the base URL and send a DELETE request. For example, if the account ID is “001XXXXXXXXXXXX”, the URL would be ‘https://your-salesforce-instance-url/services/apexrest/Account/001XXXXXXXXXXXX’. Execute the request and verify the response, which should include a success message along with the deleted account’s ID.
Conclusion:
In this blog post, we explored how to build a RESTful API using Salesforce Apex. We discussed the purpose of each method in the “restResources” class and provided step-by-step instructions on how to test the API endpoints using Postman. By following these guidelines, you can create and interact with RESTful APIs in Salesforce Apex effectively.