
Let’s Begin!!! The creation of your Matillion ETL Journey
There are two ways to create matillion instance.
- Matillion Account
- Snowflake Partner Connect
First, create a Matillion Free Trail account on Matillion Hub here. (Note: Matillion account required organization domain ID. It will not allow a free domain ID like gmail.com or yahoo.com).
Matillion will send you a confirmation email on your organization id after successful account creation. You need to make sure your organization is added properly to your account as shown below in the image.
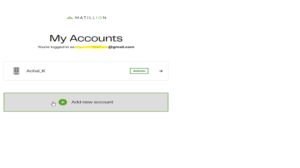
If not added, you can add your organization with the “Add new account” button as shown in the image above.
Once you have added your organization and click on Admin, you will need to select a service as shown below.
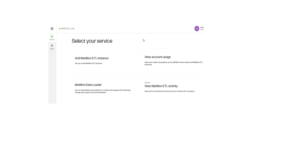
Select the “Add Matillion ETL instance” option for creating a new instance.
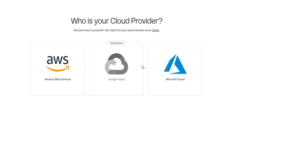
On the next page, you will need to select the appropriate cloud provider as per your requirement option (AWS and Azure). Please note: GCP is currently not supported, as shown below.
 For now, let’s go with the AWS option as a cloud provider, next you will need to choose your cloud data platform.
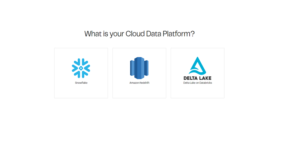
In this instance we are going to select Snowflake as the data platform. Then, you will need to choose the launching method of your Matillion as per your AWS service. You will receive two options, as shown below. I will recommend that you use the first option, which is the Cloud formation Template.
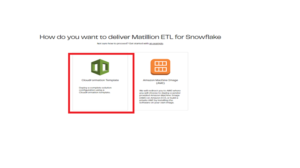
Option 1 – CloudFormation Template
There are several prerequisites you will need to define in the next couple pages.
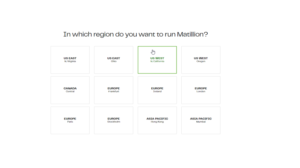
First, let’s select the region in which you want to host an instance.
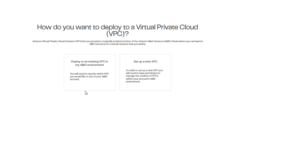
 Next, select VPC for your instance to launch AWS resources in a virtual network that you define.
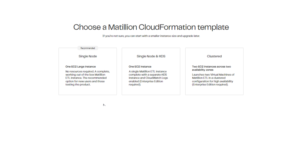
The next page will allow you to select CloudFormation Template and choose the template accordingly as per your requirement.
You will then be redirected to the AWS console page where you will need to log in with your AWS credentials.
Once logged into AWS, you will be asked to create a stack for your template, please provide details as required to create a stack.

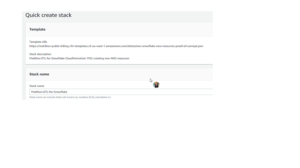
After which it will create a stack and will launch your Matillion instance with the selected region and VPC as shown in below images. Ensure that the stack status is Create_Complete.
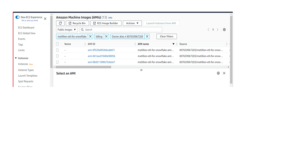
Option 2 – Amazon Machine Image (AMI)
If you select the AMI option to launch your instance, it will redirect you to the AWS console page where you will need to log in with your AWS credentials.
After logging into your AWS account, you will get a list of AMIs for the Matillion ETL tool, you just need to select one AMI for the launching instance.
 After successfully creating an instance (whether by AMI or CloudFormation Template), you are done with the Mtillion ETL tool creation and now will need to access that tool over the internet as a SaaS platform.
Accessing Matillion ETL Tool
For accessing the Matillion tool you need to make sure that your created instance is up and running continuously. You will require an instance Public IP to load the Matillion ETL Tool login page on your browser.
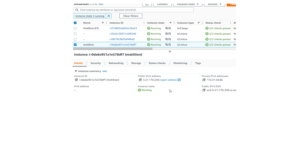
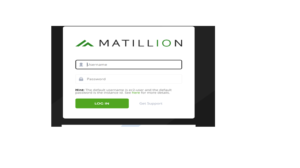
Use the copy to clipboard option and paste the public IP on any browser. You will get a Matillion Tool login page asking for a Username and Password. The Username will be ec2-user. Password will be the instance id as shown in the above image.
Please make sure you use the copy-to-clipboard option to avoid failed login attempts. Below image showing the login page of Matillion ETL Tool.
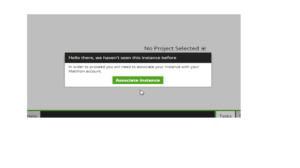
Once logged in into the Matillion ETL tool console you will get a pop-up window, to associate your instance. Click on Associate Instance tab.
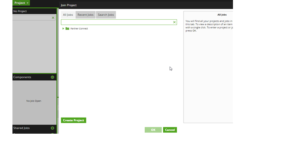
Then you will get a pop-up window, use Create Project Button to create a new project. You will get windows with 4 stages required for the project.
Fill in the required details.
The next stage is AWS connection, the environment name and AWS credentials are required to proceed.
The next stage is setting up the Snowflake Connection, you will require a Snowflake account. If you don’t have an account, please create a 30-day free trial account here.
The last stage is setting up Snowflake Defaults Environment, which means the snowflake default data warehouse setting. If Snowflake is connected successfully, you will get your default warehouse options in the drop-down list automatically.
Click on Finish and your project will be created. Now, you can work on Matillion ETL for data transformation using Orchestration Jobs and Transform Jobs.
- Snowflake Partner Connect
Additionally, Snowflake allows us to set up a matillion account. We can create an account using the partner connect feature that Snowflake offers.
Once you have created your snowflake account, sign in with your credentials and you will redirect to snowflake dashboard.
You will see a dropdown menu after selecting Admin from the panel.
From there, choose Partner connect.
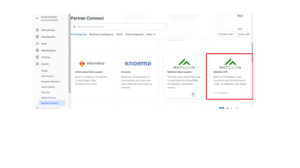
Next you will need to select Matillion ETL as shown in below image and click on Connect button.
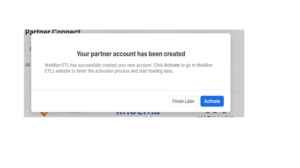
Click on Activate.
You will redirect to matillion log in page asking for a Username and Password. Your username and password will be sent to you through email. Login with credentials and you are ready to create a project on matillion.
Summary
- I have provided a step-by-step guide for creating a Matiliion account.
- Please share your thoughts and suggestions in the space below, and I’ll do my best to respond to all of them as time allows.
- Refer to the official Matillion documentation here if you want to learn more.
Keep Learning!!!!!
Very informative blog Achal…thanks for sharing 🙂