
Welcome back for the final post in my series on DevOps Best Practices related to Sitecore Headless implementations. In Part 3 we are going to look at the continuous deployment of our Sitecore and Next.js applications following a zero downtime model. If you haven’t checked out Part 1 and/or Part 2, I would recommend pausing here and doing so as we will continue to build off the foundation laid in those parts.
Prerequisites
The processes covered in the post assume the following:
- Vanilla Sitecore has been deployed in a PaaS configuration.
- Service connections with Azure subscriptions have been created. I recommend a different service connection for each environment following the least privilege principle.
- You have Sitecore and Next.js solutions that can be complied with Azure Pipelines.
Vercel Overview
I have mentioned Vercel several times in the earlier posts, but we haven’t specifically talked about it so let’s do a quick overview. Vercel is a platform for front-end frameworks and static sites, built to integrate with your headless content, commerce, or database. They are a Sitecore Technology Partner as well as the creators of Next.js making them a great fit for the implementation used during this series. They support a wide range of frameworks so even if you are not using Next.js, Vercel and the processes described in this post can still be used in your implementation. Currently they don’t have an integration with Azure Repos so I will be highlighting how to use the Vercel CLI to perform some of the built-in actions that you would get if you used one of the existing Git integrations.
To get started with Vercel, you first need to create a project by running the vercel command described here in the frontend directory (see Part 1 for repository configuration). When the new project is created, the CLI will automatically detect the framework being used.
While we are talking about Vercel, let’s go ahead and create an access token that we will use to authenticate our CLI commands. You can find the steps to create the token here.
Preparation for Zero Downtime

At this point, we have our vanilla Sitecore site running on Azure PaaS, an empty project created in Vercel, working Sitecore and Next.js solutions, and a continuous integration process in place. Before we build the continuous delivery releases, we need to configure the resources to support zero downtime.
In our zero downtime deployment model, we are going to use deployment slots on our CD App Service and the concept of preview deployments in Vercel. I won’t be covering the creation of the deployment slot, but you can find more info here. I will refer to the slots as production and staging to keep in line with Microsoft verbiage. Once the staging slot has been created for the CD App Service, here are a few key configurations/decisions I want to point out.
- Move connection string values up to the App Service level.
- This makes the system more secure and allows for easier management.
- Our staging slot will only be running during a deployment. All other times it will be stopped.
- We will have two web databases: permanent production one used by CM and CD and a copy created during the release to be used only by the CD staging slot.
- Note: We are using Content Hub for management of media assets which keeps the web database at a reasonable size for the copy approach. If your web database is too big for this, you could also have a permeant secondary web database and configure replication.
- We need to know the state of the environment.
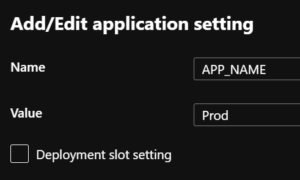
- Knowing the state allows us to track which version of the application is running in each slot. This can be done by adding an application setting, APP_NAME, to each CD slot. Values should correspond to each slot’s role which is our case will be Prod and Staging. This setting should not be a deployment slot setting.
- Knowing the state allows us to track which version of the application is running in each slot. This can be done by adding an application setting, APP_NAME, to each CD slot. Values should correspond to each slot’s role which is our case will be Prod and Staging. This setting should not be a deployment slot setting.
- To effectively use the Vercel preview deployments, it is recommended to have a custom domain specifically for the preview. By default, Vercel will assign a random domain to preview deployments, but we don’t want to look up this value for each deployment.
- We’ll look at how to use the CLI to assign the preview domain to deployments later. You can read more about adding custom domains to a Vercel project here.
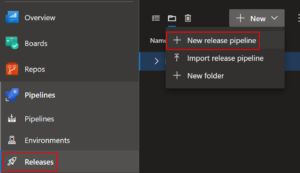
Create Release Pipeline
Now that our prep work is done, we can create our release pipeline. I have seen implementations use build pipelines written in YAML for their releases so they could be source controlled but I prefer to use release pipelines for the ease of management, approvals, and automation.
I like to have two release pipelines, one used for deploying to the development environment and one for all upper environments. Having a dedicated pipeline for the development environment helps us enable the team to work at high velocity because rules and schedules can be defined specifically with development in mind. Also, it keeps the pipeline for the upper environments from being cluttered with releases that may have unstable work. The pipeline for the upper environments has a single stage for each environment and each stage is made up of multiple jobs (both agent and agentless) and the jobs are made up of tasks and tasks groups.
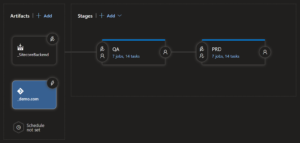
Before we look at the logic of a stage, we need to add artifacts for our pipeline to consume. Since we have two applications, we will have two artifacts. The first one is the output of our Sitecore build pipeline referenced in Part 2. It has the web deploy packages and serialized items to be deployed to our Azure App Services. The second is a reference to the repository that will be used by the Vercel CLI tasks.
When we execute the release pipeline, we will create a release which holds a specific version of our artifacts. The creation of releases can be automated via a trigger or a schedule to fit your teams cadence, read more about them here.
Create Tasks and Task Groups
After the pipeline has been created, we can start building out the tasks to be performed during a release. Since the tasks for different environments will largely be the same, we can encapsulate the tasks into task groups to centralize their management and allow for reuse. I won’t cover all the details of creating task groups, you can read more about them here, but there are a few points I want to call out:
- Task groups are created from existing tasks.
- Parameters of tasks to be included in a group should be defined as variables.

- When a task group is referenced in a pipeline and you make a change to task group definition, that change will be reflected in all references which will keep your implementation consistent.
For the sake of brevity, I won’t detail the configuration of each individual job, task, and task group, but I have included a summary of the order with descriptions and some key scripts.
- Agent Job: CM and CD Slot Deploy
- Task Group: CM Deployment
- Remove Unicorn Files: Inline Azure PowerShell to empty the Unicorn folder on the CM because we don’t want any items lingering around that are no longer included in our artifacts.
$ResGroupName = "$(RES_GROUP_NAME)"$WebAppName = "$(CM_WEBAPP_NAME)"# Get publishing profile for web application$WebApp = Get-AzWebApp -Name $WebAppName -ResourceGroupName $ResGroupName$publishingProfile = Get-AzWebAppPublishingProfile -WebApp $WebApp# Create Base64 authorization header$username = $publishingProfile.publishData.publishProfile[0].userName$password = $publishingProfile.publishData.publishProfile[0].userPWD$base64AuthInfo = [Convert]::ToBase64String([Text.Encoding]::ASCII.GetBytes(("{0}:{1}" -f $username,$password)))$bodyToPOST = @{command = "find . -mindepth 1 -delete"dir = "/home/site/wwwroot/App_Data/Unicorn"}# Splat all parameters together in $param$param = @{# command REST API urlUri = "https://$WebAppName.scm.azurewebsites.net/api/command"Headers = @{Authorization=("Basic {0}" -f $base64AuthInfo)}Method = "POST"Body = (ConvertTo-Json$bodyToPOST)ContentType = "application/json"}# Invoke REST callInvoke-RestMethod @param$ResGroupName = "$(RES_GROUP_NAME)" $WebAppName = "$(CM_WEBAPP_NAME)" # Get publishing profile for web application $WebApp = Get-AzWebApp -Name $WebAppName -ResourceGroupName $ResGroupName $publishingProfile = Get-AzWebAppPublishingProfile -WebApp $WebApp # Create Base64 authorization header $username = $publishingProfile.publishData.publishProfile[0].userName $password = $publishingProfile.publishData.publishProfile[0].userPWD $base64AuthInfo = [Convert]::ToBase64String([Text.Encoding]::ASCII.GetBytes(("{0}:{1}" -f $username,$password))) $bodyToPOST = @{ command = "find . -mindepth 1 -delete" dir = "/home/site/wwwroot/App_Data/Unicorn" } # Splat all parameters together in $param $param = @{ # command REST API url Uri = "https://$WebAppName.scm.azurewebsites.net/api/command" Headers = @{Authorization=("Basic {0}" -f $base64AuthInfo)} Method = "POST" Body = (ConvertTo-Json $bodyToPOST) ContentType = "application/json" } # Invoke REST call Invoke-RestMethod @param$ResGroupName = "$(RES_GROUP_NAME)" $WebAppName = "$(CM_WEBAPP_NAME)" # Get publishing profile for web application $WebApp = Get-AzWebApp -Name $WebAppName -ResourceGroupName $ResGroupName $publishingProfile = Get-AzWebAppPublishingProfile -WebApp $WebApp # Create Base64 authorization header $username = $publishingProfile.publishData.publishProfile[0].userName $password = $publishingProfile.publishData.publishProfile[0].userPWD $base64AuthInfo = [Convert]::ToBase64String([Text.Encoding]::ASCII.GetBytes(("{0}:{1}" -f $username,$password))) $bodyToPOST = @{ command = "find . -mindepth 1 -delete" dir = "/home/site/wwwroot/App_Data/Unicorn" } # Splat all parameters together in $param $param = @{ # command REST API url Uri = "https://$WebAppName.scm.azurewebsites.net/api/command" Headers = @{Authorization=("Basic {0}" -f $base64AuthInfo)} Method = "POST" Body = (ConvertTo-Json $bodyToPOST) ContentType = "application/json" } # Invoke REST call Invoke-RestMethod @param
- Remove Unicorn Files: Inline Azure PowerShell to empty the Unicorn folder on the CM because we don’t want any items lingering around that are no longer included in our artifacts.
- Rest Environment State: Inline Azure PowerShell to check the APP_NAME setting for the CD slots and for the existence of a duplicate web database. Should always start and end with Production in the Production slot and with only one web database.
$app=Get-AzWebApp -ResourceGroupName "$(RES_GROUP_NAME)" -Name "$(CD_WEBAPP_NAME)"$appSettings=$app.SiteConfig.AppSettingsforeach($appSettingin$appSettings){if($appSetting.Name -eq 'APP_NAME'){if($appSetting.Value -eq 'Staging'){Switch-AzWebAppSlot -SourceSlotName "staging" -DestinationSlotName "Production" -ResourceGroupName "$(RES_GROUP_NAME)" -Name "$(CD_WEBAPP_NAME)"}}}$webdeploydb=Get-AzSqlDatabase -ResourceGroupName "$(RES_GROUP_NAME)" -ServerName "$(SQL_SERVER)" -DatabaseName "$(WEB_DB_NAME)_deploy" -ErrorAction SilentlyContinueif($webdeploydb){Remove-AzSqlDatabase -ResourceGroupName "$(RES_GROUP_NAME)" -ServerName "$(SQL_SERVER)" -DatabaseName "$(WEB_DB_NAME)_deploy"}else{continue}$app=Get-AzWebApp -ResourceGroupName "$(RES_GROUP_NAME)" -Name "$(CD_WEBAPP_NAME)" $appSettings=$app.SiteConfig.AppSettings foreach ($appSetting in $appSettings){ if($appSetting.Name -eq 'APP_NAME'){ if($appSetting.Value -eq 'Staging'){ Switch-AzWebAppSlot -SourceSlotName "staging" -DestinationSlotName "Production" -ResourceGroupName "$(RES_GROUP_NAME)" -Name "$(CD_WEBAPP_NAME)" } } } $webdeploydb=Get-AzSqlDatabase -ResourceGroupName "$(RES_GROUP_NAME)" -ServerName "$(SQL_SERVER)" -DatabaseName "$(WEB_DB_NAME)_deploy" -ErrorAction SilentlyContinue if ($webdeploydb){ Remove-AzSqlDatabase -ResourceGroupName "$(RES_GROUP_NAME)" -ServerName "$(SQL_SERVER)" -DatabaseName "$(WEB_DB_NAME)_deploy" } else{ continue }$app=Get-AzWebApp -ResourceGroupName "$(RES_GROUP_NAME)" -Name "$(CD_WEBAPP_NAME)" $appSettings=$app.SiteConfig.AppSettings foreach ($appSetting in $appSettings){ if($appSetting.Name -eq 'APP_NAME'){ if($appSetting.Value -eq 'Staging'){ Switch-AzWebAppSlot -SourceSlotName "staging" -DestinationSlotName "Production" -ResourceGroupName "$(RES_GROUP_NAME)" -Name "$(CD_WEBAPP_NAME)" } } } $webdeploydb=Get-AzSqlDatabase -ResourceGroupName "$(RES_GROUP_NAME)" -ServerName "$(SQL_SERVER)" -DatabaseName "$(WEB_DB_NAME)_deploy" -ErrorAction SilentlyContinue if ($webdeploydb){ Remove-AzSqlDatabase -ResourceGroupName "$(RES_GROUP_NAME)" -ServerName "$(SQL_SERVER)" -DatabaseName "$(WEB_DB_NAME)_deploy" } else{ continue } - Azure App Service deploy CM specific packages
- Copy Web Database: Inline Azure PowerShell
New-AzSqlDatabaseCopy -ResourceGroupName "$(RES_GROUP_NAME)" -ServerName "$(SQL_SERVER)" -DatabaseName "$(WEB_DB_NAME)" -CopyResourceGroupName "$(RES_GROUP_NAME)" -CopyServerName "$(SQL_SERVER)" -CopyDatabaseName "$(WEB_DB_NAME)_deploy"New-AzSqlDatabaseCopy -ResourceGroupName "$(RES_GROUP_NAME)" -ServerName "$(SQL_SERVER)" -DatabaseName "$(WEB_DB_NAME)" -CopyResourceGroupName "$(RES_GROUP_NAME)" -CopyServerName "$(SQL_SERVER)" -CopyDatabaseName "$(WEB_DB_NAME)_deploy"New-AzSqlDatabaseCopy -ResourceGroupName "$(RES_GROUP_NAME)" -ServerName "$(SQL_SERVER)" -DatabaseName "$(WEB_DB_NAME)" -CopyResourceGroupName "$(RES_GROUP_NAME)" -CopyServerName "$(SQL_SERVER)" -CopyDatabaseName "$(WEB_DB_NAME)_deploy"
- Task Group: CD Slot Start/Swap
- Azure App Service management task to start the CD staging slot.
- Azure App Service management task to swap the CD slots.
- Task Group: Unicorn Sync
- Inline Powershell
$ErrorActionPreference = 'Stop'Import-Module $(System.DefaultWorkingDirectory)/_SitecoreBackend/BackendOutput/Unicorn.psm1# SYNC ALL CONFIGURATIONSSync-Unicorn -ControlPanelUrl '$(UNICORN_HOSTNAME)/unicorn.aspx' -SharedSecret '$(UNICORN_SECRET)'$ErrorActionPreference = 'Stop' Import-Module $(System.DefaultWorkingDirectory)/_SitecoreBackend/BackendOutput/Unicorn.psm1 # SYNC ALL CONFIGURATIONS Sync-Unicorn -ControlPanelUrl '$(UNICORN_HOSTNAME)/unicorn.aspx' -SharedSecret '$(UNICORN_SECRET)'
$ErrorActionPreference = 'Stop'
Import-Module $(System.DefaultWorkingDirectory)/_SitecoreBackend/BackendOutput/Unicorn.psm1

# SYNC ALL CONFIGURATIONS
Sync-Unicorn -ControlPanelUrl '$(UNICORN_HOSTNAME)/unicorn.aspx' -SharedSecret '$(UNICORN_SECRET)'
- Inline Powershell
- Task Group: CD Slot Deployment
- Azure App Service deploy CD specific packages to staging slot.
- Task Group: CM Deployment
- Agent Job: Vercel Preview Deploy
- Inline Bash script: Note on line 14 where I am capturing the output of the vercel command. This value will be the randomly assigned domain which I can then load into a variable to be used in the alias command. This will assign our custom domain to the preview deployment so the team can check changes in a known location.
[[ -d .vercel ]] || mkdir mkdir .vercelecho write .vercel/project.json fileecho \{\"orgId\":\"${VERCEL_TEAM}\"\,\"projectId\":\"${VERCEL_PROJECT}\"\} > .vercel/project.jsonecho .vercel/project.json contentcat .vercel/project.jsonecho run npm install -g vercelnpm install -g vercelecho run vercelvercel --confirm --debug --token $(VERCEL_TOKEN) > .vercel/deployment_url.txtecho set variabledeployment_url=$(cat .vercel/deployment_url.txt)echo run aliasecho $deployment_urlvercel alias set $deployment_url staging.demo.com --token $(VERCEL_TOKEN) --scope my-team --debug[[ -d .vercel ]] || mkdir mkdir .vercel echo write .vercel/project.json file echo \{\"orgId\":\"${VERCEL_TEAM}\"\,\"projectId\":\"${VERCEL_PROJECT}\"\} > .vercel/project.json echo .vercel/project.json content cat .vercel/project.json echo run npm install -g vercel npm install -g vercel echo run vercel vercel --confirm --debug --token $(VERCEL_TOKEN) > .vercel/deployment_url.txt echo set variable deployment_url=$(cat .vercel/deployment_url.txt) echo run alias echo $deployment_url vercel alias set $deployment_url staging.demo.com --token $(VERCEL_TOKEN) --scope my-team --debug
[[ -d .vercel ]] || mkdir mkdir .vercel

echo write .vercel/project.json file
echo \{\"orgId\":\"${VERCEL_TEAM}\"\,\"projectId\":\"${VERCEL_PROJECT}\"\} > .vercel/project.json

echo .vercel/project.json content
cat .vercel/project.json

echo run npm install -g vercel
npm install -g vercel

echo run vercel
vercel --confirm --debug --token $(VERCEL_TOKEN) > .vercel/deployment_url.txt

echo set variable
deployment_url=$(cat .vercel/deployment_url.txt)

echo run alias
echo $deployment_url
vercel alias set $deployment_url staging.demo.com --token $(VERCEL_TOKEN) --scope my-team --debug
- Inline Bash script: Note on line 14 where I am capturing the output of the vercel command. This value will be the randomly assigned domain which I can then load into a variable to be used in the alias command. This will assign our custom domain to the preview deployment so the team can check changes in a known location.
- Agentless Job: Confirm Staging
- Manual Intervention: List domains where users can preview latest deployment and assign users that must approve before moving to next job.
- Agent Job: CD Slot Swap to Production
- Task Group: CD Slot Swap
- Azure App Service management task to swap the CD slots
- Task Group: CD Slot Swap
- Agent Job: Vercel Production Deploy
- Task Group: Vercel Production Deploy
- Inline Bash script: Last line calls vercel with the –prod flag which will trigger the production deployment.
[[ -d .vercel ]] || mkdir mkdir .vercelecho write .vercel/project.json fileecho \{\"orgId\":\"${VERCEL_TEAM}\"\,\"projectId\":\"${VERCEL_PROJECT}\"\} > .vercel/project.jsonecho .vercel/project.json contentcat .vercel/project.jsonecho run npm install -g vercelnpm install -g vercelecho run vercel --scope my-team ls demo-comvercel --token $(VERCEL_TOKEN) --scope my-team ls demo-comecho run vercel --prodvercel --prod --token $(VERCEL_TOKEN)[[ -d .vercel ]] || mkdir mkdir .vercel echo write .vercel/project.json file echo \{\"orgId\":\"${VERCEL_TEAM}\"\,\"projectId\":\"${VERCEL_PROJECT}\"\} > .vercel/project.json echo .vercel/project.json content cat .vercel/project.json echo run npm install -g vercel npm install -g vercel echo run vercel --scope my-team ls demo-com vercel --token $(VERCEL_TOKEN) --scope my-team ls demo-com echo run vercel --prod vercel --prod --token $(VERCEL_TOKEN)
[[ -d .vercel ]] || mkdir mkdir .vercel

echo write .vercel/project.json file
echo \{\"orgId\":\"${VERCEL_TEAM}\"\,\"projectId\":\"${VERCEL_PROJECT}\"\} > .vercel/project.json

echo .vercel/project.json content
cat .vercel/project.json

echo run npm install -g vercel
npm install -g vercel

echo run vercel --scope my-team ls demo-com
vercel --token $(VERCEL_TOKEN) --scope my-team ls demo-com

echo run vercel --prod
vercel --prod --token $(VERCEL_TOKEN)
- Inline Bash script: Last line calls vercel with the –prod flag which will trigger the production deployment.
- Task Group: Vercel Production Deploy
- Agentless Job: Production Sign-off
- Manual Intervention: At this point the latest version of each application is live. If everything is stable, step can be approved to move to final job.
- Agent Job: Sync CD Slot
- Task Group: Sync CD App Service
- Azure App Service deploy CD specific packages to staging slot.
- Azure App Service management task to stop the CD staging slot.
- Remove Web Database Copy: Inline Azure PowerShell
Remove-AzSqlDatabase -ResourceGroupName "$(RES_GROUP_NAME)" -ServerName "$(SQL_SERVER)" -DatabaseName "$(WEB_DB_NAME)_deploy"Remove-AzSqlDatabase -ResourceGroupName "$(RES_GROUP_NAME)" -ServerName "$(SQL_SERVER)" -DatabaseName "$(WEB_DB_NAME)_deploy"
Remove-AzSqlDatabase -ResourceGroupName "$(RES_GROUP_NAME)" -ServerName "$(SQL_SERVER)" -DatabaseName "$(WEB_DB_NAME)_deploy"
- Task Group: Sync CD App Service
Summary
So, there we have it. A complete CI/CD process for a Sitecore Headless implementation on Azure PaaS with Next.js/Vercel that allows for fast, regular deployments with no downtime and minimal manual intervention. If you have any questions or thoughts, post a comment below.
Thank you for sharing the Sitecore Headless DevOps Best Practices. It is useful content for everyone. It is a good article. Keep sharing.