
When investigating a database, I actually prefer using PowerQuery over raw SQL for a couple reasons:
-
PowerQuery displays result sets that are much easier to look at than the a typical SQL plaintext result set.
-
It’s easy to immediately interact with PowerQuery result sets by using the graphical user interface.
-
Most importantly, you write PowerQuery queries one step at a time and can therefore easily sanity check a query as you write it. (It’s tedious to do so in raw SQL).
If you frequently use SQL to investigate databases, I highly recommend that you try out PowerQuery.
To try PowerQuery out on some test data, just create an Excel Table*, then select any cell within that Table, go to the Data tab at the top of the screen, and click “From Table/Range”. (* To create an Excel Table: enter some random data into a rectangular range of cells, then select any cell within that range, go to the Insert tab at the top of the screen, and click “Table”).
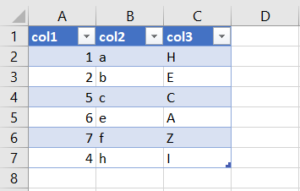
Here’s what happens if I have the following Excel Table:

The Future of Big Data
With some guidance, you can craft a data platform that is right for your organization’s needs and gets the most return from your data capital.
After I select a cell from the above table, and click “From Table/Range”, the PowerQuery editor pops up:
We can see that PowerQuery has represented my Excel Table as a query. We can also see the graphical user interface that allows us to interactively add steps to said query.
PowerQuery equivalents to SQL constructs
It’s instructive to think about how we can accomplish various SQL constructs within PowerQuery.
-
To do the equivalent of a
selectstatement, and select a subset of columns from the result set, we would click on the “Choose Columns” button (visible above). -
To do a
select distinct, we use “Choose Columns” to execute the desiredselect, and then, in the following result set, select all columns, right click, and select “Remove Duplicates”. -
Accomplishing the equivalent of a
whereclause- selecting the subset of rows from the result set for which a certain condition is true- is a bit hacky in general. (We describe how to do this later). In the case when the condition only involves one column, though, we can do everything in a non-hacky way. If we want to filter the above result set for withcol1 = 1, we would click the downwards arrow inside thecol1header, and use either the “Number Filters” option or the checkbox next to “1” in the following menu: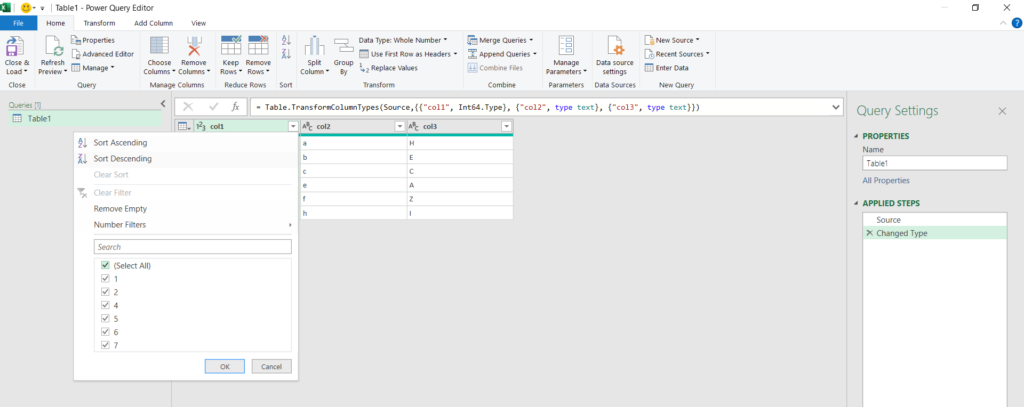
-
To do a
group by, we go to the Transform tab at the top of the screen, and click “Group By”. -
To do a
join(whetherinner,left,right,full outer, etc.), we click “Merge Queries” from within the Home tab. To do aunion, we click “Append Queries” from within the Home Tab.-
To increase encapsulation, one can use the “Merge Queries as New” or “Append Queries as New” options to produce a table that is the result of
joining orunioning two existing tables.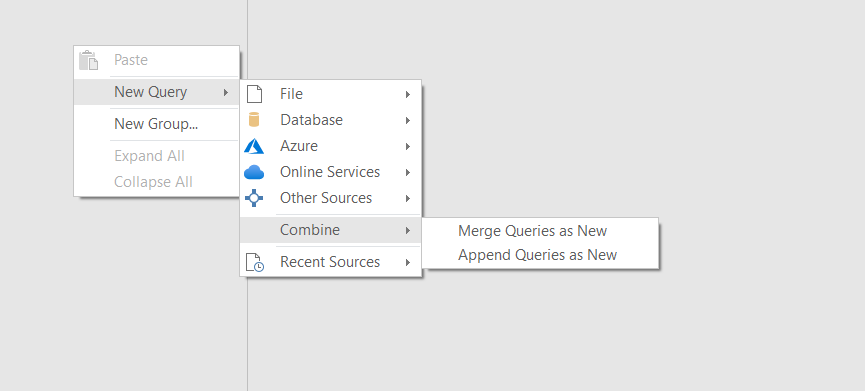
-
General where clauses
Above, we noted that accomplishing a where clause that involves more than one column is a bit hacky. We describe how to write such a where clause here. It’s really not that bad: first, just click the downwards arrow inside any column’s header, and filter for anything you like. I’ve done so, and filtered the above data for rows with col1 = 1:
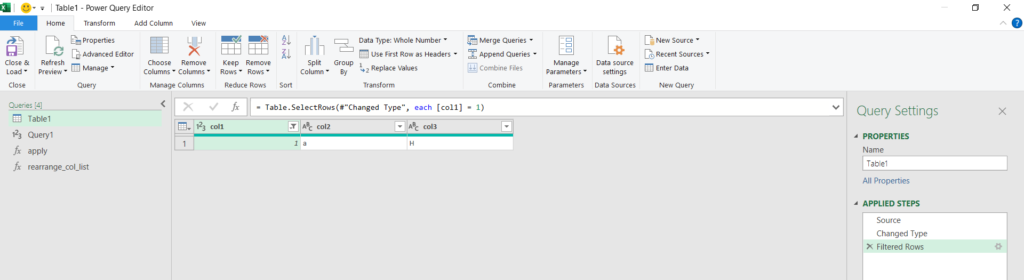
Notice the code that appears in the bar that runs horizontally over the top the table:
= Table.SelectRows(#"Changed Type", each [col1] = 1)
This code provides a more low-level description of what the “Filtered Rows” step of the query is doing. You can probably guess how we accomplish a general filter (one that involves columns other than col1). If we wanted to change the filtering condition to, say, col1 = 1 or col2 = "b", then what we do is edit said code to be
= Table.SelectRows(#"Changed Type", each [col1] = 1 or [col2] = "b")
It works! We get
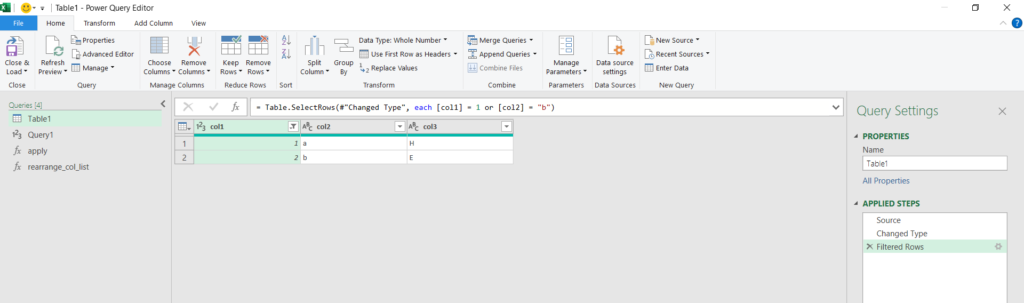
In general, any column of the table can be referenced in an “each statement” such as the above by enclosing the column name in square brackets. Soon, we’ll learn more about what this square bracket notation actually means, and why it must come after the keyword each