Sometimes the out of the box dropdown field types in Sitecore do not provide the functionality you need. Maybe you want to pull options from an external data source. Perhaps you want to alter how options appear to the Content Author but store a different value as the raw value. You may even want to have a dropdown with selectable options based off field values already selected on the same item. This blog post will show you how you can make these scenarios possible in Sitecore with a custom-implemented dropdown field type.
End Goal – Create custom dropdown like below

The end goal is to create a dropdown that provides custom options to choose from. The options hide the real value that will be stored in the field. For example, selecting Key1 in the screenshot above will store Value1 as the Raw Value as seen below:

This allows Content Authors to select from easier-to-read options while getting important data needed by the developer stored.
Step 1 – Write your custom logic to create dropdown options
namespace Foundation.Controls
{
    public class MyCustomDropdown : Sitecore.Web.UI.HtmlControls.Control
    {
        protected override void DoRender(System.Web.UI.HtmlTextWriter output)
        {
            var keyValuePairs = new List<KeyValuePair<string, string>>
            {
                new KeyValuePair<string, string>("Key1", "Value1"),
                new KeyValuePair<string, string>("Key2", "Value2"),
                new KeyValuePair<string, string>("Key3", "Value3"),
                new KeyValuePair<string, string>("Key4", "Value4"),
                new KeyValuePair<string, string>("Key5", "Value5"),
            };

            output.Write("<select" + ControlAttributes + ">");

            foreach (var keyValuePair in keyValuePairs)
            {
                if (keyValuePair.Value == Value)
                {
                    output.Write($"<option value=\"{keyValuePair.Value}\" selected=\"selected\">{keyValuePair.Key}</option>");
                }
                else
                {
                    output.Write($"<option value=\"{keyValuePair.Value}\">{keyValuePair.Key}</option>");
                }
            }

            output.Write("</select>");
        }

        protected override bool LoadPostData(string value)
        {
            if (value == null)
                return false;
            if (this.GetViewStateString("Value") != value)
                Sitecore.Context.ClientPage.Modified = true;
            this.SetViewStateString("Value", value);
            return true;
        }
    }
}
You will need to create a class that inherits from Sitecore’s Control class. From that class, you will need to override two methods: the DoRender() method and the LoadPostData() methods.
The LoadPostData() implementation above ensures that the selected option is stored upon saving changes.
The DoRender() method is where you will construct the selectable options for the Content Authors. In my example above, I created a list of Key Value Pairs with custom values. This is where you can create whatever you need. You create the data you want to present to the Content Author. I recommend creating Key Value Pairs because it makes maintaining the list much easier. Plus, it makes it possible for you to just copy the rest of my code above that actually writes the <select> to Sitecore. The end result here is to write out a <select> HTML element containing <option> HTML elements.
In my example above, I wanted to store a different value than what is presented to the Content Author. The value property set on the <option> element is what is actually stored when an option is selected. If you want the value stored to match the literal string presented to the Content Author, then make the value property match the string outputted (represented by keyValuePair.Key above).
You will notice that I made use of two variables that were inherited from the Control class: ControlAttributes and Value. ControlAttributes contains various information like what Javascript click events to perform when clicking on the field. This allows the dropdown to open. The Value variable contains the selected value the Content Author selected. When writing out your options, you will need to indicate which value has been previously selected by adding the selected property on the <option> element that is selected.
If you want to know what item this dropdown field is being interacted on, you can retrieve what item you are on through the ControlAttributes variable. Use the code below to do so:
var myRegex = new Regex(@"\{(.*?)\}");
var myCurrentItem = Sitecore.Context.ContentDatabase.GetItem(new ID(myRegex.Match(ControlAttributes).Value));
This can be useful because you may want to manipulate available options in your custom dropdown based on other selected values on the same item.
Step 2 – Patch in your new implementation
You will need to make Sitecore aware of where it can find new Control implementations in your solution.
<configuration xmlns:patch="http://www.sitecore.net/xmlconfig/">
  <sitecore>
    <controlSources>
      <source mode="on" namespace="Foundation.Controls" assembly="Foundation.Controls" prefix="blogsample"/></controlSources>
  </sitecore>
</configuration>
You will need to specify the namespace and assembly of where your custom implementation lives. You will also need to specify a prefix. You will want to be good with naming this prefix, so it can be reused to designate which custom controls you made.
Step 3 – Create custom field Sitecore item in Core
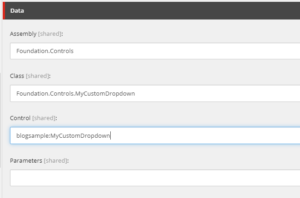
In the Content Editor in the Core database, navigate to /sitecore/system/Field types/List Types. In that folder, insert a new item based on the /sitecore/templates/System/Templates/Template field type. What you name this item will be the name that is shown when selecting a field type for a new field. You will then need to populate the fields on this item based on where you implemented your custom Control implementation. For my example, this looks like the below:

Conclusion
That’s all you have to do to set up a custom dropdown field in Sitecore! There are many different ways you can take advantage of this to present different data to your Content Authors. Drop a comment if you have any questions on how this all works!

