
This article explains the steps needed to set up Solr Cloud collections for your Sitecore environment using SearchStax. Assuming you already have Solr Cloud Manager Environment set in SearchStax, follow the below steps to set up the Solr Cloud environment.
1. Upload Solr Configurations
- The first step is to get the compatible Solr schema and config package per your Sitecore version. Here is the Sitecore and Solr compatible table link: https://kb.sitecore.net/articles/227897
- Zookeeper includes standard command-line script zkcli.sh to manage your zookeeper environment. You can download it from this GitHub repo https://github.com/searchstax/searchstax-client that includes various Solr versions.
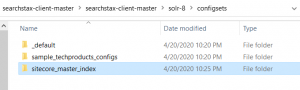
- The next step is to create configsets for each Solr config and upload it to the cloud. In order to do that navigate to configsets folder and create config sets folder with the name of the Solr index you wish to create. See here:
- Once the folders are created upload each collection conf folder to your zookeeper environment. For that, use the appropriate script per your environment. Navigate to \searchstax-client-master\solr-version\scripts, and execute one of the below scripts.
- Linux (Bash):
- $ ./zkcli.sh -zkhost <zookeeper URL> -cmd upconfig -confdir <Solr configuration> -confname <configuration name>
- Windows Command Prompt (DOS):
- $ zkcli.bat -zkhost <zookeeper URL> -cmd upconfig -confdir <Solr configuration> -confname <configuration name>
- Windows PowerShell:
- > .\zkcli.bat -zkhost <zookeeper URL> -cmd upconfig -confdir <Solr configuration> -confname <configuration name>
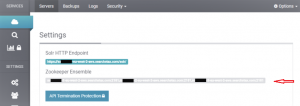
- You can find the zookeeper URL by visiting your SearchStax Cloud manager, and click on the Server. See here:
- Linux (Bash):
- Solr Configuration is the path to your Solr configuration directory where you have created config sets. i.e. ./zkcli.bat -zkhost <zookeeper URL>/ -cmd upconfig -confdir ../configsets/sitecore_master_index/conf -confname sitecore_master_index
2. Create Solr Collections
- Visit your Solr URL in the browser, and add collection with appropriate Solr Config Set, numShards, replication Factor.


- Config set: This will be config sets you have uploaded using zkcli.sh or zkcli.bat scripts.
- numShards: This represents the logical partition of the collection. Solr Sharding is used in splitting Solr index into multiple parts.
- replication Factor: This represents replica of your Solr collection node.
3. Upload Solr Managed Schema and Reindex
- Login to your Sitecore instance, and go to Index Manager page.
- Click on Populate Solr Managed Schema, and on the dialogue box select all indexes.

- Click Populate.
- Go to Index Manager, reindex all Solr indexes.
That’s all!
You now have your Solr environment set up in SearchStax. In the next article I will explain how to set up SwitchOnRebuild Indexes in the Solr cloud for your Sitecore instance. Stay tuned!