The purpose of this blog is to educate OneStream Software customers and consultants in the art of building dashboards. This blog provides a basic example of how to create a cube view based dashboard. This type of dashboard allows end-users the flexibility to select new drivers/variables on the fly with the click of a button. In order to create this dashboard, the following steps need to be completed. There are objects, called “Dashboard Components” that need to be constructed and compiled to develop an operational cube view based dashboard. Think of the process as a small puzzle in which you need to create each piece before putting it together.
See the link below for a dashboard starter kit with templates for parameters, buttons, combo boxes and dashboards. To follow along with the exercise, load the starter kit into the application using the Application -> Load/Extract feature.
Parameters
There are multiple parameter types, and each one accomplishes a different goal. Think of a parameter as a variable that the user selects or can be predefined by the developer based on certain actions by the user. For the purpose of a basic cube view dashboard, focus on the following three parameter types:
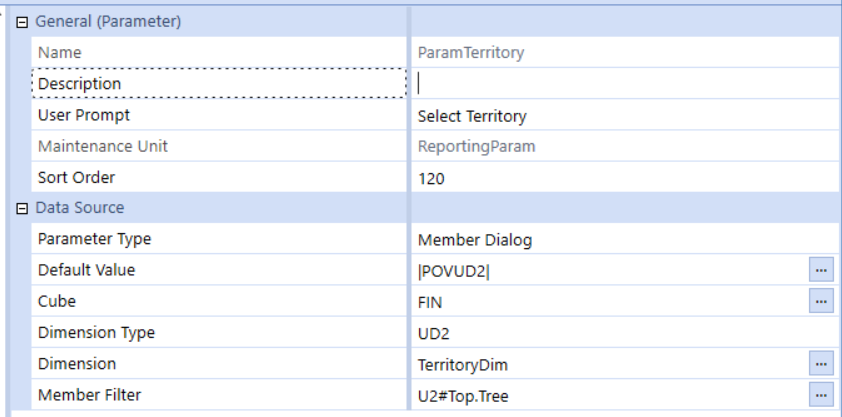
- Member Dialogue: Presents users with a window that allows them to select members based upon member filter defined in the parameter set up. If you want users to click an in-dashboard button and another window appears allowing them to select members, use this type of parameter.
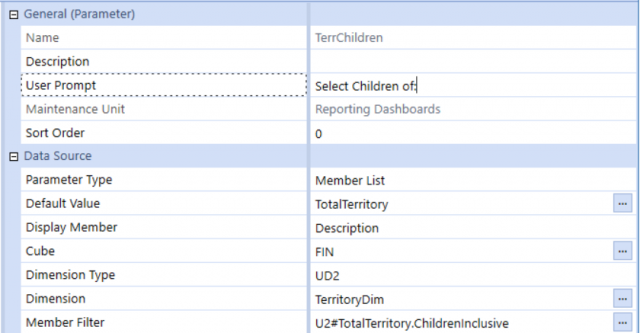
- Member List: Presents users with a flat drop-down list of members based upon member filter defined in the parameter set up. Think of this like data validation circles in excel. If you want to provide users with a drop-down list in a dashboard, create this component.
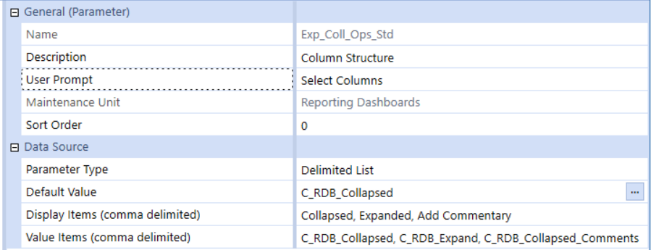
- Delimited List: It also presents users with a flat drop down, but rather than using a member filter, the parameter is defined by a delimited list created by the developer. This is useful in creating drop-downs that allow users to change the columns of a cube view within a dashboard.

Button Components
These components are created to allow users to click a button and be presented with a window to select members from a hierarchy. Button components are driven by Member Dialogue type parameters. So in order to create a button component, you will first need to create a Member Dialogue type parameter.
- Create member dialogue type parameter (see above Parameters Section)
- Navigate to Reporting Dashboards -> Components -> Button
- Select btn_TEMPLATE and click the “Copy Selected Component” button.
- Name the component with the prefix “btn_”
- You will then need to update the following fields to correlate to the member dialogue parameter you created:
- Text: XFMemberProperty(DimType=UD2, Member=|!ParamTerritory!|, Property=Description)
- Select Member: Make the following same as the Member Dialogue parameter you set up:
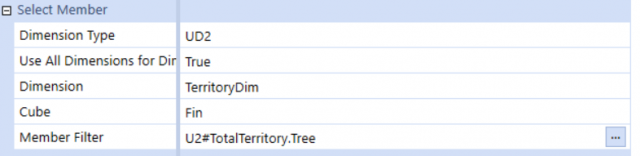
- Bound Parameter: Make this the same as the parameter you created, If you created a parameter called “MyParam”, Type “MyParam”
- Dashboards to Redraw: Once you create your dashboards, you will enter the names of the content & toolbar dashboards where this button will be used.
Combo Box Components
These components are created to provide users a drop-down list of members/values. Combo Box components are driven by Member List or Delimited List type parameters. So in order to create a Combo Box component, you will first need to create a Member List or Delimited List type parameter.
- Create member list or delimited list type parameter (see above Parameters Section)
- Navigate to Reporting Dashboards -> Components -> Combo Box
- Select cbx_TEMPLATE and click the “Copy Selected Component” button.
- Name the component with the prefix “cbx_”
- You will then need to update the following fields to correlate to the member list / delimited list parameter you created:
- Text: Selected Territory:
- Bound Parameter: Make this the same as the parameter you created, If you created a parameter called “MyParam”, Type “MyParam”
- Dashboards to Redraw: Once you create your dashboards, you will enter the names of the content & toolbar dashboards where this button will be used.
Cube View Components
In order to utilize a cube view within a dashboard, a Cube View Component must be created.
- Navigate to Reporting Dashboards -> Components -> Cube View
- Click “Create New Dashboard Component”.
- Select Cube View
- Enter the name of the desired cube view into the highlighted field below

Dashboard Objects
Now that we have created a button and/or combo box objects, we can begin building dashboard objects. The “dashboard” and end-user views are actually the product of multiple Dashboard Objects. To create a simple dashboard, three dashboard objects need to be created. To create a dashboard object, first create a dashboard group by clicking ![]() . Next, you will create the dashboard object by clicking.
. Next, you will create the dashboard object by clicking.
- Toolbar Dashboard Object: A toolbar dashboard object is used to hold the button(s) and/or combo box(s) created earlier.
- Follow the steps above to create a dashboard and name the object with the prefix “1_Toolbar_”
- Make the dashboard type “Horizontal Stack Panel”
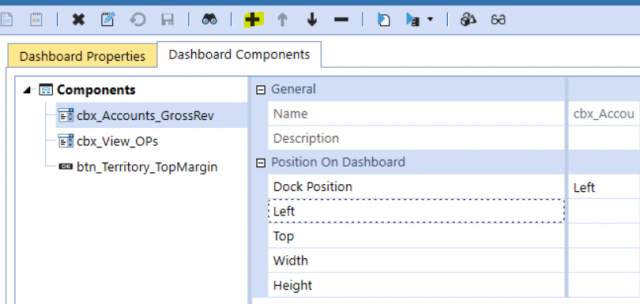
- Click on the second tab within the dashboard titled “Dashboard Components”
- Use the highlighted “+” sign seen below to add/remove components
- Add the button/combo box components created
- Content Dashboard: The content dashboard is used to hold the cube view component created earlier.
- Follow the steps above to create a dashboard and name the object with the prefix “2_Content_”
- Make the dashboard type “Uniform”
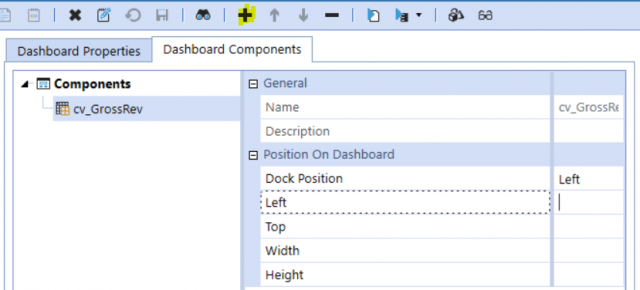
- Click on the second tab within the dashboard titled “Dashboard Components”
- Use the highlighted “+” sign seen below to add/remove components
- Add the cube view component created
- Frame Dashboard: The frame dashboard is used to hold the “Embedded Dashboard” Components. Each time a dashboard object is created, an embedded dashboard component is created automatically. These embedded dashboard components are used to put the dashboard objects created into a “Frame” type dashboard.
- Follow the steps above to create a dashboard and name the object with the prefix “0_Frame_”
- Make the dashboard type “Dock”. The Dock type dashboard allows the developer to assign what percentage of the screen each embedded dashboard takes up.
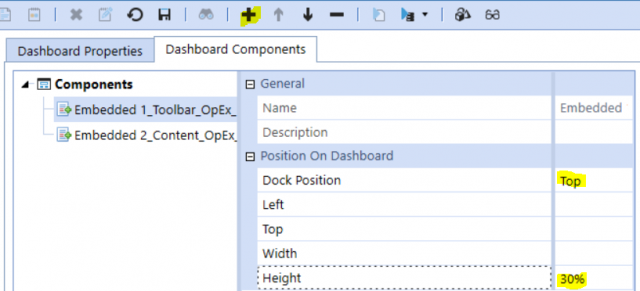
- Click on the second tab within the dashboard titled “Dashboard Components”
- Use the highlighted “+” sign seen below to add/remove components
- Add the Embedded dashboard components & Assign Dock Position / Height. For the Toolbar, select “Top” for dock position & “30%” for Height. For the Content, Select “Bottom” for dock position & “70%” for height.
Dashboard Profiles
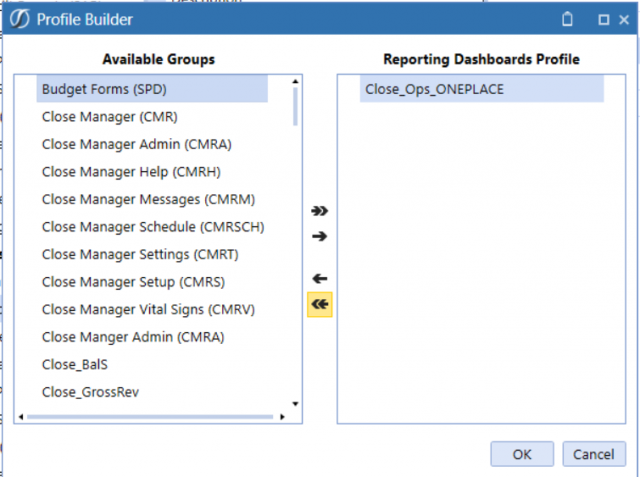
In order for users to see dashboards within the OnePlace tab, Dashboard Groups must be assigned to Dashboard Profiles. To avoid users seeing the different dashboard objects created, create a new dashboard group. Inside of this group create a new dashboard of type “Uniform”. Attach the Embedded “Frame” dashboard. Now there is a clean dashboard group with only one dashboard inside for users to view. To attach it to a profile, walk through the following steps (If you would like to attach to an already existing profile, jump to step 2)
- Click the create dashboard profile button

- Name the dashboard and define security
- Click the “Manage Profile Members” button

- Add the created dashboard group.