Hello and welcome back to part 2 of “The Ins and Outs of Guest Access in Teams” blog series. It’s been a little over a month from the first blog post so let me just bring you up to speed on what we discussed in the first blog. Last time, we discussed what Guest Access was and its limitations. This time, we’ll dig into guest access by discussing where guest access will need to be configured as well as what you’ll need to know to plan for guest access in your organization.
How do I start using guest access?
Since Microsoft Teams is just a wrapper for different Microsoft 365 services, it is important to understand how guest access fits into the mix. One of the most important things to understand with guest access is that Microsoft Teams leverages several services like Azure AD, Office 365 Groups, SharePoint/OneDrive, and of course Teams to allow guest access. You’ll need to make a few changes within each of these services to implement guest access correctly. The following four services all have different authorization levels which will apply to your Office 365 tenant.
Azure Active Directory B2B Settings
The first and most important service is the Azure Active Directory (specifically the Azure AD business-to-business settings). Sharing not only within Teams but across all Microsoft 365 services is governed at the highest level by the external collaboration settings that you set within Azure AD. If you restrict/disable external collaboration within Azure AD this will override any of the settings that you configure in the other services we will be covering. To correctly configure Azure AD you’ll need to do the following:
- Sign in to the Azure portal as a tenant administrator.
- Select Azure Active Directory > Users > User settings.
- Under External users, select Manage external collaboration settings.
- On the External collaboration settings page, choose the policies you want to enable.
- On the External collaboration settings page, choose the policies you want to enable.
- Guest users permissions are limited: This policy determines permissions for guests in your directory. Select Yes to block guests from certain directory tasks, like enumerating users, groups, or other directory resources. Select No to give guests the same access to directory data as regular users in your directory.
- Admins and users in the guest inviter role can invite: To allow admins and users in the “Guest Inviter” role to invite guests, set this policy to Yes.
- Members can invite: To allow non-admin members of your directory to invite guests, set this policy to Yes (recommended). If you prefer that only admins be able to add guests, you can set this policy to No. Keep in mind that setting No will limit the guest experience for non-admin teams owners; they’ll only be able to add guests in Teams that have already been added in AAD by the admin.
- Guests can invite: To allow guests to invite other guests, set this policy to Yes.
- Enable email one-time passcode for guests (Preview): For more information about the one-time passcode feature, see Email one-time passcode authentication (preview).
- Collaboration restrictions: For more information about allowing or blocking invitations to specific domains, see Allow or block invitations to B2B users from specific organizations.
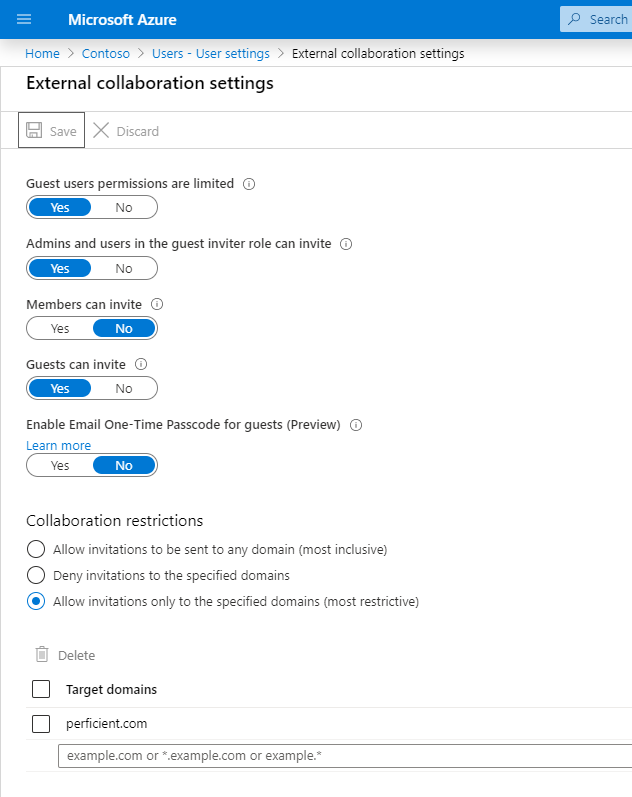
In the image above you’ll notice that we have collaboration restrictions in place to only allow invitations to specific domains. However, if you don’t need to be this restrictive you can change this as you see fit.
Note: The “guest inviter” role is not supported within Microsoft Teams at this time. So, even if you have Guests can invite set to Yes, guests still won’t be able to invite other guests in Teams.
As an extra morsel of useful information, you can also configure your Azure AD External Collaboration settings on the Organizational relationships page. To get here you’d go to Azure AD > Manage > Organizational relationships > Settings.
Now that your B2B settings/Organizational relationship settings are in place for Azure AD, it is time to move on to the next most important service, Office 365 groups!
Configuring Office 365 Groups
Whether you knew it or not, guest access within Office 365 groups is turned on by default. However, your administrators can control whether or not to allow guest access to groups for your whole organization or maybe just for a few individual groups. If enabled, group members will be able to invite guests to an Office 365 group through Outlook on the web or Outlook for Windows. For this to work the owner will add a guest to the group or a guest will be nominated by a group member and then the group owner will approve the nominee. For a full breakdown of what guests are allowed to do, you can check that out here. However, let’s say this was disabled by an administrator in the past and you are now working on implementing Teams within your organization. If that is the case you’ll want to ensure the proper settings are in place so you can collaborate with guests. To enable guest access in groups, you will need to do the following:
- In the admin center, go to the Settings > Services & add-ins page.
- Select Office 365 Groups.
- On the Office 365 Groups page, choose whether you want to let people outside your organization access group resources or let group owners add people outside your organization to groups.
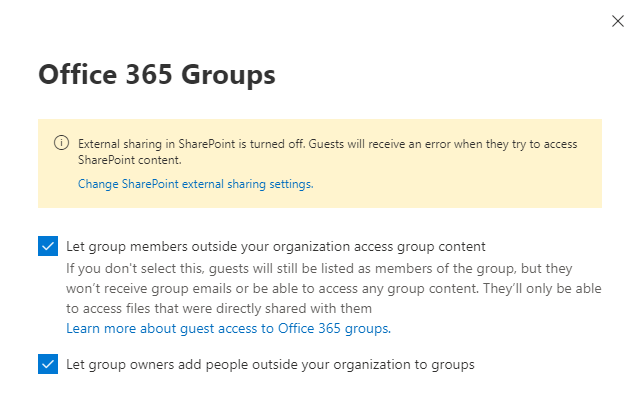
So what happens if you don’t have these boxes checked? Well, if the Let group members outside the organization access group content box is not checked, then your guests won’t be able to access any group content. Also, if the Let group owners add people outside the organization to groups box is not checked, then your team owners won’t be able to add new guests. At a minimum, you must ensure the Let group owners add people outside your organization to groups box must be checked to support guest access.
Configuring Sharing in Office 365 Groups
We’ll also need to ensure that sharing is configured for Office 365. Another quick useful morsel of information, the settings mentioned below are equivalent to the Members can invite settings in the User settings > External Users within Azure AD. So if you’ve already checked this earlier you can skip this next step.
You can find this by going to your Microsoft 365 admin center and doing the following:
- Settings > Settings > Security and Privacy > Sharing.
- Select Let users add new guests to the organization checkbox. Don’t forget to save these changes 🙂

On to the next one, and that’ll be SharePoint (and OneDrive)!
SharePoint (and OneDrive)
For guests to have access to SharePoint sites, the SharePoint organization-level sharing settings must allow for sharing with guests. Teams content such as files, folders, and lists are all stored in SharePoint. To set the organization level settings for SharePoint you’ll need to do the following:
- In the Microsoft 365 admin center, in the left navigation, under Admin centers, click SharePoint.
- In the SharePoint admin center, in the left navigation, click Sharing.
- Ensure that external sharing for SharePoint is set to Anyone or New and existing guests.
- If you made changes, click Save.

Note: The organization-level settings determine what settings are available for individual sites, including sites associated with teams. Site settings cannot be more permissive than the organization-level settings.
Let’s say the organization has the external sharing set to Anyone but you’d like this to be a little less permissive for a specific site. No need to worry, you can configure the sharing settings on a site level as well!

To set your site-level sharing settings you’ll need to do the following:
- In the SharePoint admin center, in the left navigation, expand Sites and click Active sites.
- Select the site that you just created.
- In the ribbon, click Sharing.
- Ensure that sharing is set to Anyone or New and existing guests.
- If you made changes, click Save.
Great job! You’ve got your sharing settings configured for guests so you can start adding both your internal users and guests to your site. Adding internal users vs guests will be done in different manners and we’ll outline below:
First, let’s invite some internal users to the group:
- Navigate to the site where you want to add users.
- Click Members in the upper right.

- Click Add members.
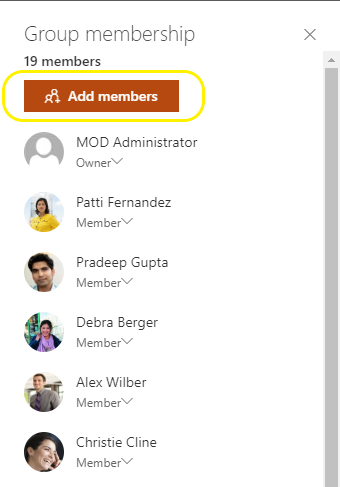
- Type the names or email addresses of the users that you want to invite to the site, and then click Save.

Now let’s add some guests to the mix! As you may have noticed in the image above, “to add guests outside of your organization, go to Outlook”. So let’s do just that!
To invite guests to a group:
- In Outlook on the web, under Groups, click the group where you want to add members.
- Open the group contact card, and then, under More options (…), click Add members.
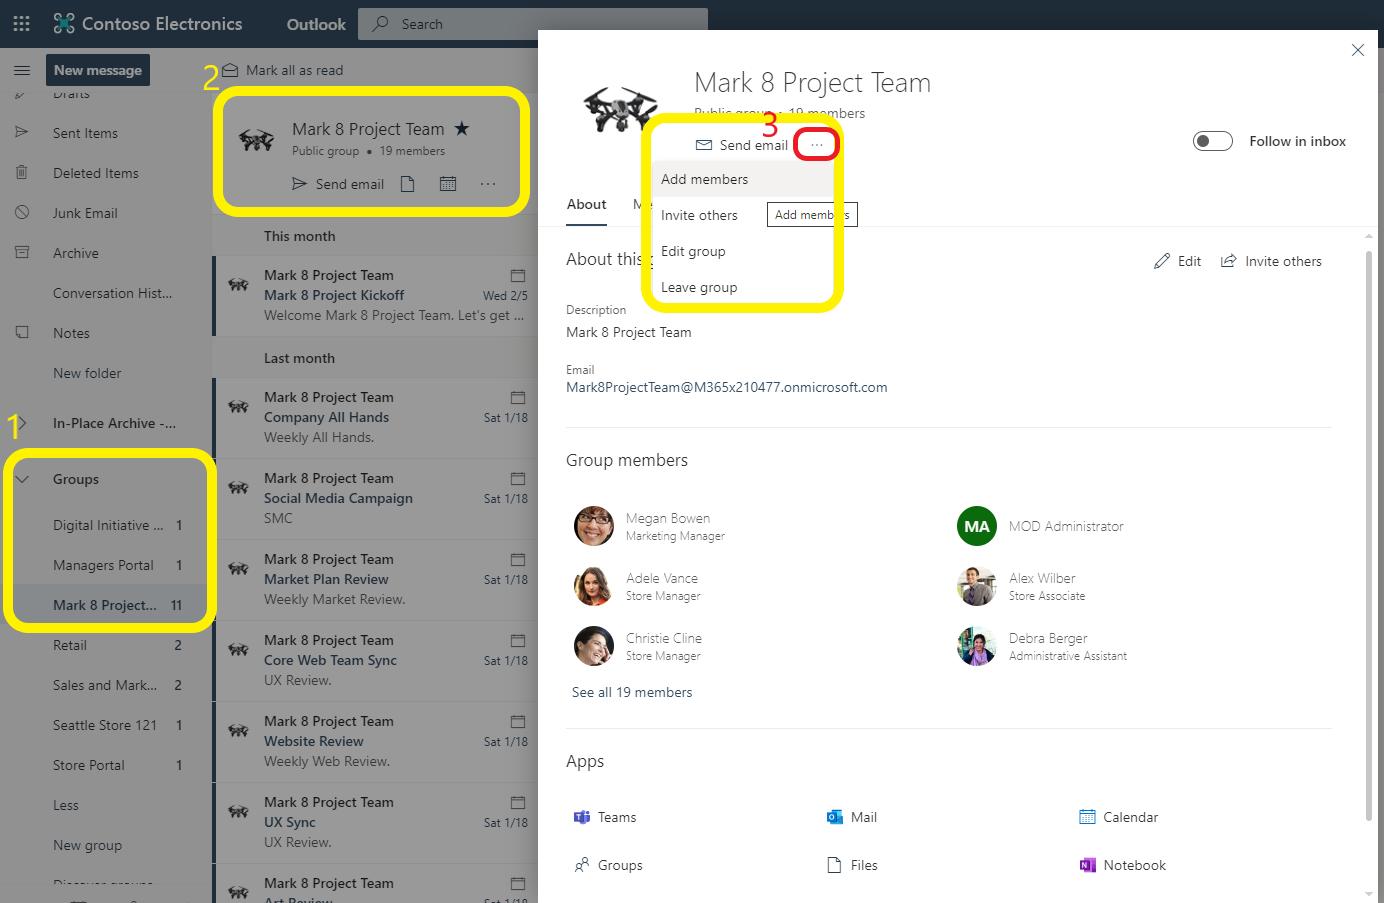
- Type the email addresses of the guests that you want to invite, and then click Add.
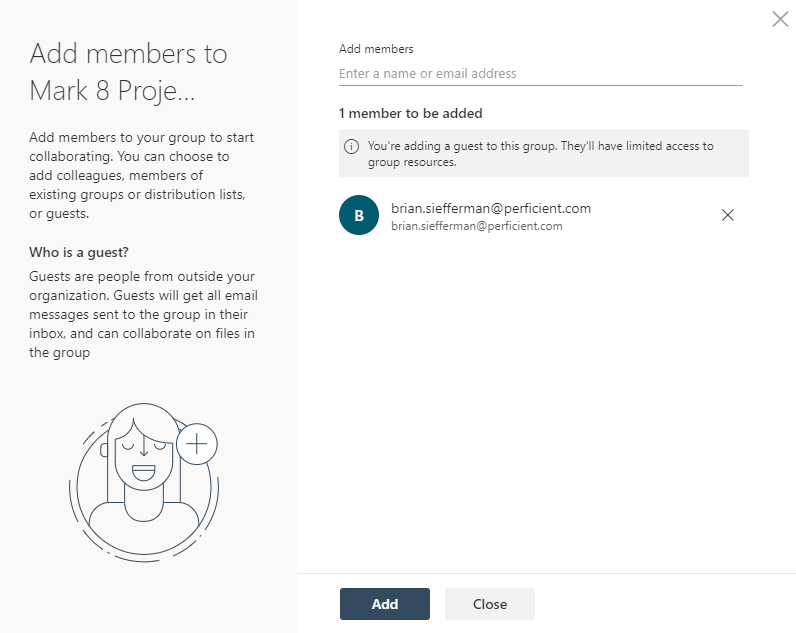
- Click Close.
The image below is what the guest will see on their end.
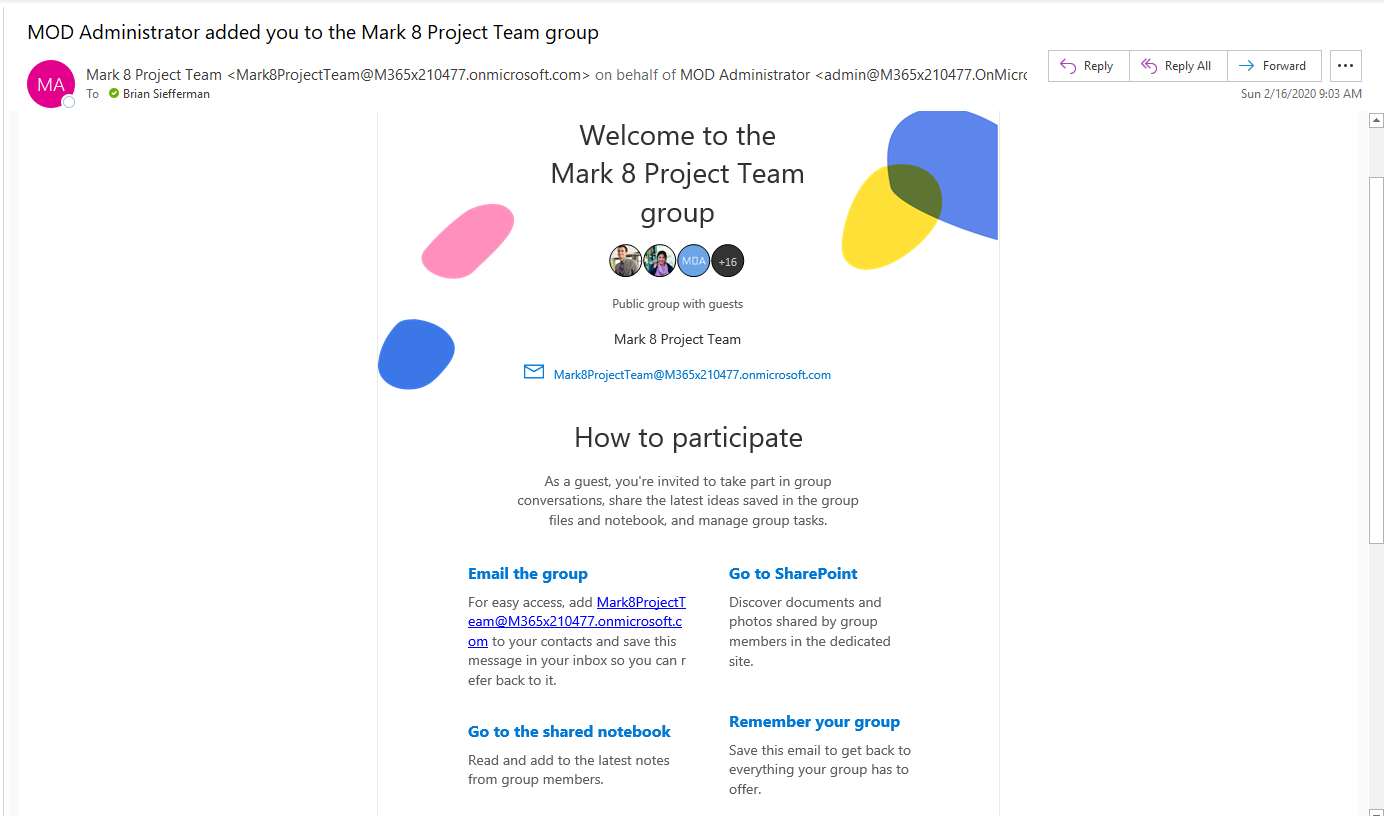
Last but not least, we’ll have to set up guest access within Microsoft Teams!
Microsoft Teams
Surprisingly, Microsoft Teams is actually the easiest to configure when it comes to guest access. Turning on guest access within Teams will be an org-wide level change meaning that everyone within your organization will either have this enabled or disabled. To turn on guest access, go to your Microsoft Teams admin center. Once you’re logged in, you’ll just need to do the following:
- In the Teams admin center, select Org-wide settings > Guest access.
- Set the Allow guest access in Microsoft Teams to switch to On.

- On this page, you can also turn on/off Calling, Meetings, and Messaging settings for your guests as you see fit. The following settings can be configured for your guest users in Microsoft Teams:
- Make private calls – Turn this setting On to allow guests to make peer-to-peer calls.
- Allow IP video – Turn this setting On to allow guests to use video in their calls and meetings.
- Screen sharing mode – This setting controls the availability of screen sharing for guest users.
- Turn this setting to Disabled to remove the ability for guests to share their screens in Teams.
- Turn this setting to Single application to allow the sharing of individual applications.
- Turn this setting to the Entire screen to allow complete screen sharing.
- Allow Meet Now – Turn this setting On to allow guests to use the Meet Now feature in Microsoft Teams.
- Edit sent messages – Turn this setting On to allow guests to edit messages they previously sent.
- Guests can delete sent messages – Turn this setting On to allow guests to delete messages they previously sent.
- Chat – Turn this setting On to give guests the ability to use the chat in Teams.
- Use Giphys in conversations – Turn this setting On to allow guests to use Giphys in conversations. Giphy is an online database and search engine that allows users to search for and share animated GIF files. Each Giphy is assigned a content rating.
- Giphy content rating – Select a rating from the drop-down list:
- Allow all content – Guests will be able to insert all Giphys in chats, regardless of the content rating.
- Moderate – Guests will be able to insert Giphys in chats, but will be moderately restricted from adult content.
- Strict – Guests will be able to insert Giphys in chats, but will be restricted from inserting adult content.
- Use memes in conversations – Turn this setting On to allow guests to use Memes in conversations.
- Use Stickers in conversations – Turn this setting On to allow guests to use stickers in conversations.
- That’s it! Now you’ll just need to click Save.
Also, within the Teams application, at the individual team level, you can configure guest permissions so you can control whether guests can create, update, or delete channels. The Teams administrators, as well as team owners, will have access to configure these settings.

Note: For those of you PowerShell guru’s out there that prefer it over the Microsoft 365 admin center and Azure AD portal, you can use Windows PowerShell to control guest access. You can find more information on controlling guest access via PowerShell here.
How do I add a guest now that it is configured?
Awesome! We’ve checked all the boxes to allow guest access in the environment. Now comes the fun part of adding a guest to our team! If you’ve already added guests, users, via Azure AD B2B, Office 365 Groups, or SharePoint Online then they are ready to go. Either the admin or team owner can add those guests to their respective teams. What if a team already exists with an Office 365 group, and the guest is added to the group instead of directly to the team? No worries, any guest that was added to the group will then be automatically added to the team. However, please note that for any guests that are added via Office 365 groups, this won’t generate an invitation email to the guest so as the admin or team owner it will be your responsibility to notify the guest that they have been added to the team. Now that we have that out of the way, let’s actually get to adding a guest from within the Teams application. Adding a guest to a team can be done in a few different ways:
- The global admins and Teams admins can add guests to a team in the Team admin center.
- Within the Teams admin center select the Teams tab on the left-hand navigation bar.
- Select Manage Teams
- Find the team that you want the user to have guest access to.
- After you have selected the team, select the Members option and then select Add.
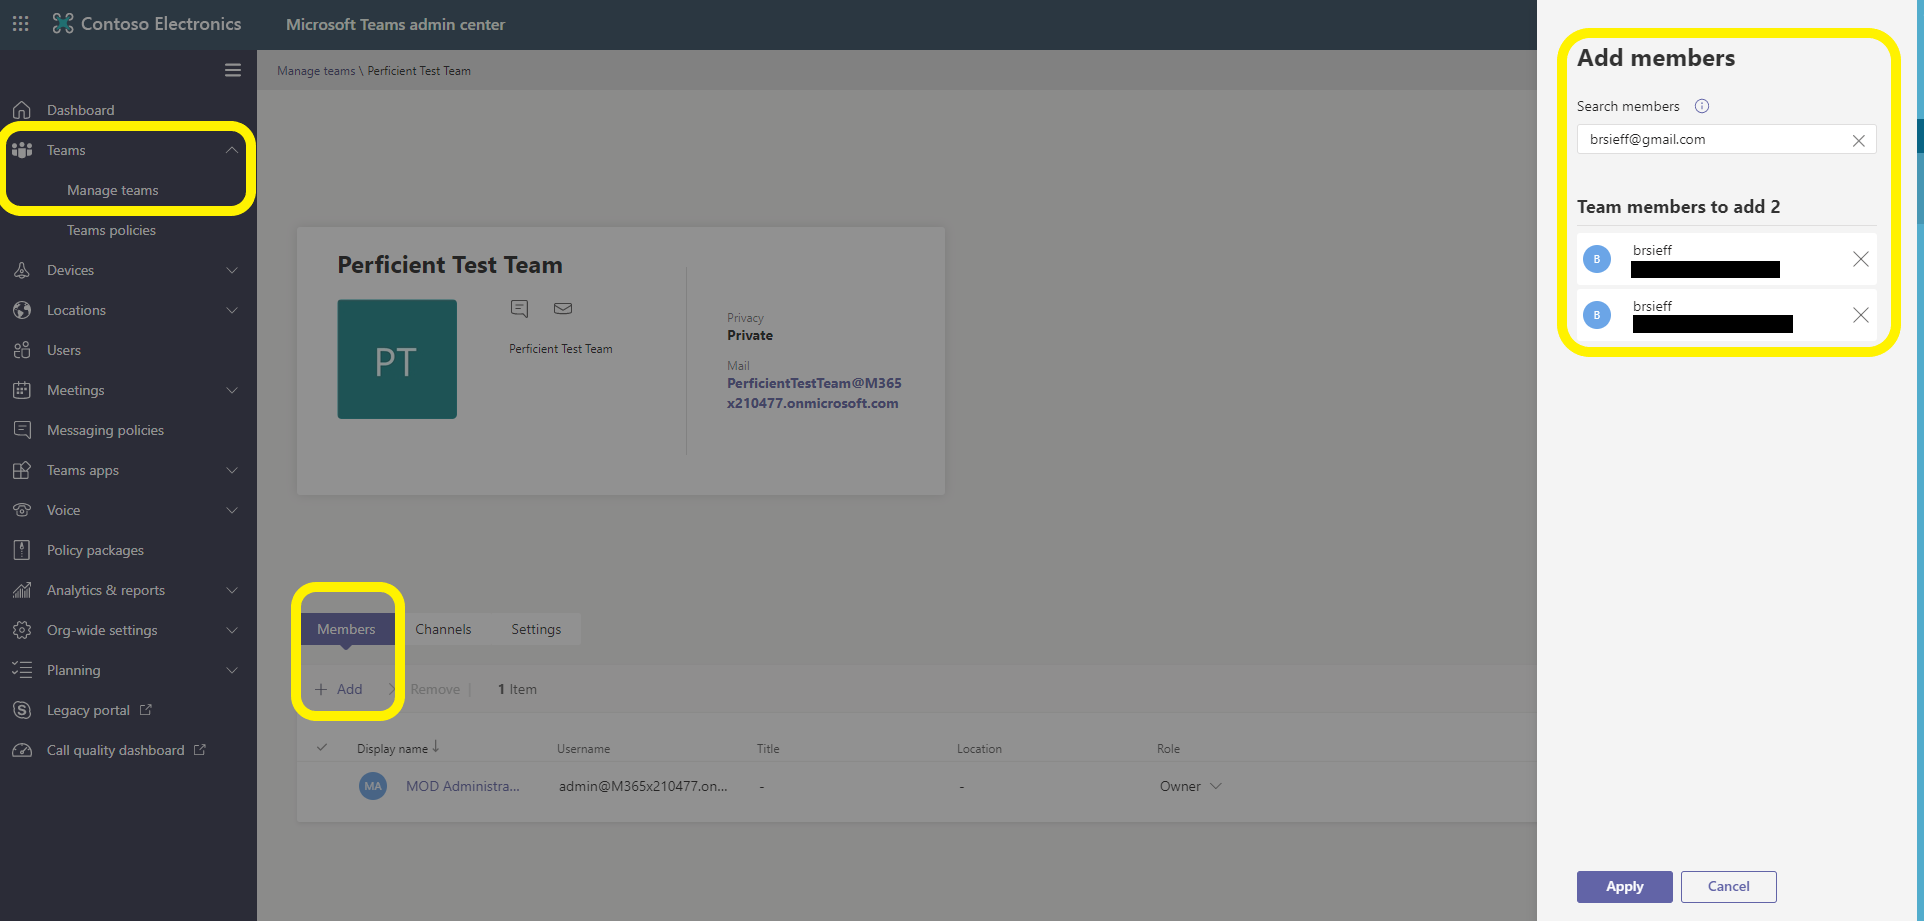
- Add the guest’s email address and then select Apply.
- All users that you’re adding here must already exist within your organization’s Azure Active Directory. Otherwise while searching for the user’s email, you will get a “We can’t find any team members to add” error.
- The team owner can add guests to a team in the Teams client. You can find a step-by-step process here.
- Guests can be added to your organization via Azure AD B2B collaboration. Global admins can invite and authorize a set of external users by uploading a comma-separated values (CSV) file of no more than 2,000 lines to the B2B collaboration portal.
That pretty much wraps up everything about guest access that we’ll be covering! Guest access can be a bit of pain to troubleshoot if not configured correctly, but as long as you follow the guidelines I’ve mentioned here you’ll be set to start collaborating with guests in no time! I hope you’ve found this blog helpful and I welcome any and all feedback! If there are any special topics you’d like me to cover I’d be more than happy to help accommodate!


Hi, thank you so much for this step by step tutorial! We actually already did this but had to search and piece together all these different pieces from different articles as opposed to this great, all in one place article! Quick question, once enabled Guest Access can be performed by any Team owner however in our case we don’t want that. Any ideas how to disable this org wide but be able to cherry pick those Teams we want to allow this to be able to do. Thanks!
Hi Joe, glad I could help :). Great question as well. Since the “Let group owners add people outside your organization to groups” option within O365 Groups is required for guest access to function properly I don’t believe the scenario you’re looking for would be possible. Since that setting is a tenant level change its an “all or nothing” type change. Unfortunately, I don’t think Microsoft has the option of specifying only a specific subset of Team owners with the ability to add a guest.
On the bright side, these things are all auditable (i.e. whenever someone invites someone to a team) so there will be some type of ability to monitor this. In addition, you have the option of doing an access review (requires Azure AD P2) to determine if each guest really needs the access. If I can think of any other workarounds for this I’ll be sure to update it here.
Thank you!