
In HTML, the class attribute specifies one or more class names for an HTML element. This attribute can be used on any HTML element. Class names can be used by CSS and JavaScript to perform specific tasks related to that element. So, basically, class plays a crucial role in web development.
What comes to your mind when you want to add a new class to a container element of a component? This is an especially important question when working on a big project that has a large number of view files.
Introduction of SXA Styles Feature
Previously in Sitecore, adding a class to a container element was a tedious task. The developer used to need to find the file and go to the container tag. Then, they would need to add the class manually to the tag or use the rendering parameters so different class names could be added.
Now, Sitecore SXA has made this task easy with the development of SXA’s styles feature. The feature allows you to add a class name to a container element of a component from the Experience Editor itself without searching, opening and modifying files.
Next, we will consider an example of a “Rich Text content” component to show how we can add different classes to a container element of a component. Here, I will add two classes named “red-text-colour” & “blue-text-colour.”
How-To Utilize Styles Feature

Prerequisites:
- Sitecore instance (version 9 and above)
- Sitecore PowerShell
- Sitecore Experience Accelerator
Step 1: First, in Content editor inside content node i.e. Sitecore/content create a tenant. Inside that tenant, create a site. Open any page in the experience editor.
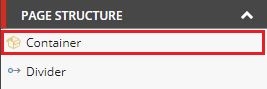
Step 2: Open the right pane of components of SXA. Expand Page Structure à Drag Container to the main placeholder on the page.
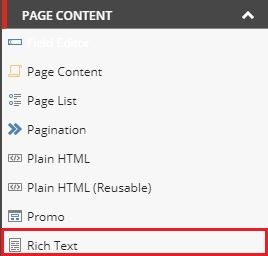
Step 3: Expand Page Content à Drag Rich Text component of SXA into the container. Select the placed component & insert any text you want to paste. Save the changes.
Step 4: In the navigation bar, go to Presentationà Other à Preview. The Rich text with the content will appear. Now Right-click on the content and click on inspect. You can see the default classes are already present in the HTML structure.

Step 5: Go to the content editor and navigate to /sitecore/content/tenant/site/Presentation/Styles expand Styles. Right-click on stylesà Insert àStyles to insert a new style folder to the tree. Name that folder Custom Styles.
![]()
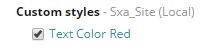
Step 6: Right-click on Custom styles à Insert à Style. Name that item “Text Color Red”. Fill the following fields:
- Value: text-color-red
- Allowed Renderings: Click on edit, navigate to Layout/Renderings/Feature/Experience Accelerator/Page Content/Rich Text. Double click on Rich Text click on Save the changes.
“This will allow user to add class on the selected rendering only.If no Rendering is selected the class can be added to any rendering.”
Step 7: Open the Experience editor tab and select the Rich text component. Click on the paint bucket icon to edit the style and behavior of component. Expand the Styling block. Now, you can see the created style under Custom styles. Check the “Text Color Red” checkbox and click on ok. Save the changes.

Step 8: Reload the page and Right-click on the content and click on inspect. Now you can see the newly created classes are also present in the HTML structure.

By performing the above steps, you can try adding your own custom styles and use them in your project. Check out more Sitecore blogs and how-tos on our site.