Intro
This week Amazon announced its release of chat functionality in Amazon Connect.
Amazon Connect now natively offers omnichannel capabilities – you can offer customer service through multiple channels of communication including voice, web and mobile chat.
At Perficient, we’ve reviewed the new capabilities and prepared a series of blog posts to help you adopt the chat functionality.
- Create a simple Amazon Connect chat flow
- Demystify the Amazon Connect chat “Disconnect flow”
- Streams API v1.4 changes with Chat
- Changes with Chat Metrics
In this post, we cover the key steps to configure an agent for chat using Routing Profiles. We also explain how the rollout of chat impacts an agent’s capacity as well as some nuances on multichannel queues.
Routing Profile Configuration for Chat
Log into your Amazon Connect instance as an administrator and follow the steps below:
- Open the Routing Profiles page and add a new profile. Fill in the required fields and make sure you add Queues.
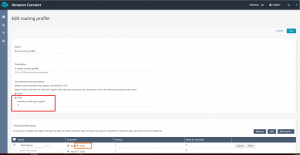
- Navigate to the “Set channels and concurrency” section and click on the checkbox next to Chat.
- Move to the “Routing profile queues” section and click on the checkbox next to the Queue you’d like to enable for chat. This is highlighted in orange in the image below.
Tip: You can assign different priority for Voice versus Chat for the same Queue.
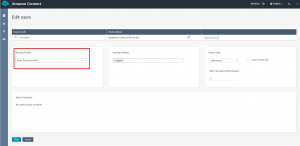
- Finally, from the User Management page assign this routing profile to an agent.
Agent capacity
In Amazon Connect, an agent’s Routing Profile assignment will determine the agent’s skillset (Queues) and utilization.
With Chat channel in place, it is important to determine the best way to organize an agent’s assignment between Voice and Chat.
The platform allows agents to take either 1 voice session or up to 5 chat sessions concurrently.
You can set your own maximum of chats per agent using the Routing Profile configuration page. At the moment, the platform maximum is 5 chats per agent.
Multichannel queues
Amazon Connect allows you to seamlessly introduce Chat to your existing Voice implementation.
This includes Queues as well. A Queue can be dedicated to Chat only, dedicated to Voice only or allow for both Chat and Voice contacts.
If you chose to handle both Voice and Chat contacts through the same Queue make sure you use the new Filtering and Grouping options on Real-Time metrics. See more details on how to set up the filtering here.
As of right now, Historical metrics do not support the same Filtering and Grouping options. Assigning separate Voice and Chat queues on the Routing Profile allows you to:
- Separate reports easily per channel.
- Customize an experience specifically for Chat, or Voice.
For a demo of how to build a basic inbound chat flow, check out our video tutorial:
Further reading on Amazon Connect chat:
- Create a simple Amazon Connect chat flow
- Demystify the Amazon Connect chat “Disconnect flow”
- Streams API v1.4 changes with Chat
- Changes with Chat Metrics
For information on how Perficient can help you integrate Amazon Connect chat into your contact center, please contact us here.


