Microsoft Azure, one of the leading cloud providers, recently launched the preview of a new platform-as-a-service offering called “Azure Bastion”. This service gives a platform for the management and deployment of VMs, meaning you don’t have to keep up a foundation to do this.
The word “bastion” itself means an adjustment for defense or safe place. Azure Bastion is a way to enable the jump box scenario without exposing the system to the web directly.
Before hopping to Azure Bastion, we must understand why this service has been presented when there are numerous approaches to secure your Azure VMs RDP/SSH connection.
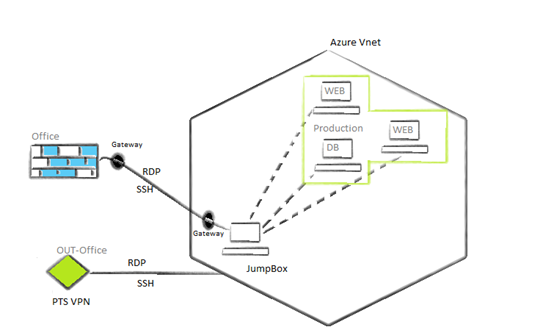
You might currently be using Azure Jumpbox, where you take RDP to your jump server to communicate with your VMs privately.
An issue with that is that you might need to create a public IP address and assign that to the server directly. Alternatively, you can do this through a load balancer or firewall. To secure this, you need to do a network address translation (NAT) or enable Just-in-Time VM access. As you are communicating through a public IP, you might need to open some port publicly for your RDP/SSH connection. This creates a loophole for attackers to enter your environment. Although it is too hard to crack this, it is possible through port scanning and brute force methods.
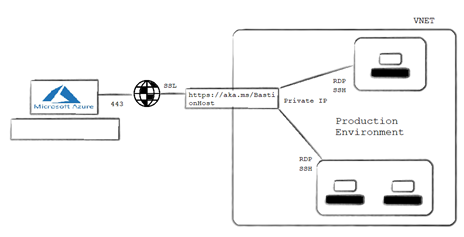
This isn’t an issue with Azure Bastion as there is no need for appointing a public IP to your VMs. Instead, you can communicate with your production VMs through the portal only with your VM’s private IP.
Moving forward to Azure Bastion
Azure Bastion prerequisites
The preview for Azure Bastion is limited to following regions:
- East US
- West US
- South Central US
- West Europe
- Australia East
- Japan East
As well as being in these regions, your Azure Bastion must be in a virtual network with the subnet name “AzureBastionSubnet” with prefix of at least /27. It also must have no network security groups (NSGs) or routes joined to it. Most significantly, for each VNET, you must make a different Bastion to get to the VMs inside your virtual network.
How Azure Bastion works
When you create Azure Bastion for your VNET and attempt to associate through Bastion, another session will start on your HTML5 browser in a tab over SSL on port 443. The SSL session can’t begin without public recognizable proof, so AzureBastionSubnet has its own overseen subnet and open IP that will lead your Bastion session over SSL on 443.
As this is preview service for now, you must enroll for this by entering the beneath PowerShell command as an administrator.
Install Azure PowerShell Module and connect with your Azure account:
Install-Module AzureRM
Set-ExecutionPolicy Unrestricted
Import-Module AzureRM
Connect-AzureRmAccount
Register your subscription with preview and verify for AzureBastionHost:
Register-AzureRmProviderFeature -FeatureName AllowBastionHost -ProviderNamespace Microsoft.Network
Register-AzureRmResourceProvider -ProviderNamespace Microsoft.Network
Get-AzureRmProviderFeature -ProviderNamespace Microsoft.Network
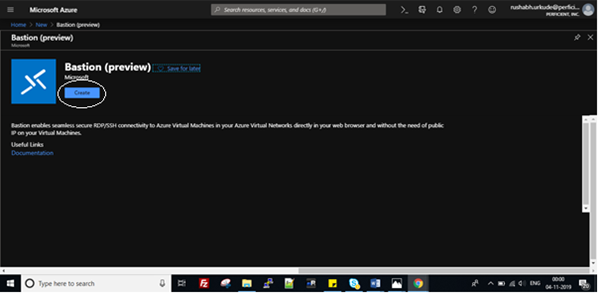
Now go to the Azure bastion – preview portal. Log in with your membership and click on Create a resource, select Bastion, and then click on Create Bastion.
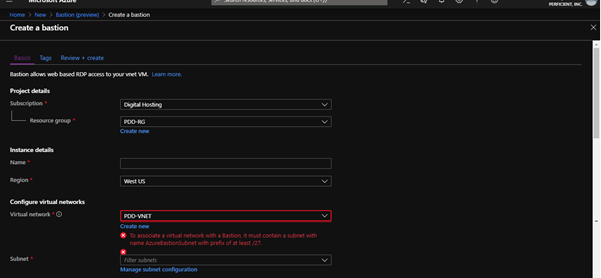
Configure Bastion by selecting the resource group for which you want to create a Bastion. You can also create a new one. Enter the name for your instance – make sure the name you enter is not “Bastion”.
As I let you know in the prerequisites, you should have subnet named “AzureBastionSubnet“. Make Bastion subnet for your VNET. Once made, it will automatically choose the subnet by choosing the virtual network.
Don’t get confused with the public IP option. The IP you are going to use here will be used for the SSL connection, not for your VMs.
Click on Review + create. It will show you the summary, including information like name, subscription, resource group, region, VNET, subnet, and public IP addresses. Click on Create. You will now be told “Your deployment is done”.
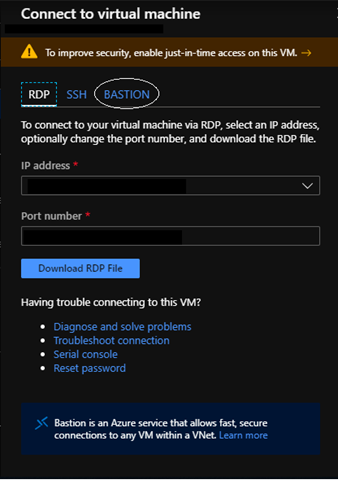
Now try to Connect your VMs inside your VNET. Here, you will select Bastion. Click on that, enter the username and password of your VM, and connect. Another tab will open with your RDP/SSH session.
Woohoo! You can see the VM’s desktop on your browser. Another thing you can see in the left half of the window is the clipboard. Through the clipboard, you can duplicate your content (only text) from your local machine to VMs.

