
This post is the second in a multi-part series talking about setting up and configuring key and trust stores for IBM MQ and IBM Integration Bus. The screenshots are clickable for a sharp image.
At this point you should have your key stores and trust stores created and empty. The next step is creating a certificate request.
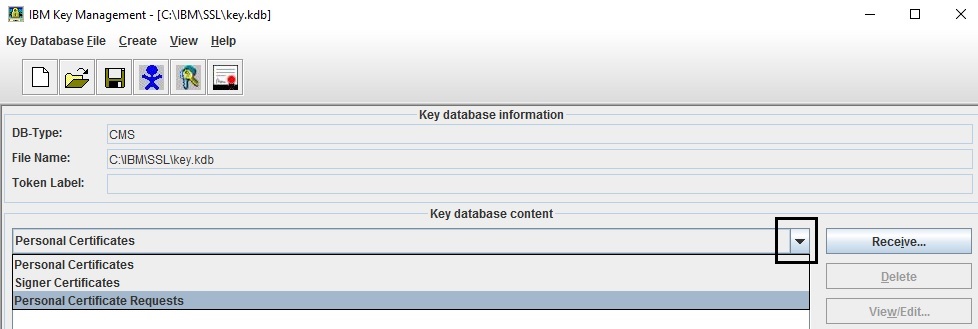
Run ikeyman (strmqikm on Linux), open a key store (e.g. MQ’s key.kdb) and select “Personal Certificate Requests” from the drop-down list right in the middle of the screen. Click “New” in the menu on the right.

Filling out the request
Fill out the certificate request with the relevant information. Key label is the human-readable name of the certificate you can reference when you work with the key store in the future. It is also the name that the queue manager will look for and reference the certificate by. Tradition and legacy demand that we name this label ibmwebspheremq<queue manager name in lower case>. It’s an all lower case string of IBM WebSphere MQ and the queue manager concatenated together. E.g., if your queue manager name is QM1, then the label should be named ibmwebspheremqqm1. Latest versions of MQ allow you to change the label name, but you will need to remember to change it in SSL settings on the queue manager.
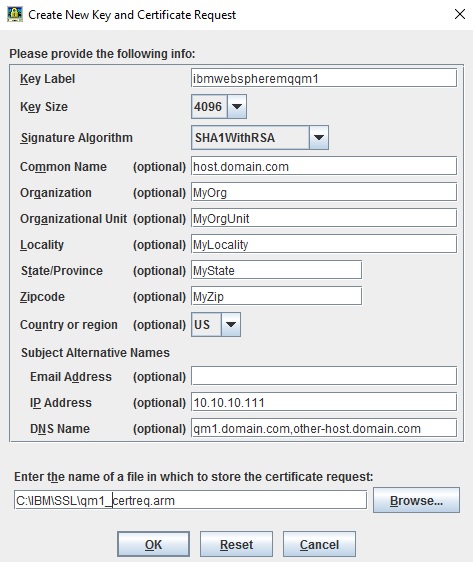
Common Name (abbreviated CN) is the name of the host you would like a certificate issued for. E.g., if your MQ server lives on mq-server01.company.com, then that is the name you would enter here. The rule of thumb is one certificate per host. However, there are cases when you need to have a certificate issued for more than one host.
Case #1: you use multi-instance queue managers. An MI queue manager lives on two hosts at once. When a queue manager fails over, it will access the same key store (that’s why the key store must be placed on the shared storage) and it will send the same certificate referenced by the label. The host name will be different but the certificate will be the same. A queue manager cannot be configured to reference two different key stores or two different labels when it’s running as a MI queue manager. This means you have to get one certificate for two different hosts.
Case #2: you use something like F5 for Virtual IPs that direct traffic to MQ. E.g., you created a VIP on F5 called qm1.company.com that forwards all requests on port 1414 to your mq-server01.company.com host. Clients will connect to the virtual hostname without any knowledge of where the back end is, and they will expect a certificate issued for the virtual hostname. Thus, your queue manager needs to be able to send a certificate for three hostnames: one for each server in MI setup and one for F5 VIP.
Fortunately, a mechanism exists called Subject Alternative Names (SAN for short) that allows just that. SAN is not supported for all types of certificates. Depending on your Certificate Authority company, you might need to request a certain type of certificate. This particular CA requires that your certificates are always Platinum type, but if SAN is used, they want you to request a Unified Communication type.

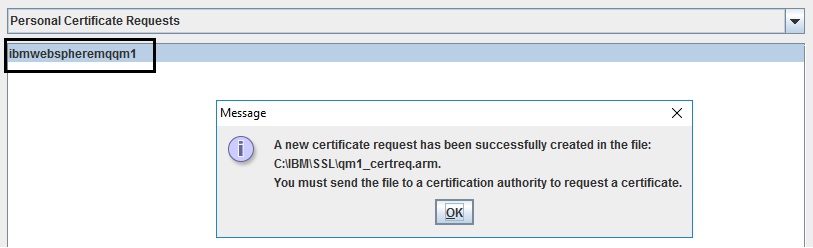
At the very bottom of the form, give your request a meaningful name and a path to save to. After you click “Ok”, ikeyman should give you a success message.
Submitting the request
Next, work through the process at your company for submitting this request. The examples here show one such process.
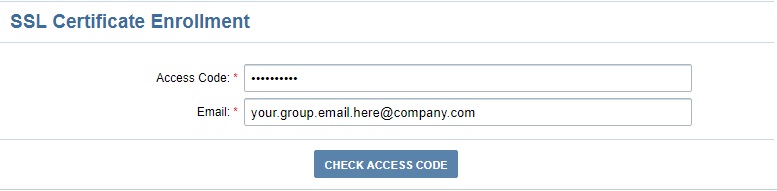
On the first form, we enter an access code and an email address. These are used to validate you have permissions to request a certificate for a server you’re referencing in CN. Email address will also be used to send the certificate.
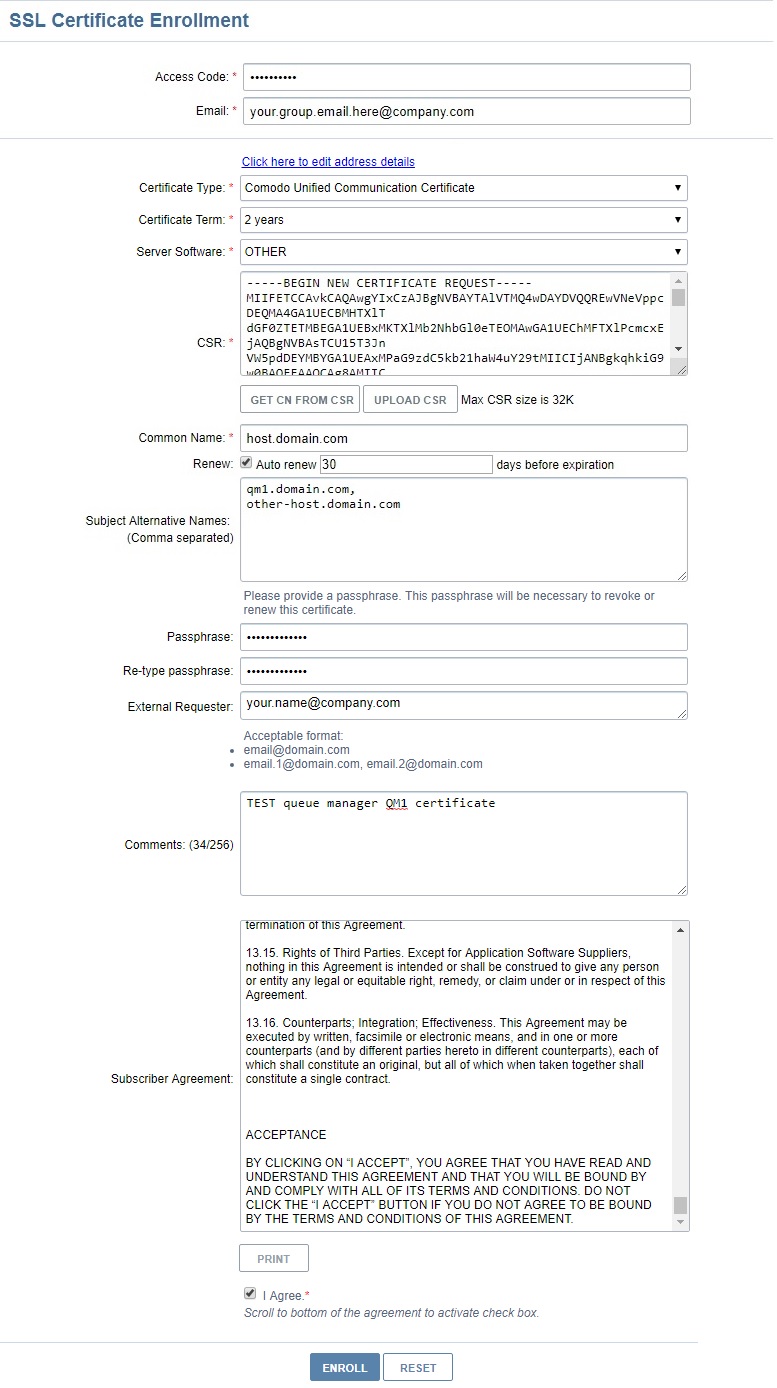
On the second form, we enter the details of our request.
I already mentioned Certificate Type earlier in the post. Different types are used for different purposes. Check with your CA what you need to select here. Instructions from this particular CA say that we need to pick Unified Communication type if we use SAN, so that dictates our choice here. Certificate Term is the length your certificate will be valid for. Server Software indicates what you will be running on that host.
CSR stands for Certificate Signing Request and it’s a text box for entering your request in encoded form. You can either open the .arm file that ikeyman created with a text editor (vi, notepad) and copy and paste the entire contents in the text box or upload the .arm file using the “Upload CSR” button.

Common Name should be automatically filled out for you from the CSR. Renew check box serves as a reminder to renew the certificate before it expires to avoid interruption in TLS encryption.
SAN field should also be filled out for you from CSR. If CN or SAN are not filled out, go ahead and copy them by hand from your Certificate Request form. Passphrase is a password that you will use if you would like to talk to the CA about this particular certificate. The Comments field allows you to enter a string that will distinguish this certificate from others. If you’re requesting tens of certificates at once, these comments will help you tell them apart.
Next checkbox is to accept the agreement and finally “Enroll” button will send the request to the CA.
After clicking “Enroll” you should receive a success message.

Receiving a certificate
Next step of processing depends on the SLA of your contract with the CA and the speed your internal organization works. Sometimes getting a certificate takes minutes, sometimes – days.
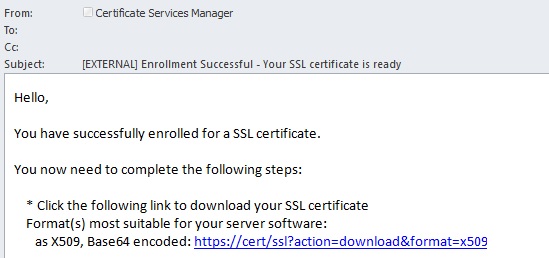
After successfully enrolling for a certificate a message will arrive to the email address you specified containing the certificate in various forms as links. The first link: X.509, Base64 encoded is usually the one you want. It will contain the certificate in the most popular format plus its trust chain. Click the link and download the certificate to an easy to remember location. Remember that this certificate contains the private key inside. So, protect it with file system permissions (400 or ACL on Linux, protected folder on Windows) in order to avoid it being copied and looked at by third parties.
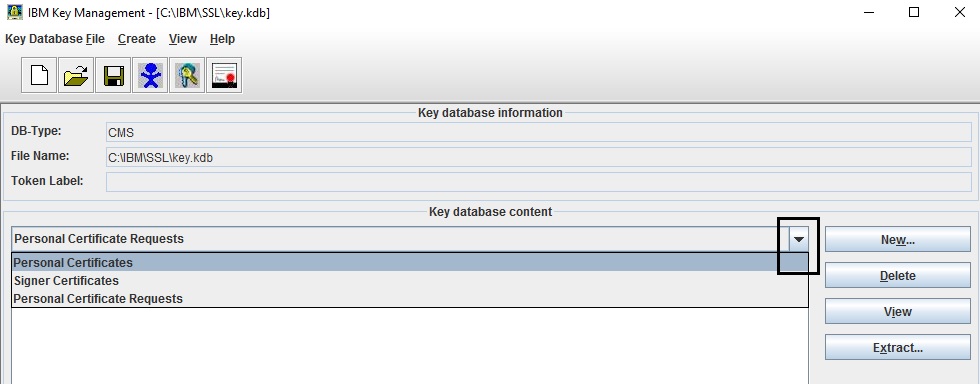
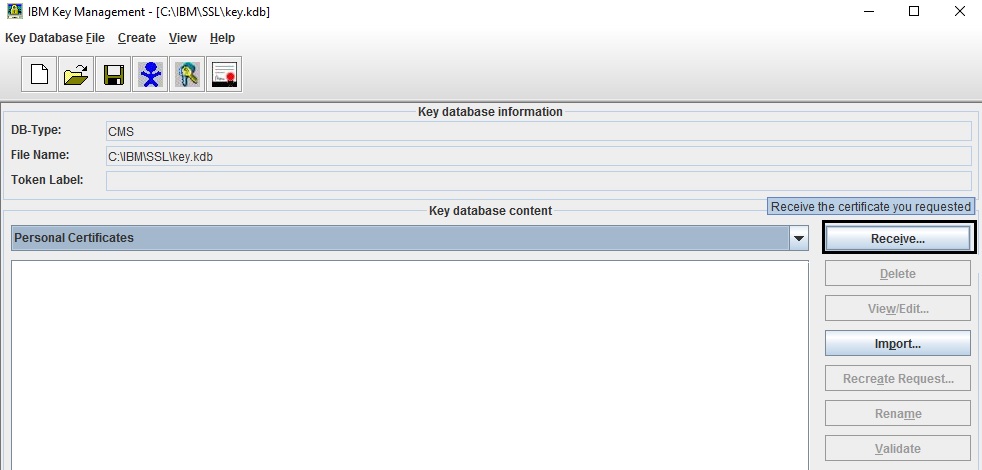
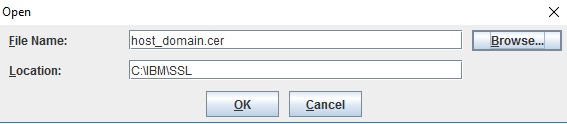
Open ikeyman, select “Personal Certificates” from the drop-down menu and click “Receive”. Specify the path where you saved the certificate and the name of the .cer file. Click “Ok” and ikeyman will load the certificate. There are several checks in place to make sure you’re:
- Loading the certificate that was issued in response to the certificate request stored in this store.
- The certificate request was not altered.
- The certificate was not altered.
- The certificate request was created in this store.

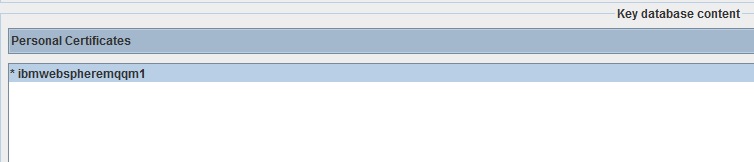
If all checks pass, you will receive a “validation successful” message. Under “Personal Certificates” drop-down you will see the key label of your new cert. An asterisk next to the key label indicates that this is the default certificate, meaning that if you have several of them in the store, and one of them is not specifically referenced by the label, this one will sent. You can also click “View/Edit” button and check the “Set the certificate as the default” checkbox to make any certificate a default one.
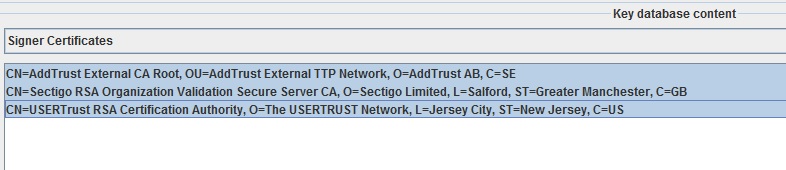
If you select “Signer Certificates” from the drop-down menu, you will see the trust chain.
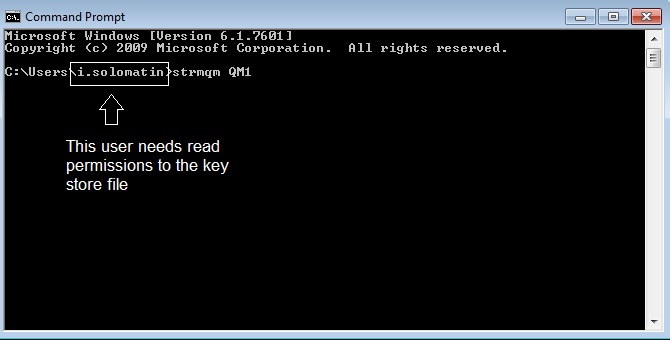
You can close the store now. Remember to protect the key and trust store files, the stash files, the certificates files and the requests on the file system by setting appropriate permissions. The MQ key store file must be readable by the user that the queue manager will run under. For example, I am starting QM1 queue manager as user “i.solomatin”, then that is the user that needs read permissions to the key store file.
Next we go to the SSL tab on the queue manager in MQ Explorer. “SSL Key Repository” option lets you specify the path to the key store. Notice how the extension is missing? MQ appends .kdb by default and looks for that file.
Next option you need to pay attention to is the label name. The string filled out by the queue manager is the default. But if you changed your key label in the request, you need to enter it here. MQ won’t be able to find the certificate in the store if it doesn’t have its label (yes, even if that certificate is the only one in the store).
This screenshot shows the path for the key store on shared disk for MI queue managers with the default label name.
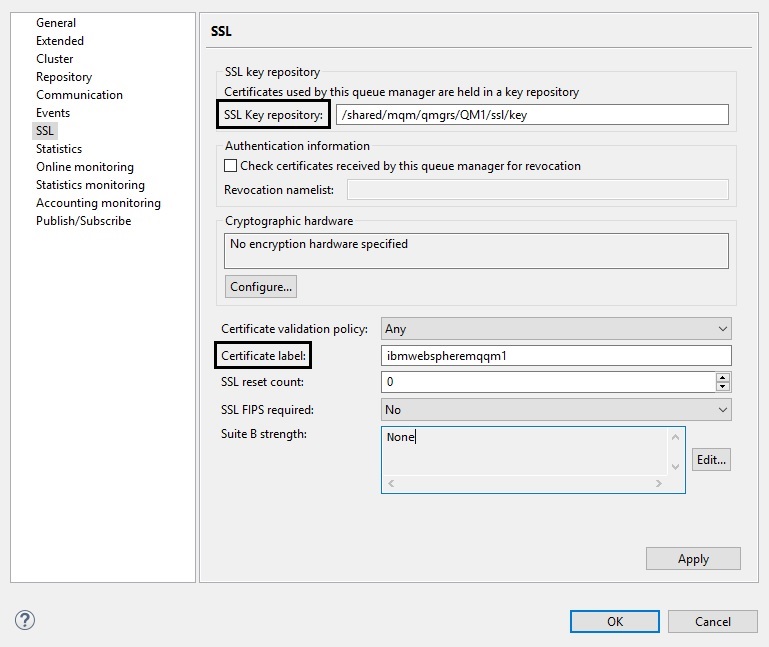
And this screenshot shows the path for a stand-alone queue manager with a modified label name.

After making the changes to SSL configuration remember to refresh security of type SSL.
refresh security type(SSL)
Congratulations! Now MQ is setup for TLS communication.
Loading trust chains into a trust store
IIB and many other applications, particularly in the Java world, require a trust store alongside the key store to function properly (MQ Explorer is a good example). A trust store only holds the trust chains of the certificates you trust. You can trust as many as you want. Check out your browser, it’s full of trust chains from many CAs.
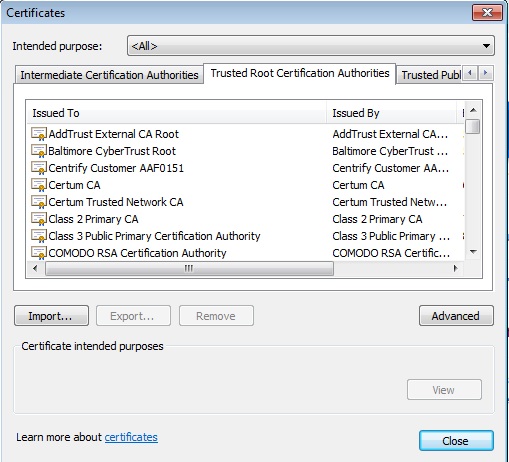
To load a trust chain, open your trust store in ikeyman, select “Signer Certificates” from the drop-down and click “Add”. Next choose the certificate you downloaded, and click “Ok”. This action will just extract the trust chain from the certificate and store it in the trust store. You can download other trust chains from CAs’ websites to add them to your trust stores.
In the third and last part of this multi-part blog, I will talk about key stores and trust stores on Windows and how to work with them.
Hello
Thank you very much for this article.
Could you please let me know, if there is any solution to case #1?
Is that true that we have to choose either HA (multi-instance) or secure communication based on SSL/TLS.
Do appreciate your answer.
Regards
Nader
Hello Nader,
the solution to case #1 is to use Subject Alternative Name (SAN) fields. In Common Name (CN) you would indicate your hostname, in SAN you would indicate any alternative hostnames.
Like,
CN=host1.org.com
SAN=host2.org.com,host3.org.com,10.10.10.10
So, if your MI queue manager lives on hosts hostname1.org.com and hostname2.org.com, then in your request you would type:
CN=host1.org.com
SAN=host2.org.com
If you have an RDQM, you would type:
CN=host1.org.com
SAN=host2.org.com,host3.org.com
Perfect, and thanks for prompt answer.
I wil try that.
Best regards
Nader