Welcome back to the last blog in the “Plan Your Network in Microsoft Teams” series! Last time we talked about the process of connecting to Office 365 over the internet. In this article, we’ll discuss peering, QoS, and some tools to assist you in planning your network for Microsoft Teams. So without further ado let’s jump right in!
What is peering? How does it work?
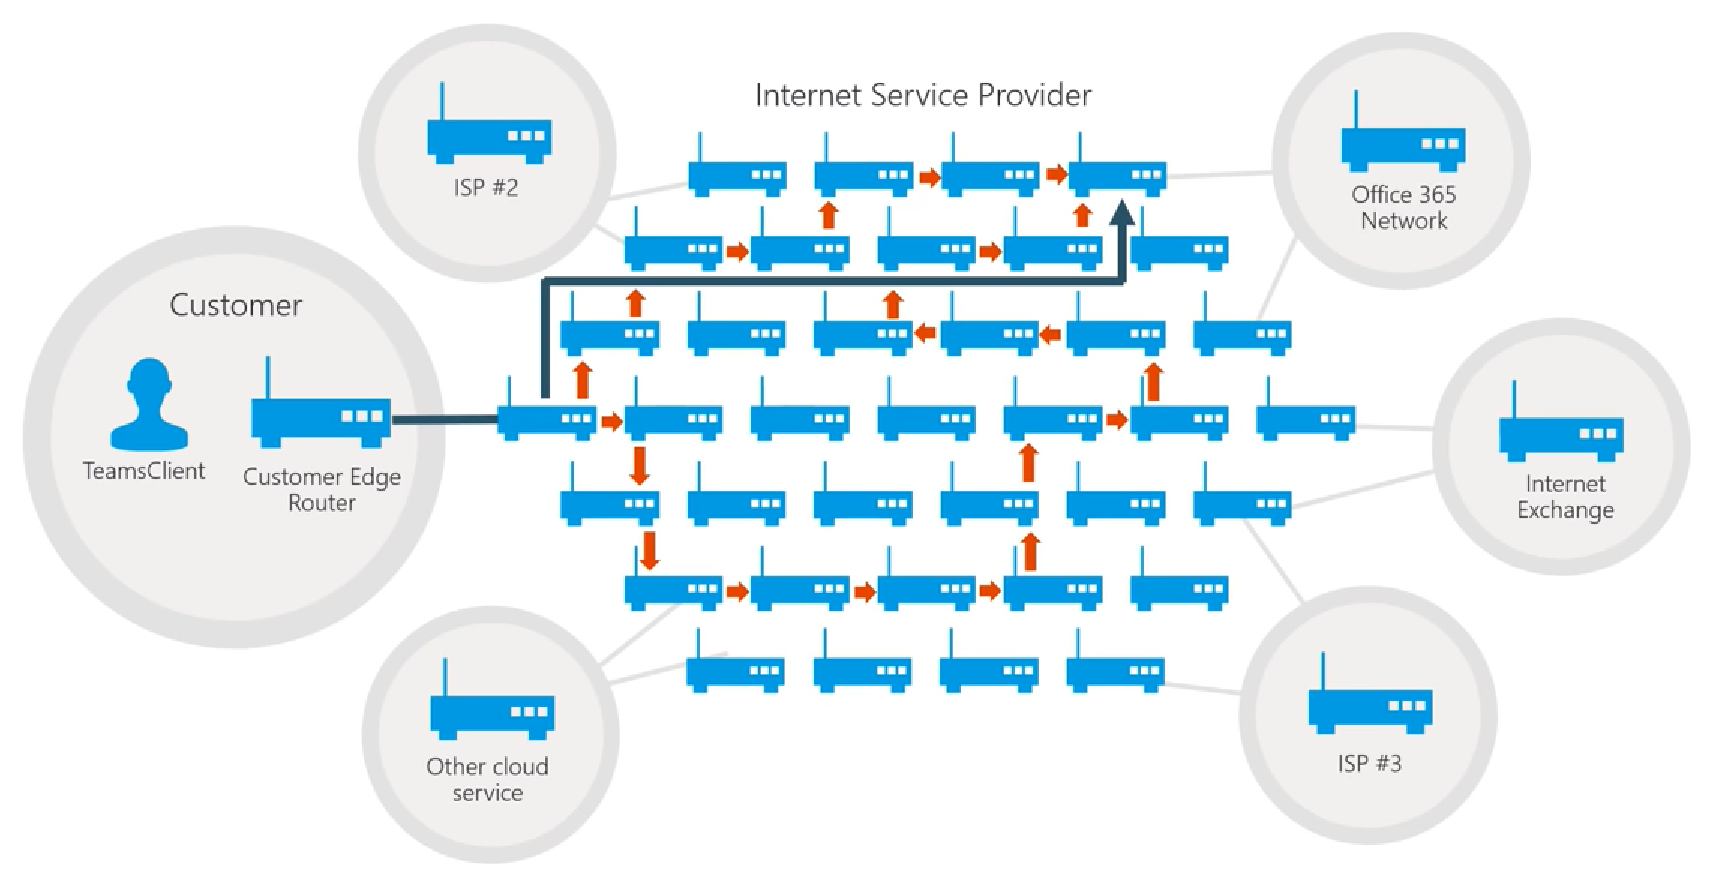
You may remember from the last blog where we discussed how you connect to the Office 365 network by leveraging the Microsoft peering points to ensure the best connection. However, we haven’t fully explained what those peering points were and how they worked. Well, to put it as simply as possible, the internet that we use on a daily basis is just a huge network of routers that route traffic to/from one another. To illustrate this, take a look at the picture below.
On the left hand side of this picture you’ll see we have a customer using a Teams client and their router that will route traffic to the internet. In addition, there are several other things connected to your ISP including (but not limited to): Internet Exchanges, other ISP’s, other cloud services, and finally the Office 365 network. If our customer wants to connect to the Office 365 network, first they send the traffic out their edge router to the first hop which is a router in the ISP’s network. From there, the traffic will continue to go from hop to hop until it reaches the Office 365 network (as illustrated by the orange arrows). However, with each additional hop through the ISP’s network comes additional delay. Since this is not the optimal route, the customer should try to work with the ISP to provide a more direct path to the Office 365 network (as illustrated by the dark blue arrow). By providing a more direct route to Office 365 this not only helps the customer by reducing the number of network hops but also the ISP by allowing them to save more bandwidth on their resources.
Quality of Service (QoS)
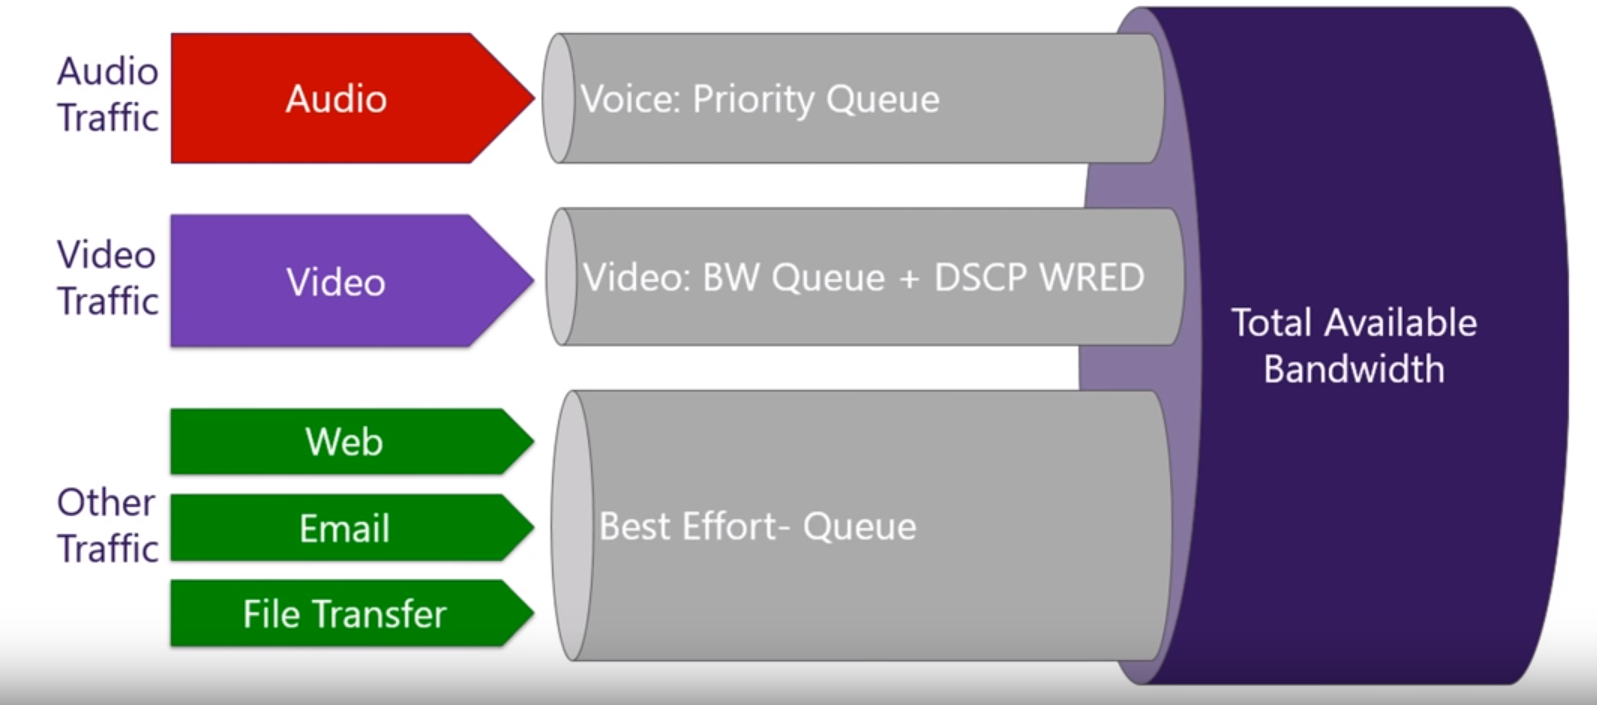
Quality of Service is great in that it allows you to prioritize different traffic types. If you only have a limited amount of bandwidth, QoS is highly recommended so you can prioritize your audio and video traffic above other types of traffic. As you will see in the picture below, by placing audio traffic in a priority queue your routers will know to prioritize your audio traffic above other types of traffic when there isn’t enough bandwidth to send all the traffic through.
In addition, you can give a priority queue to video so you can prioritize this type of traffic as well. However, it is recommended to give this type of traffic a lower priority than your audio queue because a call without audio is significantly worse than one where your video is just freezing from time to time. Although your users may not be too thrilled with their experience with the video you can ensure that they still have a great experience with audio by prioritizing this traffic above all other types. As far as the other types of traffic (web, email, and file transfer), these are placed in the Best Effort queue. In the best effort queue we will try to send this traffic and if you are unable to we just try to send this traffic later. This way, your users will have an optimal experience with the real time media and the non-real time media traffic can take a back seat until it is time for it to be delivered. Just like with Skype for Business Online, you can use QoS with Microsoft Teams. As you may already know, QoS can only be configured on networks that you control. So you’ll be able to configure this in your enterprise network but as soon as it leaves your network the traffic is no longer prioritized.
Marking Teams Traffic
When marking your Teams traffic, it is important to make sure the traffic is marked based on the client ports. In addition, you’ll need to configure different port ranges for your audio, video, and sharing which will allow you to assign different policies to the different traffic types. By doing the marking based on the client ports, you’ll be able to mark the client-to-service traffic (conference/meeting) as well as peer-to-peer traffic (1 to 1 calling). As a best practice, Microsoft recommends that you mark your traffic on the network. There are ways to mark traffic on the PC/device itself but seeing as Windows and Mac clients are the only client types to allow client side marking (won’t work for mobile devices, IP phones, etc.), for that reason alone it is highly recommended to mark this traffic on the network instead. Lastly, any traffic coming from Office 365 should be marked as well. Since this traffic is coming from the internet it will not have any marking once entering your network. However, on your network ingress on your routers to your ISP you can look at the client ports and make the determination on media type, and then give the traffic the appropriate tagging.
Teams Client Port Ranges
The teams client port ranges are exactly the same as Skype for Business Online and use separate port ranges per workload. Those port ranges include:
- Audio
- 50,000 – 50,019
- DSCP value: 46
- DSCP class: Expeditied Forwarding (EF)
- 50,000 – 50,019
- Video
- 50,020 – 50,039
- DSCP value: 34
- DSCP class: Assured Forwarding (AF41)
- 50,020 – 50,039
- Application/Desktop Sharing
- 50,040 – 50,059
- DSCP value: 18
- DSCP class: Assured Forwarding (AF21)
- 50,040 – 50,059
All of these client port ranges will prefer UDP over TCP but can fallback to TCP.
Note: Web clients do not currently use these port ranges due to platform limitations thus traffic for web clients cannot be prioritized.
QoS Considerations
Although QoS isn’t required to use Teams, it is highly recommended that you deploy QoS in your network. If you know that QoS is already configured in your environment then you should definitely consider using it for Teams as well. If you have QoS being used today by other applications but not Teams, this will mean that your users will have an adverse experience with Teams since the other applications utilizing QoS are getting priority over Teams. However, if you don’t have QoS in place on your network, you may opt to leave things as is due to the high cost and management difficulties it may present. Instead, you may want to invest in additional bandwidth since QoS really only comes into play when you have a lack of bandwidth and in turn it helps you prioritize your audio/video/desktop sharing traffic. If you do have sufficient bandwidth then QoS won’t have any affect on your network so many customers will typically just purchase more bandwidth rather than dealing with a huge QoS project.
Tools for Network Planning
Last but certainly not least, is the importance of using tools for network planning and optimization. When planning your network for Microsoft Teams you have a few different options:
- Network Planner – Plan for required bandwidth
- Skype for Business/Teams Network Assessment Tool – Check for quality and connectivity from client location
- Tracert – Investigate routing to Office 365 network
Network Planner
The Network Planner is a wizard based tool that will help you plan for your bandwidth in Microsoft Teams. In this tool you’ll need to provide information like:
- What are your locations?
- What are your networks?
- What types of personas do you have?
- How many users?
- How much audio/video/desktop sharing do you expect each persona to use?
The tool then uses this information to determine if each location has sufficient bandwidth to support Teams in that environment. In addition, the tool will make recommendations on specific things to look at to improve your experience in Teams as well as give you the opportunity to export the subnet information you provided to in turn import into the Call Quality Dashboard (CQD).
Note: This tool gives you the predicted bandwidth which doesn’t necessarily translate to the actual usage of Microsoft Teams, but does serve as a good starting point.
Skype for Business/Teams Network Assessment Tool
This tool is a command line based tool which is used to test network quality and connectivity. In order to use this tool you’ll just need to go to http://aka.ms/NWATool and install this from any location you want to test. So, if Alice wants to test from her Chicago office she’ll just need to install the tool, run it on her computer while internal to the network, and see if she passes the necessary network quality and connectivity checks. As mentioned there are two different types of tests you can run within the Skype for Business Network Assessment Tool:
- Network Quality Test
- Conducts a real audio call (17 sec in length) from client to Office 365
- Reports networking metrics
- RTT (Round Trip Time) latency
- Packet loss
- Jitter
- Connectivity Test
- Tests connectivity to both media ports and current relays
- Relays are added/removed from time-to-time
- Tests connectivity to both media ports and current relays
Tracert
Although not specifically made for Teams, Tracert is a very good command-line tool built into Windows which allows you to see how traffic is being routed.
Note: Tracert packets might use different paths than Teams since Tracert leverages ICMP packets it is possible for this traffic to be routed differently than Teams media traffic.
Tracert also gives you the flexibility in that you can run this against any IP in the Office 365 network. So if you wanted to run: “tracert world.tr.teams.microsoft.com” this would run against the Transport Relays that are used in Teams. Once this finishes running you should be able to see the amount of hops you have on your internal network so you can optimize accordingly. In addition, you should take a look at the amount of hops that it takes across the internet before it reaches the Office 365 network and work with your ISP to optimize this traffic.
This wraps up the blog series on planning your network for Microsoft Teams. Just as a recap of everything we’ve covered in this series:
- Plan and provide sufficient bandwidth
- Without sufficient bandwidth you won’t be able to support Teams real time media traffic.
- Connect to Office 365 network as directly as possible
- You need to optimize your enterprise network by avoiding centralization, hairpins, etc.. Anything that introduces latency
- You need to optimize the traffic across the internet by working with your ISP to ensure they are providing the most direct route as possible
- Check each site for network connectivity and quality
- Utilize the free tools Microsoft provides (Network Planner and Skype for Business Network Assessment Tool to ensure you have low latency, packet loss, and jitter.
Provided that you are able to cover the three points above, then you are in good standings for supporting Microsoft Teams in your environment. I hope you have found this blog series helpful and I encourage you to check back again soon, as I cover topics like this on a regular basis.


