In Part 1 of this series, we extensively covered setting up a Helix-based project to support handling site metadata generation and caching. In Part 2, we are going to bring it to the finish line by adding templates, scaffolding actions, PowerShell scripts, and much more. Let’s get started!
Prep Work
Before we actually get to the Sitecore side of things, we still need to do a bit of setup on the project side to ensure that our changes are tracked. If you don’t have one already, set up a Unicorn serialization config using one of these base templates, or the one provided in the github, show below:
<configuration xmlns:patch="http://www.sitecore.net/xmlconfig/">
  <sitecore>
    <unicorn>
      <configurations>
        <configuration name="YourProject.Feature.SiteMetadata"
                       description="Module for site metadata."
                       dependencies="YourProject.Foundation.*"
                       extends="Helix.Feature">
          <predicate>
            <include name="Scripts" database="master" path="/sitecore/system/Modules/PowerShell/Script Library/YourProject/SiteMetadata" />
            <include name="Settings" database="master" path="/sitecore/system/Settings/Feature/YourProject/SiteMetadata" />
          </predicate>
        </configuration>
      </configurations>
    </unicorn>
  </sitecore>
</configuration>
You will also want to make sure that any templates and renderings are serialized as well, but for the solution that this came from, a separate configuration was handling Feature templates and renderings. Now we can really get started!
Really Getting Started
First, we can go add a single controller rendering at /sitecore/layout/Renderings/Feature/YourProject/SiteMetadata. We’ll call it “Web App Manifest” and give it the following field values:

![]()
Remember that our controller is using GetIndexViewName to resolve the view path, so we need to provide the Rendering View Path with the correct value so that it can find our view. Make sure that this rendering is being serialized.
Next, we are going to add an interface template. An interface template is not different from a normal Sitecore template, except that the name has a leading underscore to designate that it shouldn’t be used for item creation. It should be located at /sitecore/templates/Feature/YourProject/SiteMetadata and inherit from the Standard Template. We’ll name it “_Web App Manifest”. Set the template up with the following fields:
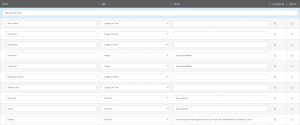
Some of the fields are using SXA tokens combined with Sitecore queries, which is a powerful yet flexible pattern for item scaffolding. Regarding the Display Types field, this will be set up in a moment once we start creating Settings items. Once this is created, go back to the Templates file in your project and fill in the GUID fields with the field IDs from the template you just created.
The first Settings item you need to create is a PowerShell script. Find the PowerShell script library located at /sitecore/system/Modules/PowerShell/Script Library and insert a PowerShell Script Module Folder from the Context Menu, named after your project.

Right click on this folder and choose Insert > Module to bring up a dialog. Ensure that the Enable Module box is checked and name it “Site Metadata”. Leave the Integration Points unchecked.
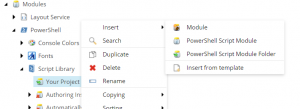

Right-click the Module and select Insert > PowerShell Script Library and name it “Functions”. Under this, insert a PowerShell Script called “AddWebAppManifestMetadata”. Your tree should now look like this:

Elevate your session and paste the contents of AddWebAppManifestMetadata.ps1 to the Script Body field. This script will add the Web App Manifest rendering to your site’s Metadata partial design on the head placeholder when the Site module is installed. You can always specify a different partial design or placeholder in the script body. Make sure that the PowerShell Script Library folder and its children are serialized.
Finally, we can add our scaffolding actions. Navigate to /sitecore/system/Settings/Feature and add a folder named after your project. Right-click the Feature node to choose Insert > Module. This action will bring up a dialog where you can provide some information and a new Feature scaffolding action will be created for you.

Personally, I’ve had a lot of trouble with this feature, so if you encounter problems with module creation you can do it manually. Add another folder under your project called Site Metadata, then add two templates into this folder.
/sitecore/templates/Foundation/Experience Accelerator/Scaffolding/Roots/SiteSetupRootnamed Site Metadata Site Setup/sitecore/templates/Foundation/Experience Accelerator/Scaffolding/Roots/TenantSetupRootnamed Site Metadata Tenant Setup
You can also add a folder called “Enums” at this time and leave it empty. By now your folder should look like this:

Be sure to give the Site and Tenant setup items a unique name, as this is what will appear in the Add Module dialog. I like to designate them like Site Metadata (Your Project). A nice touch on the Site setup item is to specify a dependency, which will prevent installation unless a tenant has that item installed. For this choose either the Tenant setup item, or the Edit Tenant Template action which will be created shortly.
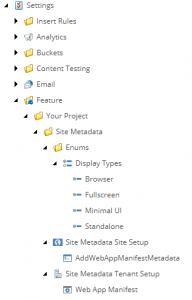
First, for the Enums folder, add an Enums item (/sitecore/templates/Foundation/Experience Accelerator/Common/Enums) called Display Types. Insert four Enum items (/sitecore/templates/Foundation/Experience Accelerator/Common/Enum) with the following names and values:
- Browser: browser
- Fullscreen: fullscreen
- Minimal UI: minimal-ui
- Standalone: standalone
These will be referenced by the Display Type field on the Web App Manifest interface template.
Second for the Site Setup scaffolding action, right-click and choose Insert > Execute Site Script and name it “AddWebAppManifestMetadata”. Select the PowerShell script you created from the treelist on the left. This will execute your script when the module is installed.
Third for the Tenant Setup scaffolding action, right-click and choose Insert > Edit Tenant Template and name it “Web App Manifest”. Choose the Settings item from the Template treelist, select Add Base Template from the Type of Action, and finally find the interface template from the treelist. This will add the interface template to the Settings item when the module is installed.

Your tree should now be complete and look like this:
Now all that remains is to test our module!
Finishing Up
Go to your tenant and add a module using the Context Menu > Scripts > Add Tenant Module. You should see your module in the list:
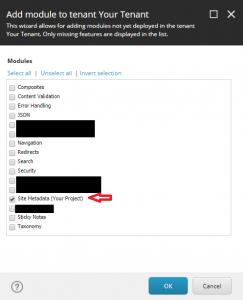
Add it and then do the same for your site using the Context Menu > Scripts > Add Site Module. You should see your module in the list:

Double check that the installation worked by looking for the new section of the Settings item and the new control on the Metadata partial design shared presentation details.
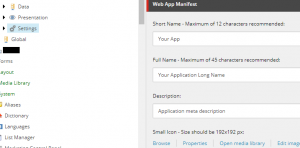
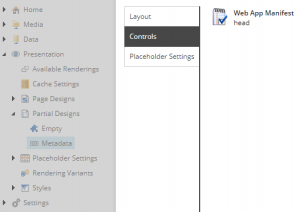
Fill out the appropriate values on the settings item and then publish the site. When you navigate to a page you should be able to see the tags in the head of the HTML.
![]()
Conclusion
With these steps in place, you should now be able to control metadata at the site level swiftly and dynamically while having it available as a flexible SXA module for other tenants and sites to utilize. Let’s review one last time what should happen once all the pieces are in place:
- Custom SXA modules are added to a tenant and site.
- Values for the Web App Manifest are provided via a template section on the site Settings item.
- The site is published and the manifest cache gets cleared at the end.
- The HttpRequestBegin pipeline is called and generates the content from a custom pipeline.
- The manifest is rendered and optionally cached.
- The Metadata partial design calls the Web App Manifest controller rendering.
- A repository builds upon stock SXA meta tags to add new ones and a path to the cache manifest.
- A view renders the tags as HTML in the head of the document.
As you can see, this was a rather large undertaking for such a small piece of generated code, but what you have learned about creating SXA modules and editing pipelines will have bigger implications in the future as you find more use cases for these types of projects. Keep an eye out for future series where I detail modules that handle much cooler things like tenant-specific languages and video streaming platform APIs.
Thank you for reading!

