Oracle Analytics Cloud offer several options when it comes to loading data from Oracle SaaS (such as Financials, HCM, Sales, etc…). Using OAC against Oracle SaaS has several advantages, and most importantly being able to perform analytics on data that is not part of the SaaS application. You may be familiar with using Data Sync or Data Flows/Data Sets to connect to Oracle SaaS and load data into the OAC Data Warehouse or Data Sets. Now, however, there is a new method, called Data Replication. Replication offers a better means of easily replicating Oracle SaaS data into OAC. The new approach relies on the Oracle Fusion Application Storage Container, unlike the Data Set connection that connects to SaaS mainly via Oracle Transaction Business Intelligence (OTBI). For a more detailed comparison of the different ways to connect OAC to Oracle SaaS, you may refer to my previous blog here. This blog focuses solely on the steps of using OAC Data Replication.
Before going into the details, please note that Data Replication is available in OAC Data Lake or Enterprise Editions that have been patched with OAC 18.3.3 (also referred to as OAC internal v5). In addition, Replication currently only works against Oracle SaaS: Oracle Fusion Applications, Oracle Service Cloud (RightNow), Oracle Talent Acquisition Cloud (Taleo), and Oracle Eloqua.
There are a few pre-requisites to creating an OAC Fusion Application Storage connection for Replication purposes. And these may seem overwhelming but they are really a one-time setup that only needs to be done in the beginning. If your source connection is not a Fusion Application (such as RightNow, Taleo or Eloqua), skip over these four pre-requisites as they are not applicable.
- Unlike a Data Set Connection where we can either connect as a SaaS admin user or a SaaS end user, Data Replication always requires an admin user to connect to Oracle SaaS. This means that data level security defined for a user in SaaS doesn’t flow over automatically to OAC, like the case of a Data Set connection. There are other means to inherit the SaaS app security policies in OAC, and I will elaborate on that in a separate blog post.
With a Data Replication connection from OAC to Oracle SaaS, ensure that the Fusion Application user is assigned the appropriate Application Roles for export tools. This assignment is done in the Fusion Application Security Console. If a BIACM_ADMIN Fusion App role doesn’t already exist, create one and add the following 2 role memberships: “ESS Administrator” and “ORA_ASM_APPLICATION_IMPLEMENTATION_ADMIN_ABSTRACT”. Then assign the user to be used in the Replication Connection to the BIACM_ADMIN role. - The version of Fusion SaaS needs to be 13.18.05 or higher. In addition, a data extract from Oracle SaaS must be enabled and scheduled as needed from within the BI Cloud Connector (BICC), in the Oracle Fusion SaaS application. For more information about setting up an extract using BICC, refer to this Oracle Doc.
- A Cloud Storage Classic Service is required and this is already included in an OAC customer-managed subscription. For Autonomous OAC subscriptions, an additional subscription to Cloud Storage Classic Service may be needed if not already available. The Replication User will have to connect to the Service Console of the Oracle Storage Classic Service and create a Storage Container. Once created, take note of the Rest Endpoint Url of the newly created Storage Container. This Rest Endpoint Url is needed later to enter as the Storage Host and Storage Service Name.
- Setup and Configure a Storage Cloud Container to be used by the Fusion SaaS BI Cloud Connector. This is done in the Fusion SaaS BI Cloud Connector Console. In Fusion release 18.05, it is required to setup the same settings under both: “Configure External Storage” and “Configure OAC External Storage”. In SaaS releases later than 18.05, “Configure OAC External Storage” is enough. Select “Cloud Storage Service” as the Storage Type and HTTPS as the protocol. For the Host, enter the base part of the Rest Endpoint URL from the previous step. Use the storage Admin user credentials. For the Service Name, enter the last part of the REST Endpoint URL from the previous step. After testing the connection, select the Storage Container name created in the previous step and save the settings. When the BI Cloud Connector next runs, it will save the files to the newly configured cloud storage container.
Following are 4 steps to create a Data Replication:
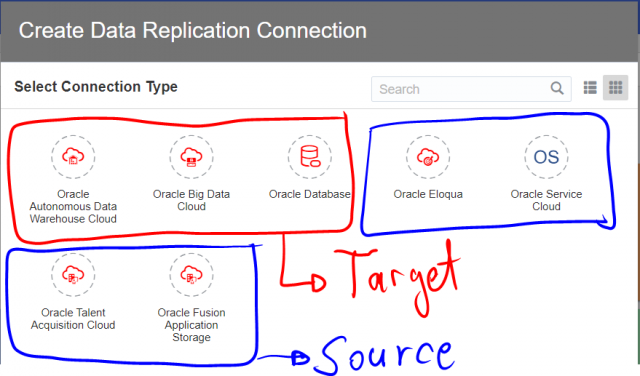
Step 1: Setup a Connection to the Source Oracle Cloud Application by clicking on Replication Connection from the Create menu. Notice that you are presented with a list of connection types. Some of these connection types only work as a data source and some work only as a target connection as specified in the screenshot below.
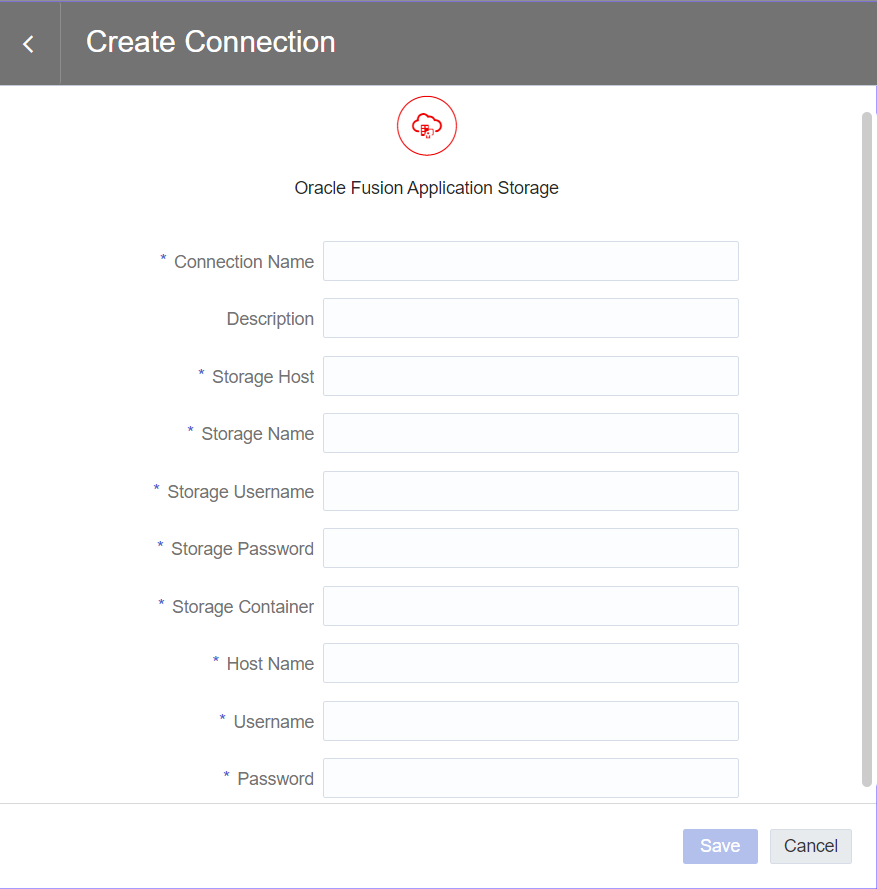
For a Fusion Application Storage connection, the following information is needed:
- Storage Connection Detail: This is based on the Rest Endpoint URL that was created in the pre-requisites section above. The host is the base part of the URL while the Storage Name is the ending part of the same Storage REST Endpoint. The Storage Container is the same Storage Container name created in the pre-requisites section above as well.
- Fusion Application Connection Detail: The HTTPS base URL to your Fusion Application needs to be appended with /bi/ess/esswebservice for the Host Name. For example, https://fusionhost.oraclecloud.com/bi/ess/esswebservice
Guide to Oracle Cloud: 5 Steps to Ensure a Successful Move to the Cloud
Explore key considerations, integrating the cloud with legacy applications and challenges of current cloud implementations.
Step 2: Setup a Target Connection to Load Data Into
The target of the replication may be one of: Oracle Database Cloud Service, Oracle Autonomous Data Warehouse Cloud Service, or Oracle Big Data Cloud Service.
Ensure that the database user for the Target Connection has privileges to create, drop and alter tables as these operations are part of the OAC Data Replication tasks.
Step 3: Create a Data Replication Task by clicking Data Replication from under the OAC Create menu.
- Select a replication source. If you select Fusion SaaS, you would then chose one of the available offerings for you, such as Finance, Human Resources, etc…
- Select a View Object to replicate: The selection pane lists out the available PVOs from the selected Oracle SaaS application. You can alternatively search for a specific PVO by name if you know it. The replication also supports sourcing data from custom View Objects in addition to the out of the box PVOs. Once you select a View Object to replicate, you can then provide additional specification about the replication tasks, such as which columns to replicate, apply a filter expression to filter out subsets of the source data, rename the target table and columns if preferred, and whether you want to allow incremental load on the specific replication task. If you chose to support incremental, you are required to specify the primary key of the target table in order to perform updates against it, as well as designate which source date column is going to be used for new data identification. This is a similar concept to performing incremental load strategy with DataSync or any other ETL tool, but of course it’s a lot easier now since it’s all defined through an internet browser. It is highly recommended to define incremental load in order to enhance data load times on a recurring schedule.
There are a couple of important features I would like to highlight here:
First is the “Include Deletions” option which is only available when the Load Type selected is Incremental. This feature is typically referred to as “soft deletes”. What this does is preserve the records that had been deleted from SaaS, in the target OAC table. Such records will continue to exist in the target table and are marked as Deleted via the target table column CDC$_DM_CODE. A Load Type of Full Load means that any records deleted in the source won’t be available at all in the target table.
The Second feature that is worth noting here is the “Include History” option. This is useful if you are sourcing data from View Objects that support change history on the data. For example, the historical tracking of changes to an employee’s address. It is important though to be careful with the definition of primary key columns in this case because a unique ID column may not always be unique when change history is enabled. Accordingly, it may be necessary to add more columns to the primary key definition of the target table to ensure that the primary key is unique across all historical data.
After finishing the Data Replication definition, you select the connection to a target database and schema to store the resulting data into.
Step 4: Run and Schedule a Data Replication Task
Once the Data Replication task is saved, you can then run it or schedule it to run automatically based on a pre-defined schedule. As the replication runs, you can monitor its execution under the Data Replications tab and get an update on its status. In case it fails, the status provides more details about the error encountered. Additional details can also be obtained by querying the corresponding error table from the database as described in the reported error message.
To learn about implementing OAC security based on Fusion SaaS Security settings refer to my next blog post here.


Hi,
How to modify DB connection to in the existing DataSet?
Let’s say, I have created a Dataset with DB connection “DB-A”, if I want to modify the connection to “DB-B” in the same Dataset – How do I do it? Could you please help me here.
Thanks,
JL