
There are several ways to set up a custom domain in Salesforce, but there is only one way you should be setting up your custom domain. Trust me, I went through the headache of trying every single one.
Yes, setting up a domain can be daunting. But, I’ve broken it down into five easy-to-follow steps (the key word being “easy”). Below, I will take you through the steps clearly and specifically so you’ll have your custom domain setup in your Lightning Community in no time flat.

How to Set Up a Custom Domain for a Lightning Community
Before you get started, you will need:
- Ownership of the domain you want to set up your community with, and access to the hosting company where the domain resides (e.g. if you want your community to be domain.com and its hosted with GoDaddy, you’ll need access to that GoDaddy account)
- Admin access to your Salesforce production org where the community will reside
- A Lightning Community that has been created in your production org
The Example Set Up
For this setup, we’ll use the following example: say you own domain.com, which is hosted through Hosting Company A. You will want your Lightning Community URL to be domain.com or domain.com/community.
Step 1: Setting Up the Domain
Setup the domain
First, you will want to make sure you own the domain and you’re logged into the correct hosting company where your domain is registered.
Once you’re logged into the correct location and the domain is registered, you will want to log into your domain hosting company’s cPanel. (Getting into the cPanel differs slightly from host to host. If you’re having problems, get in touch with your hosting company’s support).
Once you’re in the cPanel, search for Zone Editor.
Once you’re in the Zone Editor, you will see a list of domains you have in your account. Select + CNAME Record for the domain you’d like your community to be (domain.com).
Get the correct CNAME
Now, open a new tab or window in your browser and log into your Production Salesforce org.

Once in the org, go to Setup > Domains > Add a Domain. On this screen, you will see a unique CNAME record (see below).

For our example above, your CNAME would be www.domain.com.00do0002400opm8asg.live.siteforce.com. Every Salesforce org will have a unique ID after www.domain.com.
Highlight and copy 00do0002400opm8asg.live.siteforce.com which you will use in the next step.
Back to cPanel
Navigate back to the window or tab where you have the cPanel open (you should be seeing the screen where you’re entering a CNAME for the domain you’d like your community to be on).
For the Name field, you will enter “domain.com” (or whatever domain you’d like your community to be).
For the CNAME, type in your desired community domain name (“domain.com”) then paste what you copied from the previous section. Your screen may look similar to the screenshot here:
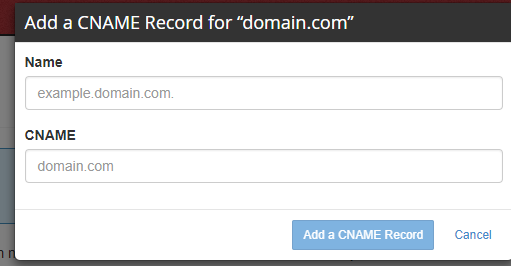
Then click Add a CNAME Record.
Step 2: The SSL Certificate
This is something you’re going to get from your domain hosting company. I’d recommend getting on chat or calling your hosting company and asking them for a complete, end-to-end, APACHE, signed SSL certificate for the domain you’d like your community to live on (domain.com, in our example).
Typically an SSL cert will cost ~$100 per year and can be renewed through your hosting company. This step can be quite a bit different for each hosting company, so getting in touch with them is going to be your best bet.
When this step is complete, your hosting company will direct you to (or send you) a location to download a file. That file is the SSL certificate that you will upload into your domain record in Salesforce, which you will need it for the next step.
Step 3: Setup SSL Certificate in Salesforce
 Log into your production Salesforce org
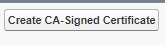
- Go to Setup > Certificate and Key Management
- Click Create CA-Signed Certificate
- All of these fields on this page can be anything you’d like except for the Key Size which that should remain as 2048. Also, you will be selecting this Certificate via the Label Name in the next step
- Click Save after all fields are filled out
- Now click Upload Signed Certificate then Choose File and navigate to the certificate you acquired in Step 1
Step 4: Create the Custom Domain in Salesforce
- Log into your production Salesforce org
- Go to Setup > Domains
- Click New Custom URL
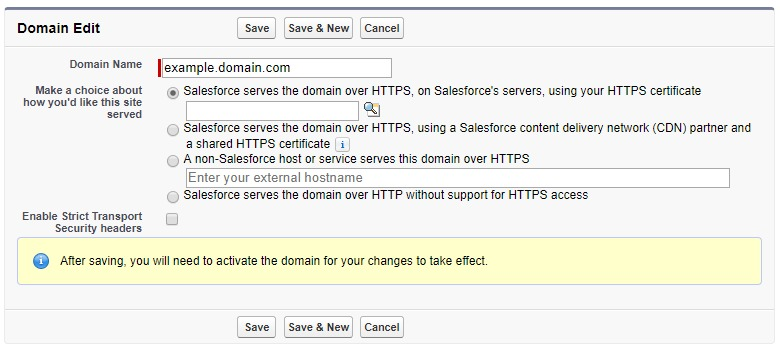
- Fill out your domain (domain.com or example.domain.com) into the Domain Name field
- Select Sales serves the domain over HTTPs…
- Then, click the Lookup Icon and navigate to the Certificate you created in Step 2
- Click Save
If you completed Step 1 correctly, this will go through no problem. If you get an error message, your CNAME record is likely incorrect (back to Step 1 for you).
- Now, when viewing the domain record click New Custom URL
- Select your domain via the lookup icon
- For the path, that should typically be “/”, unless you want your community to live on domain.com/community
- For the Site field, click the lookup icon and select your Lightning Community
- Then click Save
Step 5: Make the Domain the Default URL for the Community
- Go to Setup > Domains and select your new domain
- Under the Custom URLs section, click the Site Label (see below)

- Now under Custom URLs click Edit next to your custom domain
- Then click the checkbox for Site Primary Custom URL, then click Save
Now, your community should be set up with the new custom domain! Typically after the last step, it will take up to one hour for everything to be fully complete (it may be complete before that). Now, assuming your community is active you can simply go to the custom community domain to test if it’s working. Did this article help you? Let me know in the comments below.
Andrew, very helpful and informative. Thank you.
I think the one additional piece of information that would be helpful is how to have the naked domain connect directly to the Salesforce site without having to use the http://www.domain.com URL.
If I want http://domain.com to work, is there some way to do that with a CNAME record? Is it necessary to modify the A DNS record to have @ point to IP address of the Salesforce site?
Or do you need to set up a redirect at the registrar so that http://domain.com redirects to http://www.domain.com ?
What is the best way to solve this issue. Because currently after following steps outlined in your blog I have the http://www.mydomain.com going to the new force.com site while mydomain.com without the www goes to my old website.
Appreciate any help you can provide. My registrar and DNS record for the domain are hosted at GoDaddy.com
-Jeff