We’re half way there! Today we discuss phase 4 of 8 on our migration to Skype for Business Server 2019. In this article we’ll be discussing moving test users to your pilot pool that you have already, planned, prepared, and deployed! If you are just tuning in for the first time, check out my blog page for Phases 1-3. With that said, let’s get moving (get it…hehe)!
Phase 4: Move test users to pilot pool
Now that we have deployed the Skype for Business Server 2019 pilot pool, it is time to start moving test users to that pilot pool. There are two methods that can be used when moving either single users or groups of users:
- Skype for Business Control Panel
- Skype for Business Management Shell
The topics in this section outline tasks that must be completed during the pilot deployment, as well as prior to moving your deployment of Skype for Business Server 2019 from pilot deployment to a production-level deployment.
View current users in legacy pool
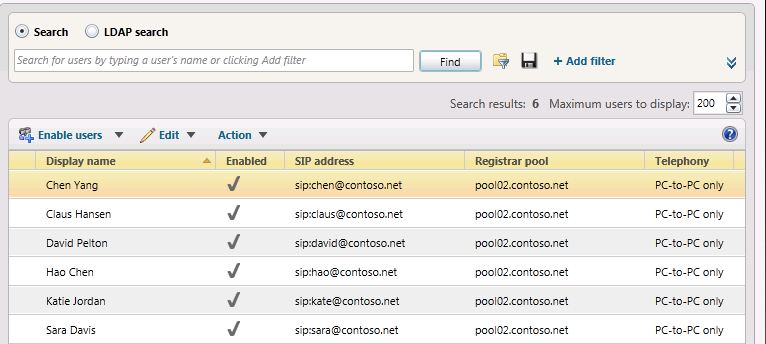
- Before learning the various ways you can move users between pools, we must first determine which users exist in the legacy pool. In the image below, the Registrar pool column identifies six users who are configured for the legacy pool. These are the test users we will move to the Skype for Business Server 2019 pool.
- Log on to the legacy Front End Server with an account that is a member of the RTCUniversalServerAdmins group or a member of the CsAdministrator or CsUserAdministrator administrative role.
- Open Skype for Business Server Control Panel.
- Click Users, click Search, and then click Find.
Verify user replication has completed
- You may notice that after running a the Move-CsUser cmdlet, you sometimes will experience a failure. This is due to the fact that ADDS (Active Directory Domain Services) and the Skype for Business Server 2019 databases are out of sync because the initial replication is not complete. Depending on the number of domain controllers you are hosting in your Active Directory forest that hosts the Skype for Business Server 2019 pool will determine how long it takes for the successful completion of the Skype for Business Server 2019 User Replicator service’s initial synchronization. This User Replicator service initial synchronization process occurs when the Skype for Business Server 2019 Front End Server is started for the first time. After that point the synchronization is based upon the User Replicator interval. The following steps should be followed to verify that the replication has completed before running the Move-CsUser cmdlet.
- Log on to the computer where Topology Builder is installed as a member of the Domain Admins group and the RTCUniversalServerAdmins group.
- Click the Start menu, and then click Run.
- Enter eventvwr.exe, and then click OK.
- In Event Viewer, click Applications and Services logs to expand it, and then select Skype for Business Server.
- In the Actions pane, click Filter Current Log.
- From the Event sources list, click LS User Replicator.
- In <All Event IDs>, enter 30024, and then click OK.
- In the filtered events list, on the General tab, look for an entry that states that user replication has completed successfully.
Move a single user to the pilot pool
- As mentioned earlier, you have the option of moving either a single user or groups of users to the pilot pool and that can be done either via Skype Management Shell or Skype for Business Control Panel. The steps for each option are as follows:
Moving a user via Skype for Business Server 2019 Control Panel
- Log on to the Front End Server with an account that is a member of the RTCUniversalServerAdmins group or a member of the CsAdministrator or CsUserAdministrator administrative role.
- Open Skype for Business Server Control Panel.
- Click Users, click Search, and then click Find.
- Select a user that you want to move to the Skype for Business Server 2019 pool. In this example, we will move user Sara Davis.
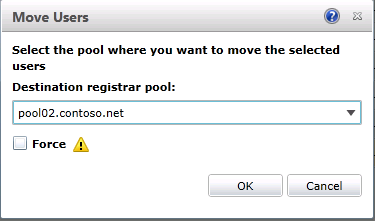
- On the Action menu, select Move selected users to pool.
- From the drop-down list, select the Skype for Business Server 2019 pool.
- Click Action, and then click Move selected users to pool. Click OK.
- Verify that the Registrar pool column for the user now contains the Skype for Business Server 2019 pool, which indicates that the user has been successfully moved.
Moving a user via Skype for Business Server 2019 Management Shell
- Open the Skype for Business Server Management Shell.
- At the command line, type the following:
Move-CsUser -Identity "Brian Siefferman" -Target "pool02.perficient.com"
- Next, at the command line, type the following:
Get-CsUser -Identity "Brian Siefferman"
- The RegistrarPool identity now points to the Skype for Business Server 2019 pool. The presence of this identity confirms that the user has been successfully moved.
Move multiple users to the pilot pool
- You also have the ability to move multiple users from your legacy pool to your Skype for Business Server 2019 pilot pool using the Skype for Business Control Panel or Skype for Business Management Shell. The steps for each of these options are as follows:
Moving multiple users via the Skype for Business Server 2019 Control Panel
- Open Skype for Business Server Control Panel.
- Click Users, click Search, and then click Find.
- Select two users that you want to move to the Skype for Business Server 2019 pool. In this example, we will move users Chen Yang and Claus Hansen.

- From the Action menu, select Move selected users to pool.
- From the drop-down list, select the Skype for Business Server 2019 pool.
- Click Action, and then click Move selected users to pool. Click OK.

- Verify that the Registrar pool column for the users now contains the Skype for Business Server 2019 pool, which indicates that the users have been successfully moved.
Moving multiple users via the Skype for Business Server 2019 management shell
- Open the Skype for Business Server 2019 Management Shell.
- At the command line, type the following and replace User1 and User2 with specific user names you want to move, and replace pool_FQDN with the name of the destination pool. In this example we will move users Hao Chen and Katie Jordan.
Get-CsUser -Filter {DisplayName -eq "User1" -or DisplayName - eq "User2"} | Move-CsUser -Target "pool_FQDN"

- At the command line, type the following:
Get-CsUser -Identity "User1"
- The Registrar Pool identity should now point to the pool you specified as pool_FQDN in the previous step. The presence of this identity confirms that the user has been successfully moved. Repeat step to verify that User2 has been moved.

Moving all users at the same time via Skype for Business Server 2019 management shell
In this example, all users have been returned to the legacy pool (pool01.contoso.net). Using the Skype for Business Server 2019 Management Shell, we will move all users at the same time to the Skype for Business Server 2019 pool (pool02.contoso.net).
- Open the Skype for Business Server 2019 Management Shell.
- At the command line, type the following:
Get-CsUser -OnLyncServer | Move-CsUser -Target "pool_FQDN"

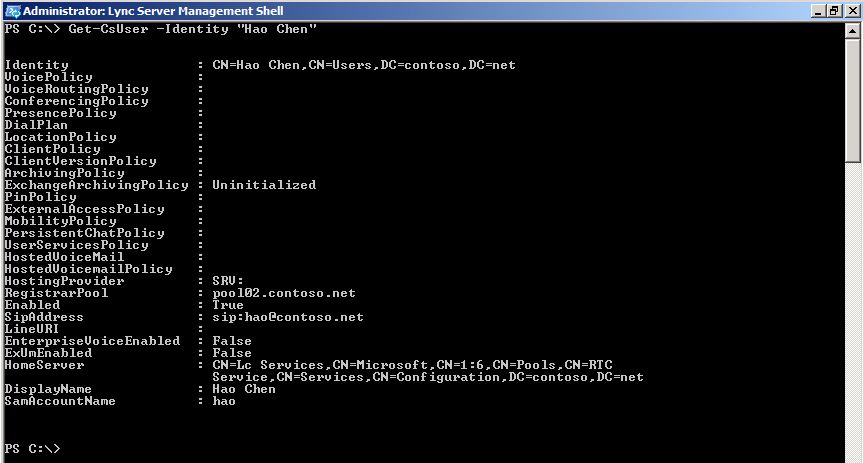
- Run Get-CsUser for one of the pilot users.
Get-CsUser -Identity "Hao Chen"
- The Registrar Pool identity for each user now points to the pool you specified as pool_FQDN in the previous step. The presence of this identity confirms that the user has been successfully moved.
- Additionally, we can view the list of users in the Skype for Business Server 2019 Control Panel and verify that the Registrar Pool value now points to the Skype for Business Server 2019 pool.

Great job! You’re officially done with Phase 4 in your migration to Skype for Business Server 2019! Check back tomorrow for Phase 5 where we discuss adding an edge server to your pilot pool!

