The default settings on a freshly downloaded virtual machine (VM) are great if all you need to do is view and maybe debug your website in IE11 or Edge, but if you want two screens or just need more pixels, need to run more programs, or write and compile code, you have to make some virtual machine optimizations.
The tips and settings referenced here are specific to VirtualBox virtual machines from Microsoft, but can probably be applied in several other VM environments.
1. A Checklist of Quick VM Optimizations
Configure your virtual machine’s memory allocation and other settings to help with performance. Do this before you start the machine up so your adjustments will become available when you sign in. Otherwise you can shut down the VM and run through the following checklist.
Settings Updates:
- Settings > General > Advanced > Shared Clipboard (Bidirectional) – This could help if you have already written some code on your Mac and need to copy and paste it into the VM.
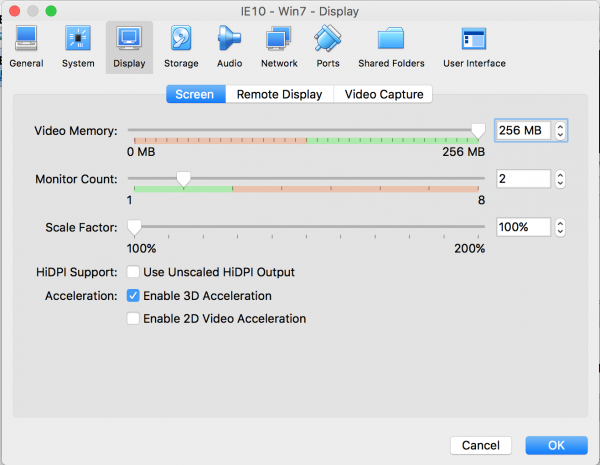
- Settings > System > Motherboard > Base Memory (12288 MB)
- Settings > Display > Screen > Video Memory (256MB)
- Settings > Display > Screen > Monitor Count (2)
- Settings > Display > Screen > Acceleration (check Enable 3D Acceleration)


2. More Pixels Please
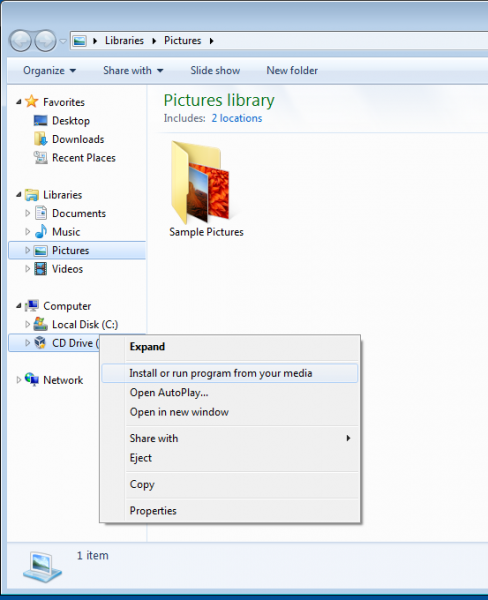
You’re not confined to that tiny default viewport. In the Devices menu, select “Insert Guest Additions CD Image.” This will be equivalent to inserting a CD into an optical drive. Be aware that this isn’t going to do anything other than hopefully prompt an installation wizard. You still have to run the program to install add-ons. (Select “Run VBoxWindowsAdditions.exe.”)
If you don’t see the installation wizard pop up, you might have to navigate to the CD drive in File Explorer and manually run the program to install add-ons. This will allow you to set your virtual machine screen resolution to 1920×1080 and give you the screen real estate you’re missing.
Also in the View menu, take the following steps:
- Select View > Auto-resize Guest Display.
- View > Virtual Screen 1 > Resize to 1920×1080.
- View > Virtual Screen 2 > Enable
- View > Virtual Screen 2 > Resize to 1920×1080.
Note: You might have to reboot after updating some of these settings if you’re not seeing the changes take place right away.
3. Take a Snapshot
Now that you can see and have taken care of some optimization and configuration settings, install whatever programs you’re going to need like Visual Studio, NVM for Windows, Node, Git, etc. Make sure you have everything you think you’re going to use, then go back to the VirtualBox Manager window and take a snapshot (top right) so you can restore your machine with all the settings you just spent all that time configuring.

4. Check Your Code In
Make sure to use Git often for virtual machine backups. If, for some reason, your VM decides it doesn’t like you one day and forces you to reinstall everything, at the very least you’ll be able to pull down your code and pick up where you left off.
If you need to work in a Windows environment, for example you need to compile your code with Visual Studio, you can run through the list of adjustments above and get your VM set up to develop in, then take a snapshot so you can easily reset back to a good working environment if your license expires. Also, don’t simply rely on your virtual machine file system. Even a shared folder between your VM and host system could be wiped out with the click of a button, so at least push a WIP commit before you shutdown.
If you’re looking for more tips on virtual machine performance, you’ll most definitely find a ton of help on Stack Overflow and VirtualBox.org forums. Please feel free to chime in with any other tips or related comments below.