
With the recent launch of Oracle Enterprise Planning and Budgeting Cloud Service (EPBCS), Oracle adds yet another cloud-based application purposed to centralize and simplify your Planning application development and needs. EPBCS is uniquely positioned as being an out-of-the-box solution for your Financials, Workforce, Capital Expenditures, and Projects budgeting and forecasting requirements.
Upon creating an Enterprise Application, one needs only to follow the configuration steps from start to finish and the application can be up and running much more quickly than would be required to develop a Planning/PBCS application from scratch. In this blog post, we will go over EPBCS application creation and how to configure the workforce module and how to get actual salaries loaded into the system.
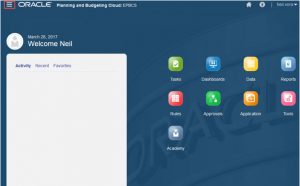
Upon accessing the new Planning Application, you are presented with this screen:

To begin creating your EPBCS Application, click ‘Start’ below Planning and Budgeting and select ‘Enterprise’.

Enter the Application Name and Application Description:

Set your Application Details:
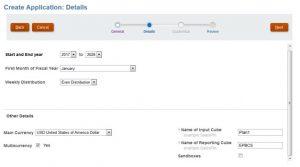
- The Start Year and End Year dictate how many fiscal years will be present in your ‘Years’ Dimension.
- Years can be added to the application beyond the end Year however once the start year is set, it cannot be changed and no years can be added prior to it.
- The Weekly Distribution dictates how data is spread amongst a quarter (4-4-5, 4-5-4, 5-4-4, Even)
- You can also select a Main Currency, make your Application Multicurrency, and name your custom plan types.
- Once you have made all of your selections, click ‘Next’ and then ‘Create’, to finish the creation of your application
Once the application creation has completed, you are brought to the application splash page, click on the menu icon in the top left to access the Application Navigator.

To access and configure the out of the box modules, from the navigator menu, select ‘Configure’

From the Configure screen, you have the ability to enable all of the modules: Financials, Projects, Workforce, and Capital Expenditures. In this guide, we are going to enable and go through the features of the Workforce module, as well as some overall understanding of how the module works.
From the Configure Dropdown, select Workforce, and then, ‘Enable Features’

This will bring the user to the ‘Workforce – Enable Features’ screen with the following options:
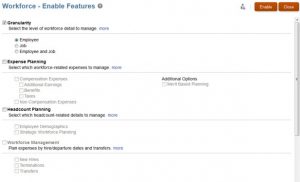
Note: Once a feature is enabled, it cannot be disabled, however features that have not been enabled can be enabled at a later time.
- To enable any of the out of the box features, Granularity must first be checked and an option must be selected.
- The Employee level of granularity allows workforce expenses to be managed only at the Employee level.
- The Job level of granularity allows workforce expenses to be managed only at the Job level.
- Selecting Employee and Job allows workforce expenses to be managed by both
- The out-of-the-box application can be configured to allow for detailed workforce expense planning
- Enabling any and all of the options in this section will allow you to plan workforce expenses at the desired level of detail
- Enabling headcount planning allows the for planning by employee demographics and strategic workforce planning
- Selecting Employee Demographics allows workforce expenses to be planned by certain attributes such as veteran stats, gender, and age.
- Selecting Strategic Workforce Planning allows planning and forecasting of long term corporate strategy through headcount and required skills
- Enabling Workforce management allows workforce expenses to be planned for New Hires, Terminations, and Transfers
- Enabling New Hires, Transfers, and Terminations creates metadata, business rules, and forms to plan for workforce expenses/changes in any of these three domains
Administrators can also Map/Rename the out of the box dimensions and add custom dimensions relevant to that specific module (workforce). The dimensions that appear here will change depending upon the selections made above. The same custom dimensions can be used in other modules.
- You can enable up to three custom dimensions for each module
- This step must be performed the first time the module is enabled

For the purposes of this guide, I have enabled the following:

Once all of the above has been completed, click Enable to begin the creation of the Module with your selections. Once the features have been enabled, log out and log back in to the application.
From the Navigator menu in the top left, return to ‘Configure’ and select ‘Workforce’ from the Configure dropdown menu.
Notice now that the screen/options have changed. To return to the ‘enable features’ options if you desire to add more features, click ‘Enable Features’. If not, follow the steps outlined in the workforce configuration below:

To get the application up and running, we simply need to go through and complete each of the (mandatory) configurations. The more thorough we are in completing the steps here, the more polished our application will be from the start.
- Importing the Component dimension (Optional)
- The Component dimension consists of different workforce expense pieces, i.e, Salary, Benefits, Taxes, and Additional Earnings
- The unedited dimension is created as:
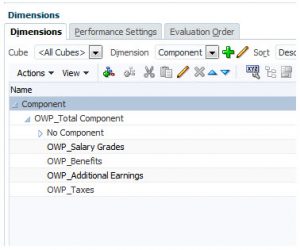
- Add the desired components to each of the prebuilt hierarchies
- Importing Entities (Mandatory)
- The Entity dimension typically consists of the companies, departments, or legal entities within an organization.
- The unedited dimension is created as:
- All Entities/hierarchies must be added under the ‘OEP_Total Entity’ hierarchy.
- Salary Grades (Mandatory)
- Once you have imported your salary grades (component), this section is used to set up the rates and basis for each grade
- The Salary Basis refers to the type of salary being paid out (hourly, annual, etc.)
- The Rate refers to the rate (dependent upon the basis that was chosen)
- Options and Tiers (Optional)
- We have the ability to set options for additional earnings and benefits and tiers with thresholds for taxes
- Planning and Forecast Preparation (Optional)
- EPBCS allows for forecasting/budgeting future years at a lower level of granularity than the typical month level. The application can be set up to have the current year forecast be monthly, the next year be quarterly, and the following to annually; or any variation therein.
- This section is used to set the granularity and period/year range for the forecast and budget. (This can be updated prior to each forecast/budget cycle)
- Changes made here will automatically be applied to all modules
- Benefits and Taxes (Mandatory)
- In this section, we are able to set up all of our benefits, taxes, and additional earnings
- The members available here will depend upon what was loaded during the ‘Importing Components’ section.
- Clicking on the ‘Benefits’ link, allows you to toggle between the component type

- Clicking on a specific Benefit/Additional Earning/Tax brings you to the following screen:

- Each Benefit/Additional Earning/Tax has various configurable options
- Component Type
- This is used to select a simple table, a rate table, or a rate and threshold table
- The Simple Table option has just one rate and one threshold value per year
- The Rate Table option allows for different rate options with no threshold values
- The Rate Table and Threshold option allows for different rate options with different thresholds
- Payment Terms
- Specify when/how often the benefit/earning/tax is paid out (Annually, semi-annually, monthly, semi-monthly etc.)
- Payment Frequency
- Dictates when the expense will be paid out, depending upon the granularity selected in the payment terms
- Value Type
- Specifies the type of value that will be input as a rate (flat amount, percentage of salary, etc.)
- Maximum Value Type
- Specifies the type of value that will be input for the threshold value (flat amount, percentage of salary, etc.)
- Taxable Component
- Specifies whether the component should incur a tax
- Earning Type
- Specifies whether the component should or should not be added to gross pay
- Once all of these options have been selected, click next to enter your rates/thresholds
- Once you have entered the rates/thresholds, click Next, and then, save
- This is used to select a simple table, a rate table, or a rate and threshold table
- Workforce Assumptions (Mandatory)
- This brings you to a form to input assumptions such as partial payment factor, hours per day, and hours per week
- These assumptions will be applied globally to all hourly employees (unless the data loaded specifies otherwise)
- Employee Properties (optional)
- This is an optional step to view and add any employee properties that you would like to track
- Non Compensation Expenses (optional – if enabled)
- This is an optional step to view and add any non-compensation expenses
- Performance Metrics
- This is an optional step to view and add any Performance Metrics that you would like to track
- Merit Rates (Mandatory – if enabled)
- This is used to set defaults across the application for standard merit increases
- Importing Employee Dimension (Optional)
- This step can be used to import your desired Employee Dimension
- The unedited dimension is created as:
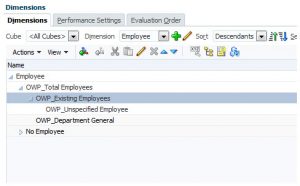
- All existing employees/employee hierarchies will be loaded under ‘OWP_Existing Employees’
- Importing Job Dimension (Optional)
- This step can be used to import your desired Job Dimension
- The unedited dimension is created as:

- All Jobs/Job hierarchies are loaded under ‘OWP_Total Jobs’
- ‘OWP_All Jobs’ is used for setting default Assumptions (i.e assigning benefits/earnings globally)
- Union Code (Optional)
- This step can be used to import your desired Union Code Dimension
- The Union Code dimension can be used to distribute different taxes/earnings/benefits to different jobs or employees
- The unedited dimension is created as:

- Union Codes/Union Code Hierarchies will be loaded under ‘OWP_Total Union Code’
- ‘OWP_All Union Code’ is used to set global defaults
- Custom Dimensions
- Any custom dimensions will need to be loaded here as well
- Component Type
- Importing Entities (Mandatory)
Once all of the above configurations are completed, the application framework has been built and can begin being used/further developed. In order to deploy all the changes made, the database must first be refreshed.
- If you are not already on the Configure: Workforce screen, return to it, click the ‘Actions’ dropdown menu, and select ‘Refresh Database’
- Select ‘Create’ to create the refresh process, select the desired options (typically default), then click ‘Refresh Database’
Congratulations! Your Workforce application base is set up, now, the customization/further development is up to you. Here are some tips/tricks to help you advance the process:
- All objects with prefixes such as OWP_, OCX_, OEP_, are application created objects/metadata and often cannot be modified.
- If one of these objects can be modified, proceed with caution as your changes may cause the object to be ignored during upgrades/patches
- Prior to using the application, set up your user variables, as some forms require the variables to be set before opening them
- This is done from the application home page: Click the ‘Tools’ icon, then ‘User Variables’
- In order to load Actual salaries/rates for employees, there are certain requirements that must be met during the data load
- For each employee, the following must be loaded to &OEP_CurYr->&OEP_CurMnth (unless the period is otherwise specified):
- ‘OWP_Basic Salary’ -> ‘OWP_Salary Basis’ ->BegBalance
- The type of Salary to be paid (Annual, Hourly, etc) – (May need to view the Salary Basis smartlist for the proper values)
- ‘OWP_Basic Salary’->’OWP_Value’
- The Rate (dependent upon the Salary Basis chosen above)
- ‘OWP_Start Month’->’No Property’
- Choose the Employee Start Month (May need to view the Months for the proper smartlist values)
- OWP_FTE -> ‘No Property’
- Enter the Employee’s FTE
- ‘OWP_Partial Payment Factor’ -> ‘No Property’ (can be loaded to all periods for different values)
- Enter the Employee’s Partial Payment Factor
- This value is used to reduce the employee’s pay for certain periods for any reason such as paid leave
- ‘OWP_Applicable Union Code’->’No Property’
- Each Employee needs a Union Code associated to it (for specifying different benefits/earnings, etc.)
- If the application is not using different union codes, you can set all employees to the default union code (the value can be found from the Union Code Smart list values)
- Once these values have been loaded for all employees, run the ‘Process Loaded Data’ Business Rule for the desired intersections
- Enter the Employee’s Partial Payment Factor
- After configuration is complete, and data is loaded and processed (if aiming to use actual salaries), follow the process outlined in the ‘Workforce – Compensation Planning’ card from the application home page, to walk through an abridged version of the forecast/budget process.
- ‘OWP_Basic Salary’ -> ‘OWP_Salary Basis’ ->BegBalance
- For each employee, the following must be loaded to &OEP_CurYr->&OEP_CurMnth (unless the period is otherwise specified):