In Edge Delivery Services, you have good options for putting together engaging content. Adobe’s block collection has a considerable number of content shapes, providing a good base or starting point for your project. This is similar in purpose to the Sling + HTL-driven components provided by WCM Core Components. While similar in purpose, they are very different in design. EDS provides a more simplified process for creating authorable content, backed by an architecture that always executes optimally. EDS blocks can enable similar features to what a Sling-driven component might deliver. In this post, I’ll walk through how to build a custom block with unique capabilities and integrate third-party APIs, while keeping everything at the edge!
What We Will Build
Defining the Block
We’ll develop a block that represents a process for retrieving data and using it to directly change rendered output. We’re using a simple use case for demonstration, but this technique could be used for API data retrieval from any database, data warehouse, or repository.
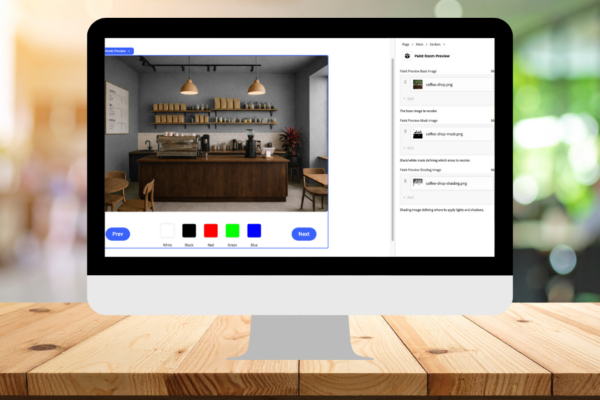
The block we’re developing is for a fictional paint company’s color previewer. It allows users to preview different paint colors in a fictional coffee shop. This type of content would be useful for customers wanting to visualize how the paint colors might look in their real-life home or business.
The paint colors will be provided from an API, internally managed by our fictional paint company. The block consumes this data and uses it to render swatches. Upon click or tap of a swatch color, the walls in the image will update to render the selected color.
Most of this can be contained in a single GitHub repository, based on Adobe’s EDS boilerplate repo. The API will be provided as a Cloudflare worker (as I said, keeping everything at the edge).
It’s to be assumed that you already have an established AEM EDS project, with a provisioned cloud service tenant, programs, environments, and deploy pipelines. Please find details on setting up an EDS site and the Universal Editor here: https://www.aem.live/developer/ue-tutorial.
Architecture Quick Summary
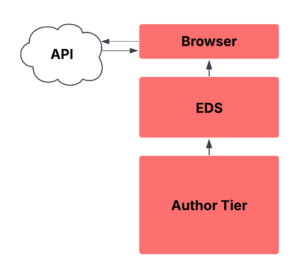
We’re leveraging the pattern of authoring EDS pages in the AEM as a cloud service author tier, and publishing to EDS preview and publish tiers. All third-party API requests happen client-side.
Block Definition and Model
For an EDS project, particularly one based on Adobe’s EDS boilerplate, 3 key files are needed for defining a block and where it may be authored.
The component-definition.json file defines a block’s display name, id, resource type, and the name of its data model. For our block, we need to add the following object to the array in this file:
{
  "title": "Paint Room Preview",
  "id": "paint-room-preview",
  "plugins": {
    "xwalk": {
      "page": {
        "resourceType": "core/franklin/components/block/v1/block",
        "template": {
          "name": "Paint Room Preview",
          "model": "paint-room-preview"
        }
      }
    }
  }
}
The component-models.json file describes the block’s data model and authorable field types. For our block, we need to add the following to the array in this file:
{
  "id": "paint-room-preview",
  "fields": [
    {
      "component": "reference",
      "valueType": "url",
      "name": "baseImage",
      "label": "Paint Preview Base Image",
      "description": "The base image to recolor.",
      "multi": false
    },
    {
      "component": "reference",
      "valueType": "url",
      "name": "maskImage",
      "label": "Paint Preview Mask Image",
      "description": "Black/white mask defining which areas to recolor.",
      "multi": false
    },
    {
      "component": "reference",
      "valueType": "url",
      "name": "shadingImage",
      "label": "Paint Preview Shading Image",
      "description": "Shading image defining where to apply lights and shadows.",
      "multi": false
    }
  ]
 }
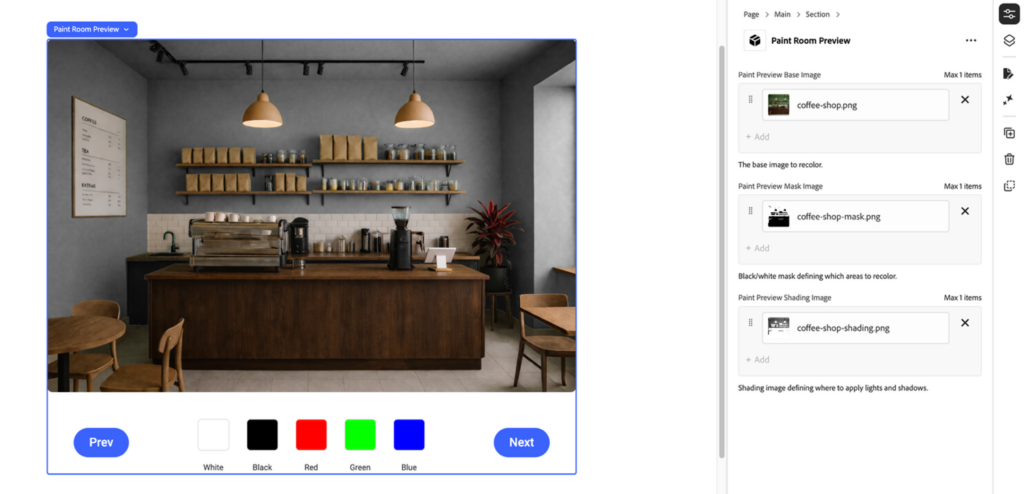
This configuration defines 3 image selection fields, allowing authors to pick one image as the base image, a layer mask version of that base image, and a shading version of that base image. This base image is changed by the color selection, with the colors applied in the specific areas defined by the mask, namely, the room’s walls. The shading image ensures the existing shadows and highlights are retained, so nothing is flattened or washed out. These 3 images are used by our block script to build a composite image based on the color selection. To the user, the paint color changes as if the walls were always the selected color.
Relating this to Sling, the component-filters.json is akin to a responsivegrid/layout-container allowed components policy. Our block id is “paint-room-preview”. In the file, we can add this into any block’s array list of components to allow our block to be added to that section of a page. This is sensible for blocks designed to contain other blocks, such as sections, lists, embeds, carousels, etc. We’ll add “paint-room-preview” to the section block’s filter list:
{
  "id": "section",
  "components": [
    "text",
    "image",
    "button",
    "title",
    "hero",
    "cards",
    "columns",
    "fragment",
    "paint-room-preview"
  ]
},
Block Functionality
Ok, now for the block itself, we need to create a JavaScript and CSS file. We’ll also create a helper method in the scripts/aem.js file to abstract API calls and allow for better re-use. In the project’s blocks folder, create a new folder named paint-room-preview. Then, in this folder, create a new file called paint-room-preview.js with the following contents:
import { fetchFromApi } from '../../scripts/aem.js';

export default async function decorate(block) {
  const COLORS_URL = 'https://yourdomain.com/colorapi/colors.json';
  const PAGE_SIZE = 30;
  const VISIBLE = 5;

  function ensureMarkup() {
    let root = block.querySelector('.paint-room-preview');
    if (!root) {
      root = document.createElement('div');
      root.className = 'paint-room-preview';
      block.appendChild(root);
    }

    let canvas = root.querySelector('#room-canvas');
    if (!canvas) {
      canvas = document.createElement('canvas');
      canvas.id = 'room-canvas';
      root.appendChild(canvas);
    }

    let nav = root.querySelector('.bm-nav');
    if (!nav) {
      nav = document.createElement('div');
      nav.className = 'bm-nav';
      nav.innerHTML = `
        <button id="bm-prev">Prev</button>
        <div id="bm-colors"></div>
        <button id="bm-next">Next</button>
      `;
      root.appendChild(nav);
    }
    return root;
  }

  const root = ensureMarkup();

  function findImageFromMarkup(prop) {
    const img = block.querySelector(`img[data-aue-prop="${prop}"]`);
    return img ? img.getAttribute('src') : '';
  }

  const baseImage = (block.dataset.baseImage?.trim())
    || (root.dataset.baseImage?.trim())
    || findImageFromMarkup('baseImage') || '';

  const maskImage = (block.dataset.maskImage?.trim())
    || (root.dataset.maskImage?.trim())
    || findImageFromMarkup('maskImage') || '';

  const shadingImage = (block.dataset.shadingImage?.trim())
    || (root.dataset.shadingImage?.trim())
    || findImageFromMarkup('shadingImage') || '';

  if (!baseImage || !maskImage || !shadingImage) {
    root.innerHTML = `
      <div style="border:1px dashed #ddd;padding:12px;border-radius:6px;color:#666;">
        Paint Room Preview requires Base Image, Mask Image, and Shading Image.
      </div>`;
    return;
  }

  const canvas = root.querySelector('#room-canvas');
  const ctx = canvas.getContext('2d');
  if (!ctx) return;

  const prevBtn = root.querySelector('#bm-prev');
  const nextBtn = root.querySelector('#bm-next');
  const colorsContainer = root.querySelector('#bm-colors');

  canvas.style.width = '100%';
  colorsContainer.style.display = 'flex';
  colorsContainer.style.gap = '10px';
  colorsContainer.style.flexWrap = 'wrap';
  colorsContainer.style.justifyContent = 'center';

  function loadImage(src) {
    return new Promise((resolve, reject) => {
      const img = new Image();
      img.crossOrigin = 'anonymous';
      img.onload = () => resolve(img);
      img.onerror = () => reject(new Error(`Failed loading image ${src}`));
      img.src = src;
    });
  }

  let imgBase;
  let imgMask;
  let imgShade;
  try {
    [imgBase, imgMask, imgShade] = await Promise.all([
      loadImage(baseImage),
      loadImage(maskImage),
      loadImage(shadingImage),
    ]);

    block.querySelectorAll('img[data-aue-prop]').forEach((img) => {
      const wrap = img.closest('picture,div') || img;
      wrap.style.display = 'none';
    });
  } catch (e) {
    // eslint-disable-next-line no-console
    console.error(e);
    root.innerHTML = '<div style="color:#b00">Error loading images.</div>';
    return;
  }

  canvas.width = imgBase.width;
  canvas.height = imgBase.height;
  ctx.drawImage(imgBase, 0, 0);

  function getMaskData() {
    const temp = document.createElement('canvas');
    temp.width = canvas.width;
    temp.height = canvas.height;
    const tctx = temp.getContext('2d');
    tctx.drawImage(imgMask, 0, 0, temp.width, temp.height);
    return tctx.getImageData(0, 0, temp.width, temp.height).data;
  }
  const maskData = getMaskData();

  function getShadeData() {
    const temp = document.createElement('canvas');
    temp.width = canvas.width;
    temp.height = canvas.height;
    const tctx = temp.getContext('2d');
    tctx.drawImage(imgShade, 0, 0, temp.width, temp.height);
    return tctx.getImageData(0, 0, temp.width, temp.height).data;
  }
  const shadeData = getShadeData();

  function hexToRgb(hex) {
    const h = hex.replace('#', '');
    return {
      r: parseInt(h.substring(0, 2), 16),
      g: parseInt(h.substring(2, 4), 16),
      b: parseInt(h.substring(4, 6), 16),
    };
  }
  function blend(base, target, amt) {
    return Math.round(base * (1 - amt) + target * amt);
  }

  function applyPaintHex(hex) {
    const tgt = hexToRgb(hex.startsWith('#') ? hex : `#${hex}`);

    // Step 1: reset base
    ctx.drawImage(imgBase, 0, 0);
    const imgData = ctx.getImageData(0, 0, canvas.width, canvas.height);
    const { data } = imgData;

    // Step 2: apply flat paint using alpha mask
    for (let i = 0; i < data.length; i += 4) {
      const maskVal = maskData[i] / 255;
      if (maskVal > 0.03) {
        data[i] = blend(data[i], tgt.r, maskVal);
        data[i + 1] = blend(data[i + 1], tgt.g, maskVal);
        data[i + 2] = blend(data[i + 2], tgt.b, maskVal);
      }
    }

    // Step 3: multiply wall shading (lighting pass)
    for (let i = 0; i < data.length; i += 4) {
      const maskVal = maskData[i] / 255;
      if (maskVal > 0.03) {
        const shade = shadeData[i] / 255; // grayscale
        data[i] = Math.round(data[i] * shade);
        data[i + 1] = Math.round(data[i + 1] * shade);
        data[i + 2] = Math.round(data[i + 2] * shade);
      }
    }

    ctx.putImageData(imgData, 0, 0);
  }

  let apiPage = 1;
  let pageIndex = 0;
  let colors = [];

  async function loadApiPage(p = 1) {
    try {
      const json = await fetchFromApi(COLORS_URL, {
        page: p,
        pageSize: PAGE_SIZE,
      });
      colors = Array.isArray(json.data) ? json.data : [];
      apiPage = json.page || p;
      pageIndex = 0;
    } catch (e) {
      // eslint-disable-next-line no-console
      console.error(e);
      colors = [];
    }
  }

  function renderSwatches() {
    colorsContainer.innerHTML = '';
    const start = pageIndex * VISIBLE;
    const slice = colors.slice(start, start + VISIBLE);

    if (slice.length === 0) {
      colorsContainer.innerHTML = '<div>No colors</div>';
      return;
    }

    slice.forEach((c, idx) => {
      const hex = (c.hex || '').replace('#', '');
      const name = c.name || `Color ${idx + 1}`;
      const sw = document.createElement('button');
      sw.style.width = '48px';
      sw.style.height = '48px';
      sw.style.borderRadius = '6px';
      sw.style.border = '1px solid #ddd';
      sw.style.background = `#${hex}`;
      sw.addEventListener('click', () => applyPaintHex(hex));

      const wrap = document.createElement('div');
      wrap.style.display = 'flex';
      wrap.style.flexDirection = 'column';
      wrap.style.alignItems = 'center';
      wrap.style.fontSize = '12px';
      wrap.style.color = '#333';
      wrap.style.minWidth = '64px';
      wrap.style.gap = '4px';

      const lbl = document.createElement('div');
      lbl.textContent = name;
      lbl.style.maxWidth = '72px';
      lbl.style.textOverflow = 'ellipsis';
      lbl.style.overflow = 'hidden';

      wrap.appendChild(sw);
      wrap.appendChild(lbl);
      colorsContainer.appendChild(wrap);
    });
  }

  if (pageIndex < 1) {
    prevBtn.disabled = true;
  }

  prevBtn.addEventListener('click', async () => {
    const maxIndex = Math.floor((colors.length - 1) / VISIBLE);

    if (pageIndex > 0) {
      pageIndex -= 1;
      renderSwatches();
      if (pageIndex < 1) {
        prevBtn.disabled = true;
      }
      if (pageIndex < maxIndex) {
        nextBtn.disabled = false;
      }
      return;
    }
    if (apiPage > 1) {
      await loadApiPage(apiPage - 1);
      pageIndex = Math.floor((colors.length - 1) / VISIBLE);
      renderSwatches();
    }
  });

  nextBtn.addEventListener('click', async () => {
    const maxIndex = Math.floor((colors.length - 1) / VISIBLE);

    if (pageIndex < maxIndex) {
      pageIndex += 1;
      if (pageIndex >= 1) {
        prevBtn.disabled = false;
      }
      renderSwatches();
      if (pageIndex === (maxIndex - 1)) {
        nextBtn.disabled = true;
      }
      return;
    }
    await loadApiPage(apiPage + 1);
    if (colors.length > 0) renderSwatches();
  });

  await loadApiPage(apiPage);
  renderSwatches();
  if (colors.length > 0 && colors[0].hex) applyPaintHex(colors[0].hex);
}
This script provides a decorate function, which is used to initialize and define the HTML DOM structure of the block. Within decorate we have methods and fields unique to this block’s custom functionality.

The ensureMarkup() method guarantees that required HTML is created, namely a root container div, a canvas element for our image previews, and a navigation div for paging through color swatches and selecting colors.
Several constants are also defined to ensure the required images are available. These attempt to pull the image URI values from the block’s data attributes, ensureMarkup’s containing div, or from img elements containing a specific attribute with a value matching the image type. If any one of the base, mask, or shading images is missing, the block renders text indicating that all are required. This is like Sling/HTL default content that may be rendered if a component instance is not yet authored.
Then details of the canvas are defined based on the Canvas API, to set up our photo manipulation in a 2D context.
The images are rendered from the previously defined URIs via a loadImage() method, which asynchronously loads an image and returns a Promise that resolves with the loaded image element. The base, mask, and shading images are simultaneously loaded. The author-selected images are hidden, as the canvas will render them as a combined composite image. The canvas width and height are defined, and the base image is drawn to it.
The getMaskData() and getShadeData() methods extract the pixel data from the mask and shade images using the Canvas API context’s getImageData() method. This returns an array of RGBA-formatted pixels for each of these images. These are drawn in off-screen canvases, and the pixel arrays are computed and cached once, then reused for every color change.
The hexToRgb() method converts hex color codes to RGB color values. The blend() method performs a smooth blending between a base and target value. These are each used in the applyPaintHex() method, which is where the key functionality takes place for painting! The base image is redrawn to obtain its pixel data (again as an array of RGBA pixels), and the mask data is used to determine which parts of the base image are “paintable”.
The blend() method is called to mix the original base image pixel data with the selected paint color, within the paintable areas derived from the mask data. Pixel data from the shading array is then applied to ensure the shadows and highlights of the base image are retained, so no depth is lost.
The loadApiPage() method is used to call for available colors from a third-party API service and uses a utility method from scripts/aem.js to make the request. The renderSwatches() method renders the colors as sets of swatches that the user can page through to select a color for painting. Buttons for this pagination are set up with click event handlers.
Third-party API requests
The previous section went over a substantial amount of the details for rendering the block.
While we could have contained everything there, it’s helpful in any modern project to modularize your code for reuse when possible. With that mindset, a utility method has been added to the aem.js file in the scripts directory:
async function fetchFromApi(url, { page, pageSize, params = {} } = {}) {
  const query = new URLSearchParams();

  if (page !== undefined) query.set('page', page);
  if (pageSize !== undefined) query.set('pageSize', pageSize);

  Object.entries(params).forEach(([k, v]) => {
    if (v !== undefined && v !== null) {
      query.set(k, v);
    }
  });

  const fullUrl = query.toString()
    ? `${url}?${query.toString()}`
    : url;

  const res = await fetch(fullUrl, {
    headers: { Accept: 'application/json' },
  });

  if (!res.ok) {
    throw new Error(`fetchAPI failed: ${res.status} ${res.statusText}`);
  }

  return res.json();
}
This fetchFromApi() method was also added to the aem.js export object so that we can call it in our blocks (like we did in the import statement of paint-room-preview.js).
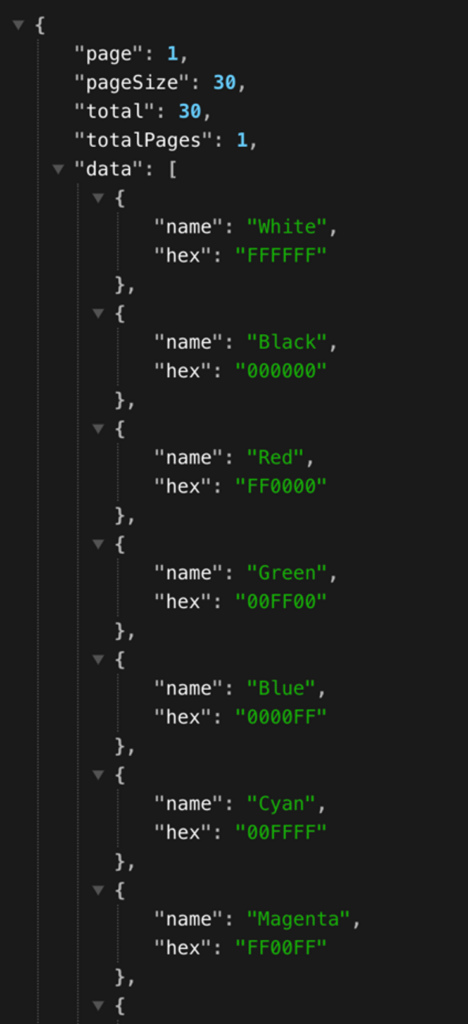
This method makes paginated API requests, though the pagination is optional when calling it. This takes a provided URL, page, page size (the number of items per page), and any additional parameters. For our block, we use this to call our third-party API on page 1. The API offers 30 colors in total. We make a single request for all of them and then page between sets of 5 when the user clicks the next or previous buttons.
You’ll notice in the decorate() method of our block script, we defined the API URL via:
const COLORS_URL = 'https://yourdomain.com/colorapi/colors.json';
This should be updated to match the domain and path of your API, based on your implementation. As for that API, we’ll cover it in the next section.
Third Party Colors API
For my EDS site, I’m using the bring your own CDN approach via a Cloudflare worker. Adobe documentation provides a worker script that you can use for requests to your configured EDS domain. To enable our colors API, we just need to make a few minor updates to the script.
In the handleRequests() method, we first define constants for pages and colors returned in API requests, then we define a JSON object containing the page, page size, total number of pages, and most importantly, the array of colors!
const page = parseInt(url.searchParams.get("page") || "1", 10);
const pageSize = parseInt(url.searchParams.get("pageSize") || "30", 10);

const colors = [
  { name: "White", hex: "FFFFFF" },
  { name: "Black", hex: "000000" },
  { name: "Red", hex: "FF0000" },
  { name: "Green", hex: "00FF00" },
  { name: "Blue", hex: "0000FF" },
  { name: "Cyan", hex: "00FFFF" },
  { name: "Magenta", hex: "FF00FF" },
  { name: "Yellow", hex: "FFFF00" },
  { name: "Gray", hex: "808080" },
  { name: "Orange", hex: "FFA500" },
  { name: "Purple", hex: "800080" },
  { name: "Brown", hex: "A52A2A" },
  { name: "Pink", hex: "FFC0CB" },
  { name: "Lime", hex: "32CD32" },
  { name: "Teal", hex: "008080" },
  { name: "Navy", hex: "000080" },
  { name: "Olive", hex: "808000" },
  { name: "Maroon", hex: "800000" },
  { name: "Silver", hex: "C0C0C0" },
  { name: "Gold", hex: "FFD700" },
  { name: "Coral", hex: "FF7F50" },
  { name: "Indigo", hex: "4B0082" },
  { name: "Turquoise", hex: "40E0D0" },
  { name: "Lavender", hex: "E6E6FA" },
  { name: "Beige", hex: "F5F5DC" },
  { name: "Mint", hex: "98FF98" },
  { name: "Peach", hex: "FFDAB9" },
  { name: "Sky Blue", hex: "87CEEB" },
  { name: "Chocolate", hex: "D2691E" },
  { name: "Crimson", hex: "DC143C" }
];

const total = colors.length;
const start = (page - 1) * pageSize;
const end = start + pageSize;
const pageColors = colors.slice(start, end);

const json = JSON.stringify({
  page,
  pageSize,
  total,
  totalPages: Math.ceil(total / pageSize),
  data: pageColors,
});
Lastly, above the condition checking if the path starts with /drafts/, add the following:
if (url.pathname.startsWith('/colorapi/')) {
  return new Response(json, {
    headers: {
      "Content-Type": "application/json",
      "Access-Control-Allow-Origin": "*",
      "Access-Control-Allow-Methods": "GET, OPTIONS",
      "Access-Control-Allow-Headers": "Content-Type"
    },
  });
}
This sets up our API as path-based, supporting requests to /colorsapi/colors.json. Once we deploy our worker changes, the JSON response to API requests will resemble the following:
I will mention that while this works, our API does leave some things to be desired. In a true, production-ready implementation, the worker should only act as a proxy to a separate data service (with its own dedicated redundancy and fault tolerance). The colors data could be enriched with details such as product codes, applications where each color is supported (works on drywall vs wood), and split into different sets of color palettes based on the paint quality (economy, super, deluxe, etc.). There might even be a review process where certain colors are filtered out based on inventory or other factors. The primary goal of this post is to demonstrate block building and, secondly, to keep the entire implementation at the edge, not to provide a best practice API implementation.
Block Design
With the functional aspects of our block complete, we need to add some styles to make our image previewer, color options, and paging work cohesively on varying client devices. So, in the /blocks/paint-room-preview folder, create a file called paint-room-preview.css and add the following contents:
.paint-room-preview {
  max-width: 800px;
  margin: auto;
  text-align: center;
}

#room-canvas {
  width: 100%;
  border-radius: 8px;
  margin-bottom: 20px;
}

.bm-controls {
  display: flex;
  justify-content: space-between;
  margin-bottom: 20px;
}

.bm-nav {
  display: flex;
  align-items: center;
  justify-content: center;
  gap: 16px;
  margin-bottom: 20px;
}

#bm-colors {
  display: flex;
  gap: 12px;
  justify-content: center;
  flex-wrap: nowrap;
  margin: 0 10%;
}

.bm-color {
  display: flex;
  flex-direction: column;
  align-items: center;
}

.bm-swatch {
  width: 60px;
  height: 60px;
  border-radius: 6px;
  border: 1px solid #ccc;
  cursor: pointer;
  margin-bottom: 8px;
  transition: transform .2s;
}

.bm-swatch:hover {
  transform: scale(1.1);
}

@media (width <= 900px) {
  .bm-nav {
    flex-wrap: wrap;
  }

  #bm-colors {
    order: 3;
    width: 100%;
    justify-content: center;
    margin: 12px 0 0;
    flex-wrap: wrap;
  }

  #bm-prev {
    order: 1;
  }

  #bm-next {
    order: 2;
  }
}
With that, we should merge or commit our changes. Then we can author our block on a page, via the universal editor:
If you want to test drive this using the coffee shop example above, please find the base image, mask, and shading image at the links below. Upload these images to AEM Assets to select them in your block’s authorable fields.
https://blogs.perficient.com/files/coffee-shop-shading.png
https://blogs.perficient.com/files/coffee-shop-mask-1.png
https://blogs.perficient.com/files/coffee-shop.png
With all 3 images authored, you can publish the page and see your changes in action.
Closing Thoughts
As you can see, EDS blocks can be as specific as you need them to be. All the block and utility code is contained in JavaScript and CSS. Authoring fields are easily enabled in component-models.json. The block is easily enabled for use in pages via component-filters.json. Using just browser APIs, event handlers, and DOM selectors, we built a compelling experience for our fictional paint company. Using just ES6+ modular code, we built a serverless API to provide simple color options. The best part of this is that it’s all delivered at the edge, for an optimally fast application. There are many possibilities for block customization. The speed and flexibility of Edge Delivery Services should be considered for your project.