
For many years, overlays have been an often-used method for AEM tools and UI customization. This requires copying system code from /libs to /apps and letting Sling resource merger resolve Adobe’s provided code alongside custom code.
With the introduction of AEMaaCS came the establishment of immutable areas in the repository node tree and therefore limitations to this overlays approach. Some nodes that may have been used or overlaid in 6.4 were locked down with the mixin “granite:InternalArea” in 6.5 and cloud instances. This change wasn’t meant as a restrictive update, but rather to prevent Adobe-provided updates from breaking customizations.
Many aspects of the out-of-the-box JCR structure can still be overlaid, inherited from, or used directly; however, it’s a game of careful, selective usage. Thankfully, with the maturity of AEMaaCS and the overall Adobe Experience Platform, there is now a more modern option for customizing services used with AEM: App Builder Extensions!
They’re called extensions because they use cloud native extensibility via App Builder to enhance Adobe Experience Cloud apps or build custom tools to work alongside them. Extensions are “a new property of App Builder applications that enables developers to build and to extend specific Adobe products in an integrated fashion across our ecosystem.”
In this post, I’ll detail how to use these extensions to enhance 2 key services, the cloud native Content Fragments Editor and the Universal Editor. Each of these services/tools has an API with several extension points:
https://developer.adobe.com/uix/docs/services/aem-cf-editor/api/
https://developer.adobe.com/uix/docs/services/aem-universal-editor/api/
Please note, the techniques outlined assume you have access to:
- An AEM cloud service instance (we’ll only be interacting with the author tier)
- NodeJS and NPM installed
- The Adobe I/O CLI is installed
- Developer console
- Universal Editor
Please refer initially to https://developer.adobe.com/uix/docs/guides/local-environment/ for your local setup.
Creating an extension follows a repeated pattern of first creating a project in the developer console, then creating a project via Adobe I/O, which uses the developer console project.
What makes up an Extension?
Extending AEM Cloud Service UIs takes advantage of the JAM (JavaScript, APIs, and markup) stack.
Extensions are based on React and use the React Spectrum UI library; this is the toolkit now used by Adobe for its cloud native UIs. As a result, local development for UI extensions leans heavily into NodeJS and React.
As for the solution infrastructure, extensions use the serverless Adobe I/O runtime to facilitate event-driven or HTTP request-driven execution of the React apps. In addition, App builder has state storage and storage of static assets in the CDN.
From a development standpoint, extensions are managed as projects in the developer console. Project development is aided by the Adobe I/O Extensible CLI (AIO). This CLI is used to deploy the project code and can also help with scaffolding the application via templates. These templates provide generated code to be used as a starting point. This generates code for the client side and microservices for the backend.
Extension code structure
Two configurations are required in the extension’s App Builder app to define where and how the extension appears: app routing (React routes) and extension registration.
React Route
The extension’s App.js (./src/aem-ui-extension/web-src/src/components/App.js) declares the React router that includes an index route, which registers the extension in the AEM UI.
The index route is invoked when the AEM service’s UI initially loads, and the target of this route defines how the extension is exposed in the console.
Extension Registration
ExtensionRegistration.js must be immediately loaded via the index route of the extension and acts as the registration point of the extension.
Based on the AEM service UI extension template selected when initializing the App Builder app extension (more on this init process below), different extension points are supported.
Enhancing the Content Fragments Editor
For this enhancement, I’ll be adding a toolbar button to the RTE. This button will be used to apply a unique identifier to RTE fields in a content fragment that has a multiline text data type, which itself is a multifield. This is handy for headless situations where you have multiple blocks of text and want a way to uniquely identify each in the JSON provided from AEM Content APIs.
Developer console project creation
To get started, we need to create a project in the developer console. You can access this at https://developer.adobe.com/ and click the console button in the upper right.
Create a new project from a template and select App Builder.
Note, Project Title is used to identify your project within Adobe Developer Console and in CLI.
App Name will be used as a unique identifier for your application, and this value cannot be changed after project creation.
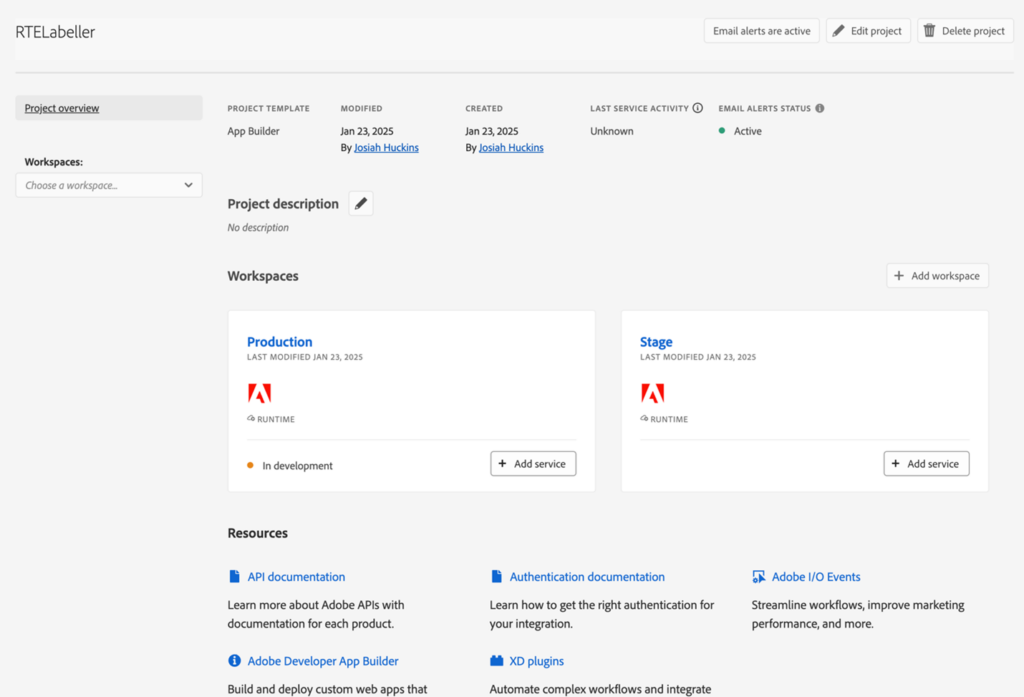
Give the project a title and give your app a name.
For this example, I’m using the name RTELabeller.
Be sure to click/tap save when done.
We don’t need to do anything else with this project; it just needs to exist here.
Local Development
- Per the note above on local setup, make sure you have Node.js version 16.15.1 or higher and npm version 8.11.0 or higher installed. You also should already have AIO installed: https://github.com/adobe/aio-cliIt’s a good idea to make sure it’s up to date:
npm install -g @adobe/aio-cli
- Assuming you are authenticated to the Adobe developer console in your browser, and you have created the project in the developer console, you need to authenticate to the developer console from AIO. You can do this via:
aio login
- We need to initialize our app via:
aio app init <Name>
In this case, we’ll align with the App Builder project name we created in the developer console and name it RTELabeller. You will be prompted to select an Org; this should be the org within which you created the App Builder project. Then you’ll be prompted to select a project or create a new one. In this case, we’ll select the RTELabeller App Builder project we set up in the developer console.
- You’ll then be prompted to select the templates to search for. These are used to set up code scaffolding/starter code. We’ll select All Extension Points, then using the arrow we’ll move to the “Extensibility template for AEM Content Fragment Editor”, press space to select it and enter to confirm.
- Once the template files are downloaded, you’re prompted to provide an extension name, short description, and starting version. We’ll use the following for each:
RTELabeller
This extension provides a button to add custom labels and unique identifiers to richtext fields.
1.0.0
- Then we need to select “Add Rich Text Editor (RTE) Toolbar Button.” Note, of course, if we wanted to customize the RTE in some other way, we could select one of the options or none at all and just start coding. You’ll be prompted to create a unique ID and tooltip text. For the ID, I used: rte-labeller. For the tooltip, we’ll use: Add a label to this field.
- Then select, “I’m done.”

At this point, the app will finish initialization, and we should be set up with some starter code we can modify.
Writing the code updates
- First, we need to modify src/aem-cf-console-admin-1/web-src/src/components/ExtensionRegistration.js. This file registers our extension with the host AEM instance as soon as it loads, so they can share data and communicate with each other. This is where we define button properties such as id, tooltip text, the icon, and click event handler. Notice that some of this has been filled in for us already via the template prompts we went through earlier.
- Let’s update the icon from the ‘Airplane’ to ‘Label’
- Referring to the state API reference https://developer.adobe.com/uix/docs/services/aem-cf-editor/api/rte-toolbar/, we can refer to markup in the current RTE via the passed-in state objects html field. We need to store this markup in our own variable, and importantly, remove any existing label element that we may have added when this button was previously clicked. We’ll replace the paragraph element surrounding the span element, which contains our target class rte-field-label, with an empty string:
let stateHtml = state.html.replaceAll(/<p><span (.*) class="rte-field-label hidden" (.*)><\/span><\/p>/g,'');
- Then we generate a fresh UUID (universally unique identifier) and store it in the variable genID:
const genID = generateUUID();
More on the UUID generation logic in a sec.
- Before our return object, we can indicate to the user that their label creation was successful by showing a toast notification. We can refer to this API for toasts: https://developer.adobe.com/uix/docs/services/aem-cf-editor/api/commons/#toasterLet’s add the call to the toast display method below our genID const:
     guestConnection.host.toaster.display({

          variant: "positive",

          message: "Label created with ID: " + genID + "!",

     })
Now the user will see a message with the ID value, indicating that it worked.
- Next, for the onClick function’s return object, we are providing the instruction replaceContent, which should be self-explanatory. We’re also replacing the value property’s contents with:
"<span data-field-label='' class='rte-field-label hidden' id=" + genID + "></span>" + stateHtml
What this is doing is adding a span when our icon is clicked and setting the value of the element’s id attribute to that of our freshly generated UUID. We preserve any existing authored markup via “+ stateHtml” appended to the span.
- The generateUUID() is a custom function we’ll add to this ExtensionRegistration functional component. We’ll place it below the init function:
const generateUUID = () => {

return 'xxxxxxxx-xxxx-4xxx-yxxx-xxxxxxxxxxxx'.replace(/[xy]/g, function(c) { const r = (Math.random() * 16) | 0; const v = c === 'x' ? r : (r & 0x3) | 0x8;

return v.toString(16);});

  };
The function returns a string representing the UUID format, and the replace updates occurrences of x and y to either be a random value between 0 and 15 or the output of a bitwise OR operation. The result is a valid, collision-resistant UUID.
That’s it for our code updates. I know, it’s very light, but the idea here is to make minimal, purposeful changes to add needed enhancements.
Testing
I created a content fragment model in a dev instance.
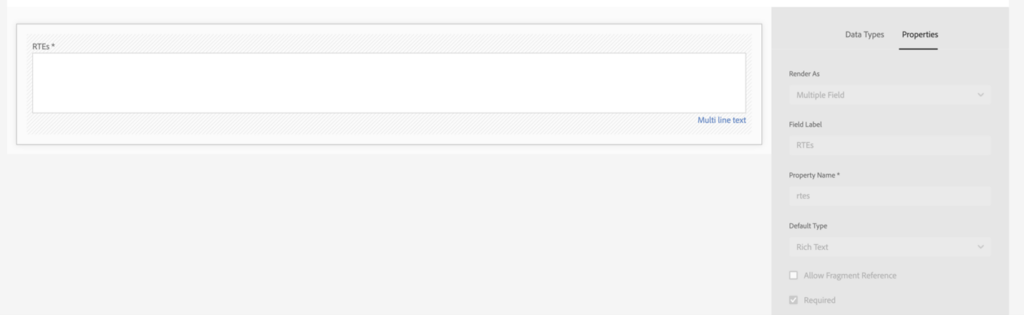
My model has a multiline text field, which is rendering as a multifield. And of course, it accepts rich text. I created a test fragment from this model called RTEs-with-labels.
You’ll need to create a similar model and content fragment to test with.
Note the before state above, many widgets are available, but our custom button is not yet there.
We can test our app/extension within the context of our content fragment by running:
aio app run
This will deploy the actions to Adobe I/O Runtime while running the UI part on the local machine.
For our app/extension, viewing it directly under localhost doesn’t make sense as we want to see it working in the context of the Content Fragment editor’s RTE. Thankfully, we can test it in the Content Fragment Console by including a set of parameters when requesting the console.
- devMode (development mode): devMode=true
- ext (extension): ext=https://localhost:9080
- repo: repo=<CUSTOMER_AEM_HOST>#/@<CUSTOMER_TENANT_NAME>/aem/cf/admin/
You can obtain the tenant name while pressing ctrl + i while on any Experience Cloud page.
Putting all the parameters together, you should have something similar to:
Where some.author.domain.com is your AEM cloud service author and tenantname is your customer tenant name.
(Note the following documentation for building a URI to validate an extension: https://experienceleague.adobe.com/en/docs/experience-manager-learn/cloud-service/developing/extensibility/ui/verify )
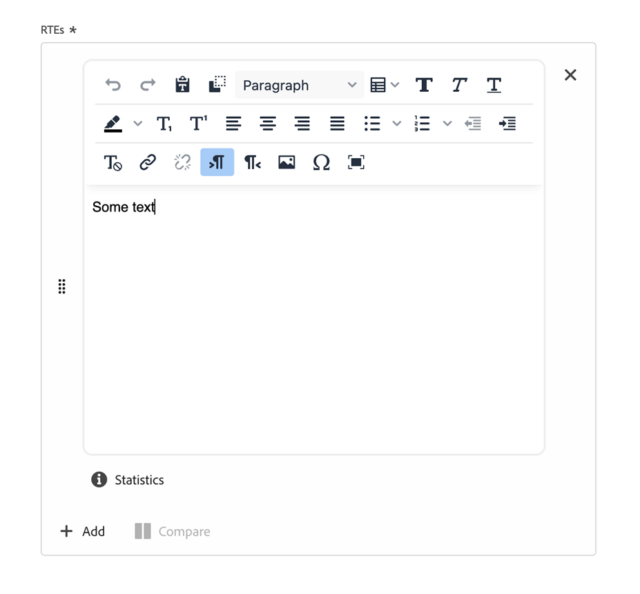
Now let’s open our test RTEs-with-labels fragment using the parameterized URL, and there we should see our new icon to invoke our custom functionality!
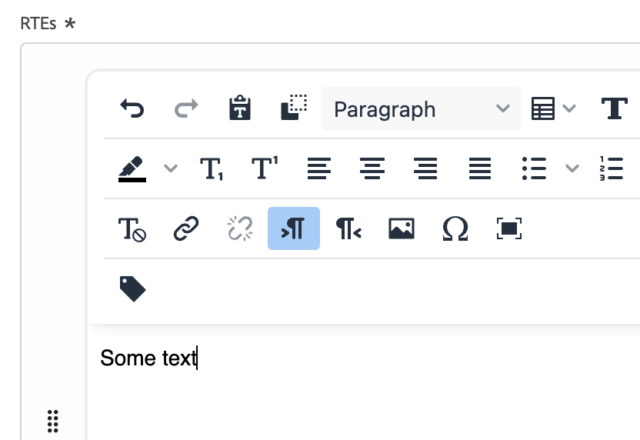
When we click the label button. A hidden span tag is added to the markup with our generated UUID. A toast notification indicates successful invocation:

The span tag ID will be available to fragment consumers. You might reference it using the core component’s content fragment component or in a third-party GraphQL call. Below is the JSON representation of our RTE from above:
"rtes": [

"<p><span id=\"78307fd3-c90d-4f1f-ae80-14c1148fbd47 \" class=\"rte-field-label hidden\" data-field-label=\"\"></span></p><p>Some text</p>"

]
The purpose of our label button is to enable the generation of IDs for each multiline RTE in a multifield. You can see below that this works when I add more RTE fields and generate IDs for each:
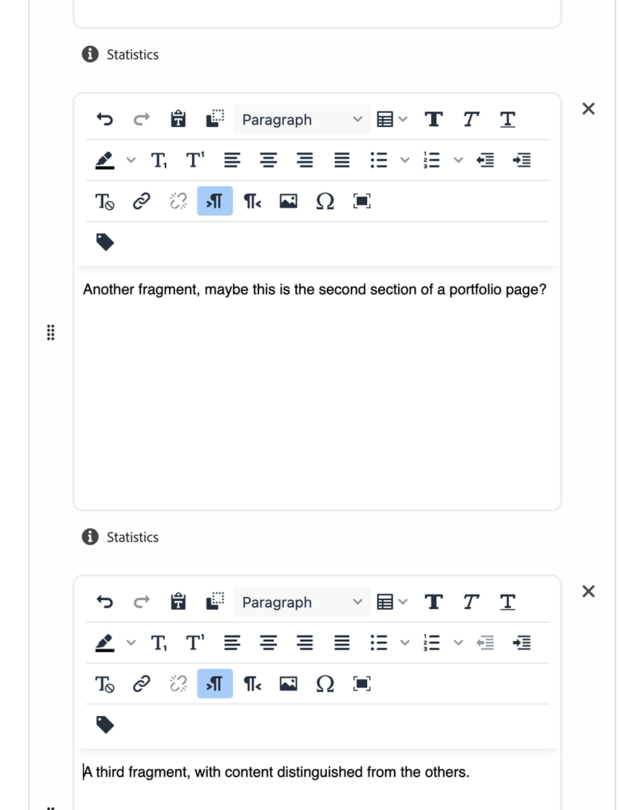
"rtes": [
"<p><span id=\"78307fd3-c90d-4f1f-ae80-14c1148fbd47 \" class=\"rte-field-label hidden\" data-field-label=\"\"></span></p><p>Some text</p>",
"<p><span id=\"9b70f674-784b-4eea-b118-89f72f5a1e86\" class=\"rte-field-label hidden\" data-field-label=\"\"></span></p><p>Another fragment, maybe this is the second section of a portfolio page?</p>",
"<p><span id=\"f35bbcf4-a004-49e0-a98a-9c0ca1780873\" class=\"rte-field-label hidden\" data-field-label=\"\"></span></p><p>A third fragment, with content distinguished from the others.</p>"
]
This is one of many possible enhancements you can add to the Content Fragment Editor. Take a look at the available extension points here: https://developer.adobe.com/uix/docs/services/aem-cf-console-admin/api/.
Extending the Universal Editor
As our focus is on the editor UI, we can use a sample app for testing: https://github.com/adobe/universal-editor-sample-editable-app
This project requires an older version of NodeJS (16.20.2), however, it’s advised to use a newer version for the extension, so we can make the following changes to allow this to run in NodeJS 18+:
- Move into the universal-editor-sample-editable-app project directory and run:
export NODE_OPTIONS=--openssl-legacy-provider
- In package.json, change the engines node version range to support NodeJS version 18+:
"engines": { "node": ">=16.0.0 <=22.7.0" }, - Remove the following line in the package.json (penpal is not used in the project and including it causes a dependency issue).:
"react-penpal": "^1.0.4",
- Run: npm install
- Finally, start the server by running: yarn start
Before applying our changes, let’s take a look at the app with the out-of-the-box options by going to the page hosting the Universal Editor: https://experience.adobe.com/#/@programname/aem/editor/canvas
(As you would expect, replace programname with the name of your AEM cloud service program.)
We need to provide the following as the site URL. This is the local app we have running on the yarn dev server. Notice we are also defining parameters for source content via authorHost, pointing to a dev environment:
https://localhost:3000/?authorHost=https://some.author.domain.com

When you open the site, you should see the sample app render:

As is the case with the CF editor, the Universal Editor has extension points of its own: https://developer.adobe.com/uix/docs/services/aem-universal-editor/api/
With that in mind, we’ll look at how we can extend the Properties Rail (https://developer.adobe.com/uix/docs/services/aem-universal-editor/api/properties-rails/) to add our own custom tool.
UE Extension App Setup
Okay, now we need to create a project in the developer console, using the create project from template option, and select App Builder. Let’s use project name UEPropertiesExtension and app name UEPropsExtension.
Local Development
- We need to initialize a new app via:
aio app init <Name>
We align with the App Builder project name we created in the developer console and name the app UEPropertiesExtension. You will be prompted to select an Org; this should be the org in which you created the App Builder project. Then you’ll be prompted to select a project or create a new one. In this case, we’ll select the UEPropertiesExtension App Builder project we set up in the developer console.
- You’ll then be prompted to select the templates to search for. These are used to set up code scaffolding/starter code. We’ll select All Extension Points, then using the arrow we’ll move to the Extensibility template for Universal Editor, press space to select it, and enter to confirm.
- We’ll name the action HelpView. This will allow us to include some guidance on UE usage right in the editor. Do also provide an initial version number.
- Select Add a custom panel to Properties Rail
- Provide a tooltip label of “Help”, then select “I’m done”.
Writing the Code Updates
For this, we won’t need to write a lot of code.
In fact, part of the work here is done for us via this sample guide: https://developer.adobe.com/uix/docs/services/aem-universal-editor/api/properties-rails/. Following this, we first need to add our custom component to App.js:
- Move into the UEPropertiesExtension directory and open App.js
- Add the component import if not provided during app initialization (it may already be there as the published guide above isn’t 100% in sync with the latest extension templates).
import HelpRail from "./HelpRail";
- We also need to add the component route in App.js’ App() function (again if not already present):
<Route

            exact path="help-rail"

            element={<HelpRail />}

          />
- In ExtensionRegistration.js we need to add the addRails() function and return the following properties.
          addRails() {

            return [

            // YOUR ACTION BAR BUTTONS CODE SHOULD BE HERE

              {

                'id': 'help',

                'header': 'Help',

                'icon': 'InfoOutline',

                'url': '/#/help-rail',

                'hotkey': 'h',

              },

            ];

          },
The icon was chosen from https://spectrum.adobe.com/page/icons/
Note, the URL must match the “exact path” value in App.js.
Hotkey is an optional property, but it’s nice to have for improved accessibility.
Now to the main part of our extension’s functionality. - In HelpRail.js, we need to replace the contents of the Provider tag in the return statement with the following:
<div className="youtube-container">

          <iframe

            width={`100%`}

          src={`https://www.youtube.com/embed/ECAZH8u2cOo`}

            title="Help on using the Universal Editor"

            allow="accelerometer; autoplay; clipboard-write; encrypted-media; gyroscope; picture-in-picture"

            allowFullScreen

          ></iframe>

        </div>
This embeds a YouTube video detailing the usage of the UE.
The hard-coded values for src and title properties could be replaced with props, however, the purpose of this extension is to add help content, not to allow authoring of any video ID in the properties rail.
Note, we set the width to fill the properties rail width, so it should adjust dynamically with your screen size.
Testing
- With our code changes in place, run aio app run from the root of the project directory. You’ll want to open the https://localhost:9080When first running this, you’ll be prompted to accept/allow usage of a self-signed certificate. When you accept, you should see this message in your browser: “Congrats, you have accepted the certificate and can now use it for development on this machine.
You can close this window.”
- To view our extension in the context of the Universal Editor, we need to generate the URL. Going back to the Universal Editor hosting page: https://experience.adobe.com/#/@programname/aem/editor/canvas, we need to provide the following as the site URL:
https://localhost:3000/?authorHost=some.author.domain.com&devMode=true&ext=https://localhost:9080
This is the local app we have running on the yarn dev server, with a parameter for source content via authorHost, devMode set to true, and our running extension. Clicking open takes us here: https://experience.adobe.com/#/@programname/aem/editor/canvas/localhost:3000/?authorHost=https%3A%2F%2Fsome.author.domain.com&devMode=true&ext=https%3A%2F%2Flocalhost%3A9080
You can see the extension in the properties rail. Clicking it will render our help video content in the properties rail:

Deploying to the Developer Console
For the sample extensions above, we tested in a local environment. For an extension to be available on an AEM as a Cloud Service environment, it needs to be deployed to the developer console.
This guide walks through deploying an extension: https://experienceleague.adobe.com/en/docs/experience-manager-learn/cloud-service/developing/extensibility/ui/deploy
Note the following guide on managing your available extensions via the Extension Manager: https://developer.adobe.com/uix/docs/extension-manager/
Enhancing AEM Service UIs With Modern Techniques
These techniques offer a safe, modern approach to extending AEM service UIs or providing enhancements to the Universal Editor. All the while, Adobe’s tools for content authoring and delivery can continue to advance alongside your customizations.
We can realize a solution that has all the power of AEM as a headless CMS combined with the latest, fast methods for composing content.