
Intro 📖
In this post, I’ll cover three tips developers should consider when deploying a new headless site to XM Cloud. Having recently added a new headless site to an existing solution, I ran into a few issues. I hope to save others from similar headaches in the future (mostly myself 😉). If you’ve added a new headless site to your XM Cloud solution recently and are having trouble getting the site to appear and function properly, please read on 👇.
1. Verify the New Site’s Start Item 🚩
After deploying your new site, if you notice that the site isn’t appearing on the Sites landing page in XM Cloud (https://xmapps.sitecorecloud.io/?tab=tools&tenantName=<tentant_name>&organization=<organization>), double-check that the site’s Start item field is set. This field can be found on the site’s Site Grouping item whose path is (usually) as follows:
/sitecore/content/<site_collection>/<site>/Settings/Site Grouping/<site>
Moreover, make sure that the referenced item is physically present in the content tree. If the Start item isn’t present, the site won’t appear in XM Cloud.
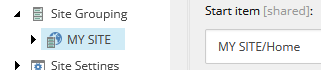
Verify that the Start item is set and points to an actual page.
In my particular case, I had initially misconfigured serialization for the new site and inadvertently excluded the new site’s Home item. The Start item field was set, but it didn’t point to anything in the target environment, so my new site wasn’t showing up in XM Cloud 🤦♂️.
2. Verify the Rendering Host Items 🤖
If your new site is appearing in XM Cloud but you can’t open any pages in Experience Editor or Preview, something could be wonky with the rendering host items.
Every XM Cloud solution includes an xmcloud.build.json file in the root directory. This is the XM Cloud build configuration file; it controls how XM Cloud builds and deploys the solution. Included in this file is a list of the rendering hosts that XM Cloud should provision and spin up as part of a deployment. Rendering hosts (also sometimes called “editing hosts” in the context of a CM) are necessary to drive Sitecore’s Experience Editor and Preview functionality. The xmcloud.build.json file is pretty important and useful; for more information on this file and what it can do, please refer to the official documentation here: https://doc.sitecore.com/xmc/en/developers/xm-cloud/the-xm-cloud-build-configuration.html.
There should be an entry in the renderingHosts property of the xmcloud.build.json file for every separate headless application in your solution. Note, however, that it is possible to run multiple headless sites with a single head application using the JSS multisite add-on. For more information on the pros and cons of either approach, check out this Sitecore developer article: https://developers.sitecore.com/learn/accelerate/xm-cloud/pre-development/project-architecture/multisite#web-application.

For the purposes of this tip, assume that there are two headless sites, each with their own headless Next.js application running different versions of Node (which also implies the need for two separate rendering hosts–one rendering host can’t run multiple versions of Node/Next.js). Let’s say the xmcloud.build.json file looks something like this:
{
    "renderingHosts": {
        "mysite1": {
            "path": "./src/rendering-mysite1",
            "nodeVersion": "16.15.1",
            "jssDeploymentSecret":"<redacted>",
            "enabled": true,
            "type": "sxa",
            "lintCommand": "lint",
            "startCommand": "start:production"
        },
        "mysite2": {
          "path": "./src/rendering-mysite2",
          "nodeVersion": "20.14.0",
          "jssDeploymentSecret":"<redacted>",
          "enabled": true,
          "type": "sxa",
          "lintCommand": "lint",
          "startCommand": "start:production"
      }
    },
    ...
When XM Cloud runs a deployment, it reads the xmcloud.build.json file, iterates through the renderingHosts property, and provisions the relevant containers behind the scenes. When the deployment completes, the rendering host items in the content tree are created and/or updated under this folder:
/sitecore/system/Settings/Services/Rendering Hosts
The rendering host items in this folder map to the rendering hosts enumerated in the xmcloud.build.json file.
One interesting thing to note is that, regardless of the name of the first rendering host the xmcloud.build.json file (e.g., mysite1 in the example above), the first rendering host in the xmcloud.build.json file will always be created in the Sitecore content tree with a name of Default. The N + 1 rendering hosts will have the names listed in the xmcloud.build.json file. For example (again, assuming the xmcloud.build.json file, above 👆), the post-deployment rendering hosts in the target XM Cloud environment would look like this:
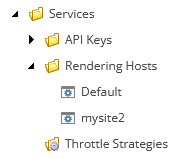
The resulting rendering host items from an XM Cloud deployment.
Once XM Cloud creates these items, it sets them to protected in the content tree–these items should not be modified outside of the XM Cloud deployment process.
If, for whatever reason, you’ve serialized these items and have manually overridden the items (either by making manual changes or by installing a content package), you can get into a situation where the changes and updates during XM Cloud deployments on these items are ignored because Sitecore is looking at the overridden items. This will remain an issue until the overridden serialized items are either cleaned up using the Sitecore CLI itemres cleanup command (reference: https://doc.sitecore.com/xmc/en/developers/xm-cloud/the-cli-itemres-command.html#the-cleanup-subcommand) or the overridden items are simply deleted (to be restored on the next deployment).
The TL;DR for this tip: do not serialize rendering host items corresponding to entries in the renderingHosts property in the xmcloud.build.json file–XM cloud manages these items, so you don’t have to.
3. Set the Name and Description for the Site Collection 📛
The XM Cloud Sites landing page has been updated recently but, in the past, the name of the site collection to which a site belonged would sometimes be presented as “N/A”:
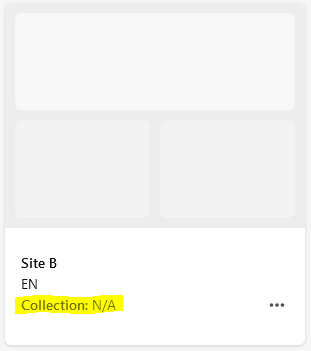
A site’s Collection label reading “N/A”.
It turns out that there’s a field section on site collection items that lets developers set the Name and Description for the site collection. Admittedly, initially, I was just annoyed with the “N/A” and wanted a way to set the site collection name. However, it’s generally a good idea to name and describe your site collections anyway, especially if there are (or will be) many of them. To set the Name and Description fields on a site collection item, navigate to the site collection item in the content tree and drill down to the Metadata field section to provide values for these fields:
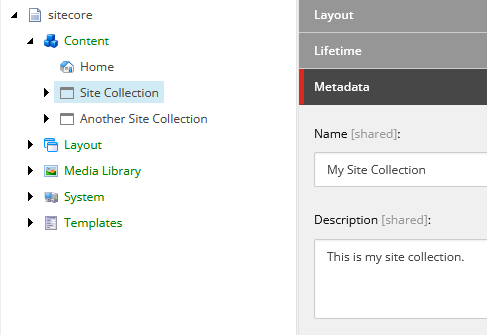
Setting the Name and Description of a site collection.
🥣 Be sure to serialize any updates to these items using the Sitecore CLI
ser pullcommand (reference: https://doc.sitecore.com/xmc/en/developers/xm-cloud/the-cli-serialization-command.html#the-pull-subcommand). Site collection items are developer-controlled and should be consistent between environments.
Now, in the XM Cloud Sites interface (and possibly elsewhere in the future), it’ll be easier to differentiate between site collections and determine the purpose of a given site collection. ✅
Thanks for the read! 🙏