As you may already know, there are several AMIs that you may utilize in the Amazon EC2 environment. However, you can see that these are missing some specific configuration software that you need. If, like me, you prefer to use third-party software like Docker or Ansible to implement configuration changes and have pre-built operating system templates with your software need to keep things productive, then you’ll probably want to consider building your own AMI.
In Packer language, the configuration file used to describe what image we want to build and how is referred to as a template. A template’s format is basic JSON. In this piece, I’ll describe how to achieve that per the diagram below.
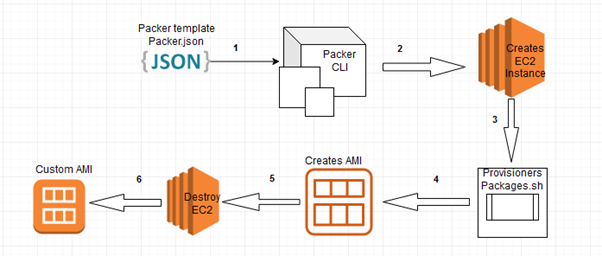
Fig: Packer architecture diagram for AWS
What is Packer?
Packer is HashiCorp’s open-source tool for creating machine images from source configuration. You can configure Packer images with an operating system and software for your specific use case.
Terraform configuration for a compute instance can use a Packer image to provision your instance without manual configuration.
Objectives
- Prerequisites
- Install Packer
- Select the Amazon Machine Image from the AWS Console
- Overview of Packer
- Create a JSON file for use with Packer.
- Run Packer to create our AMI
- Conclusion
Prerequisites
To use Packer with Amazon, you must first get your AWS Access Key and AWS Secret Key. This can be created in the IAM section of the Amazon account. Please refer to the screenshot and link below for the required IAM permission https://www.packer.io/plugins/builders/amazon
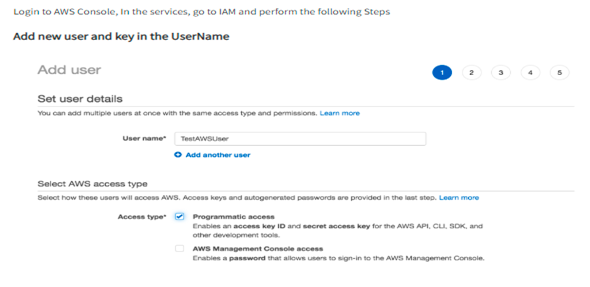
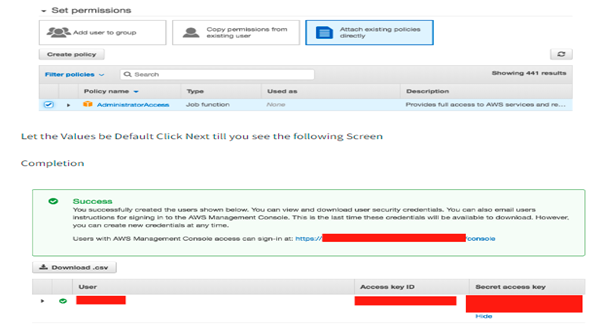
Note: As mentioned in the above IAM permission link, the existing permission should be required.
Install Packer
Install the packer using below mentioned instructions,
- Download Packer https://www.packer.io/downloads.html
- Unzip the downloaded file and extract it in any folder.
- I have installed the packer in C:\packer.
- Let us add this path to the $PATH variable
- To validate if it is working, type: packer -version
- Version to use Packer 1.8.0
To learn more about Packer, please refer to this document: https://learn.hashicorp.com/packer
Select the Amazon Machine Image from the AWS Console
Before creating the Packer template file, we need to get ready with the AMI name. AMI images that work on the US-East-1 region may not work with the US-West-1 region.
Make sure you find the AMI on Amazon Marketplace and click Accept the Software Terms. Otherwise, you won’t be able to use the AMI, and Packer will exit with an error. So, we need to validate the AMI before running the Packer model.
To select the base image, you need to go to the AWS console or Have access to the AWS CLI. Log in to the AWS interface, and on the left, select AMI.
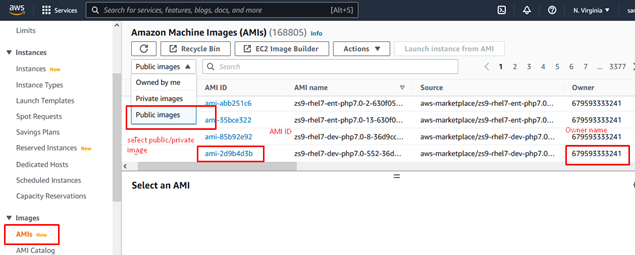
For the purposes of this article, I actually have selected an Ubuntu AMI.
Overview of Packer
In this section, we will provide an overview of Packer like how different sections are used in Packer and how we used them in the script.
We divide the packer into four sections “builders“, “provisioners“, “post-processors” and “variables“. We will go step by step and, at the end, will run the final script.
Builders – Building Your First AMI
Builders are Packer components that can generate a machine image for a single platform. Builders read certain configurations and use them to run and build machine images. A builder is called as part of the build to generate the actual resulting images. For more details on the builders, click here.
In the screenshot below, we specify AWS environment access credentials along with various parameters of our AWS environment such as region, source AMI, and instance type, ssh_username.
We have saved the below file with the name packer.json (only used for the builders section)
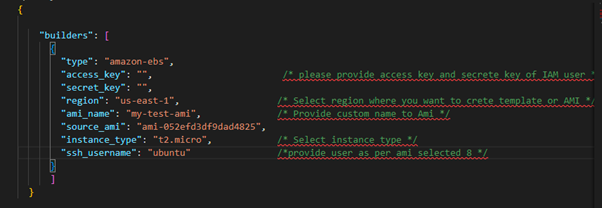
Run the packer command – packer build packer.json

Once it’s done, you’ll find the image in the AMI section with the name my-test-ami, but it’s a pointless AMI. We just created the AMI from the ec2 instance.
Provisioners – Configuring Provisioners
Provisioners use built-in and third-party software to install and configure the machine image after booting. Provisioners prepare the system for use, so common use cases for provisioners include installing packages, patching the kernel, creating users, and downloading application code. For details, click here
Now that we have the provisioning script, we need to write a simple bash script to install the appropriate software into our new Packer-generated AMI. For the purposes of this article, we will create our script and tell it to install Nginx. We’ll then place it in the provisioner section.
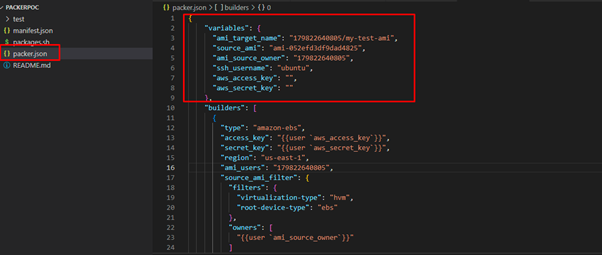
In the builder section, when we run the packer command—packer build packer.json, it creates a pointless AMI, but when we use the provisioners section in the packer.json file (only used for the provisioners section), it creates an AMI with Nginx software.
Note: At the final step, we will store provisioners section commands in packages.sh.
Post-processors
The manifest post-processor can store the list of all of the artifacts in JSON format, which is produced by the packer during the build. For more details, please click here.
Create a JSON file for use with Packer
In this section, we are using three different files for Packer: Packer.json (Builders), packages.json (provisioners) and manifests.json
Variables
In the variables section we have created some variables like ami_target_name,source_ami,ami_source_owner,ssh_username,aws_access_key, and aws_secret_key details that are required for the creation of custom Ami and passed that variable names in builder section. please refer below for more details.
“ami_name” – It is used to provide the name after the custom AMI is created.
“ami_source_owner” – It is used to capture source images from AWS account eg. AWS AMI name.
“ssh_username” – provide username as per aws standard like for redhat – ec2-user, for ubuntu – ubuntu,etc.
“aws_access_key” and “aws_secret_key” – provide credentials of a user while execution. Eg. export credentials in a terminal so our credentials will be secure no need to be exposed anywhere.

Please refer variables documentation link
Packer.json
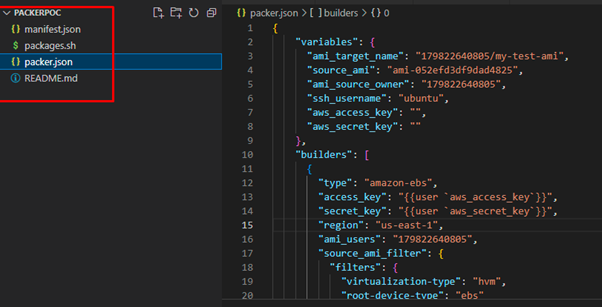
As explained above, you now know how Packer works with different sections like builders and provisioners. We also created variables and used them in the builders’ section. Now, we move on to the final script to create the custom AMI.
Run Packer to create our AMI – Final script packer.json
Step 1: You need a separate package.sh, file, and add the lines below to install Nginx.
#!/usr/bin/env bash
sudo apt update
sudo apt install nginx -y

Step 2: Create an empty manifest.json file to store the final result.
Step 3: Create the file packer.json and add the lines below to create the custom packer AMI.
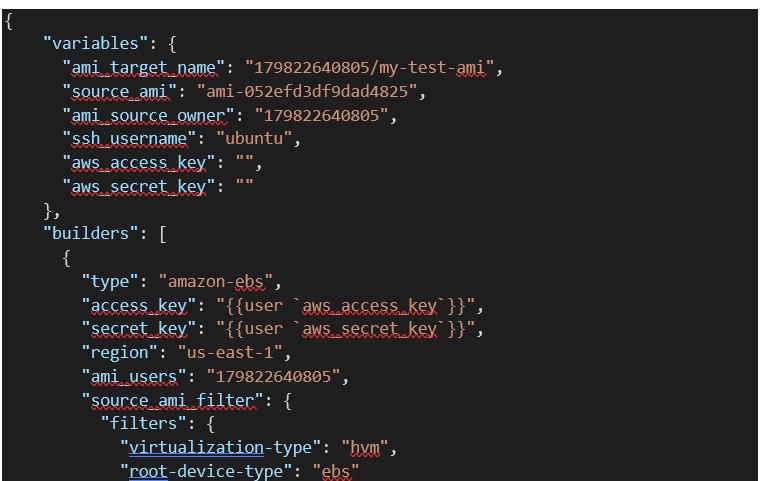

Step 4: The final output of the folder structure looks like the below
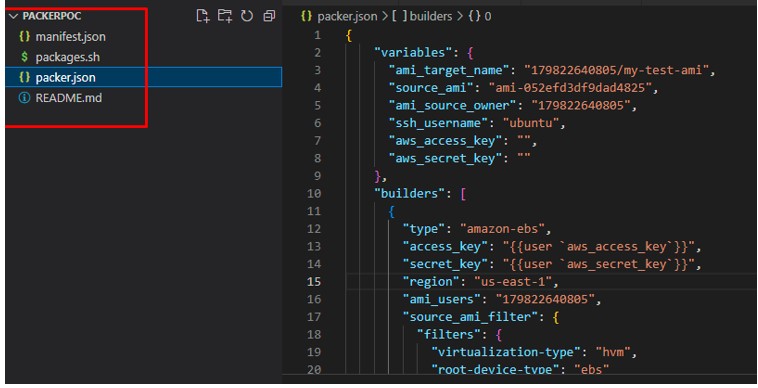
Step 5: Now that our JSON configuration file and bash provisioning script are ready, we can run Packer to create our new AMI by running the command below:
packer build packer.json
When you run this, assuming your credentials are correct, you should see something similar to the following:


Step 6: While executing step 5, log in to the AWS console and click EC2.
Next, you’ll see the commands executed inside the instance as part of the provisioning script and their output.
In the end, you should see something similar to the following, assuming everything goes as planned:


As you can see in the output below, we have a new AMI! It’s that simple

Step 7: Finally, the AMI’s output will be in the manifest.json file, as shown below.

Conclusion:
Packer is a great software that really simplifies deployment in large and small virtualized/container environments. It can be used with many other virtualization and cloud platforms, including, but not limited to, GCP, AWS, AZURE, etc.

