Sitecore Personalize has several out of the box components that notify the user such as popup takeover, corner popup, sidebar, and alert bar. These components all feature a close icon that will hide the component from the screen. But there is no logic out of the box to prevent them from being displayed again.
Imagine we have an alert banner that appears at the top of the page. You use page targeting to run the experience on all pages. This will ensure the user sees the information when they come to the site no matter what page they land on first. The user lands on the contact us page and sees the alert banner. They click the X icon to dismiss the banner and navigate to another page. The banner appears again. They click the X icon to dismiss the banner and navigate to another page. The banner appears again! What a frustrating experience! The user thinks, I don’t want to see this banner again!
Here are two ways that you can track the dismiss event and prevent the banner from appearing after it is dismissed.
Using Events and Conditions
Conditions allow you to control when an experience is displayed much like page targeting. A condition is simply a block of javascript code that can access guest data and events. A condition returns true if the experience should display and false if it should not display. This javascript runs server-side. You have access to the full guest context, but not the client’s browser window. You can use the same [[parameter | type | default value ]] syntax as in the experience variant or web template to create a user editable form allowing the condition to be customized.
Imagine our alert banner example. We want to create a condition that searches the guest’s events to see if the alert banner had been dismissed previously. CDP retains all event data from the last 1000 sessions (https://doc.sitecore.com/cdp/en/users/sitecore-cdp/data-availability-in-sitecore-cdp.html). Note that if you have a long running experience on a site where users have a high number of sessions, it could be possible that the alert banner could appear again after the session containing the dismiss event has rotated out of storage. In general, this solution will work across devices once the user has logged in and can tie their session to their guest profile.
(function () {
  var session = guest.sessions[0];
  if (!session) {
    return true;
  }
  for (var j = 0; j < session.events.length; j++) {
    var data = session.events[j];
    if (data.type === "[[Event Name | string | ALERT_BAR_DISMISSED]]") {
      return false;
    }
  }
  return true;
})();
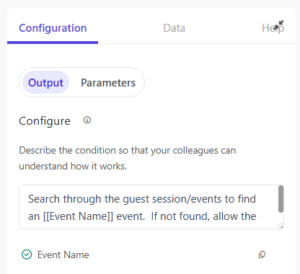
In the output section of the configuration tab, we want to edit the description. Include the parameters in the description so the user can customize the condition for this experience. The description is displayed when the user selects the condition from the experience screen. The parameterized fields will show in bold.
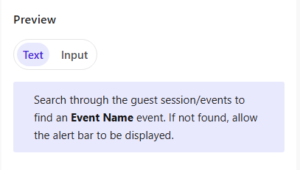
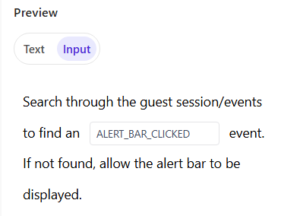
In the preview section at the bottom of the screen, you can see how the text description will be displayed with the bold fields along with a preview of the input mode.
In the web template we will create a parameter that allows the user to give this experience a unique id. This is important so dismissing BannerA does not prevent all future banners from being displayed. Notice in this code that we are adding an event listener on the close button. When the close button is clicked, we are sending an event back into Personalize so the condition can find it the next time the page is loaded. Notice that we can use Engage.settings.pointOfSale so we do not have to hard code that value. This value is read from the Engage SDK in the client’s browser.
document.body.classList.add("show-TopBanner");
insertHTMLBefore('body', 'pers-');
// Declarations
const persExperience = document.querySelector("#pers-"+variant.ref+ ' #pers_TopBanner');
const persCloseButton = document.querySelector("#pers-"+variant.ref+ ' .pers__btn-close');

// Declare Pers function event
const sendInteractionToPersonalize = function(interactionType){
    const type = "[[ Experience ID | String | ALERT_BAR | {required: true}]]_" + interactionType;
    const eventData = {
        "channel": "WEB",
        "pointOfSale": Engage.settings.pointOfSale,
    };
    window.engage.event(type, eventData);
}

//Listen on X button
persCloseButton.addEventListener("click", function(){
    persExperience.style.display = "none";
    document.body.classList.remove("show-TopBanner");
    sendInteractionToPersonalize("DISMISSED")
});
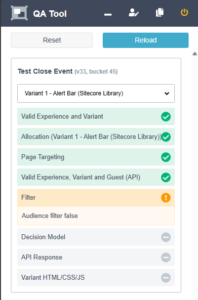
When you preview the experience with the condition, the qa tool will show a yellow people mark indicating that it stopped processing at the filter step.
This helps with performance because the decision model is not executed and the html/css step is not rendered.
Using Cookies
Let’s imagine our same alert banner but this time using cookies to track if the banner has been dismissed. When we create our experience, we won’t need to set a condition this time. Instead we’ll modify the web template to include a check to see if the cookie exists. We’ll also write a cookie when the alert banner is dismissed. Notice here I’m wrapping the entire javascript block from before inside an if statement that checks for the cookie. You can use the variant.ref variable to dynamically get the GUID of the current variant. We’ll use the variant.ref as the name of our cookie so dismissing BannerA does not prevent all future banners from being displayed.
if (!document.cookie.split(";").some((item) => item.trim().startsWith('pers-' + variant.ref + '='))) {
    document.body.classList.add("show-TopBanner");
    insertHTMLBefore('body', 'pers-');
    // Declarations
    const persExperience = document.querySelector("#pers-" + variant.ref + ' #pers_TopBanner');
    const persCloseButton = document.querySelector("#pers-" + variant.ref + ' .pers__btn-close');
    // Declare Pers function event
    const sendInteractionToPersonalize = function (interactionType) {
        const type = "[[ Experience ID | String | ALERT_BAR | {required: true}]]_" + interactionType;
        const eventData = {
            "channel": "WEB",
            "pointOfSale": Engage.settings.pointOfSale,
        };
        window.engage.event(type, eventData);
    }
    //Listen on X button
    persCloseButton.addEventListener("click", function () {
        persExperience.style.display = "none";
        document.body.classList.remove("show-TopBanner");
        sendInteractionToPersonalize("DISMISSED")
        document.cookie = 'pers-' + variant.ref + '=clicked; max-age=31536000; path=/'
    });
}
When you preview this experience, the qa tool will show a green check mark indicating that it processed all the steps including the decision model and html steps. Be awared, this could make it more difficult to debug your experiences. If the cookie does not exist, the experience is added to the page. If the cookie does not exist, the experience is not added to the page. There is no UI flicker here because it doesn’t show/hide the experience. Make sure to wrap your entire javascript block in the cookie check so you don’t get null reference errors if your code tries to read elements from the DOM.
This solution helps with performance because it does not require you to search guest session to find a specific event. However, the cookie sits on the client’s browser. In this example, I have set the cookie expiration for one year (31536000). But the experience could display again if the user blocks cookies or they clear their cookies. It is also device specific. If the user moves to another device, the experience will display again. For this reason, it is important to end experiences that are no longer being used so users don’t see experiences with outdated or incorrect information.
Conclusion
Which method you choose to implement will depend on what is best for your use case. If you want to implement either of these options on the out of the box components, you’ll want to create custom web templates by copy/pasting the html/css/javascript of the out of the box component. The out of the box components cannot be modified or duplicated.


