Styling plays a fundamental role in web development. Furthermore, when you embark on building React applications, you can choose from various approaches to skillfully manage styles and CSS. This comprehensive guide will explore diverse techniques, tools, and best practices for styling React components using JavaScript.
Different Approaches to Styling in React
In the expansive realm of React development, developers can select from a diverse spectrum of approaches to apply styles and effectively manage CSS.
1. Inline Styles:
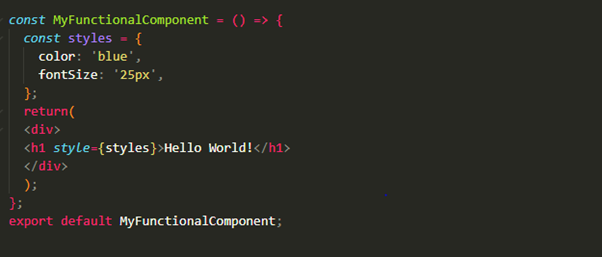
- One of the simplest approaches is using inline styles directly within React components.
- JavaScript objects apply styles, providing a unique and encapsulated styling for each component.
2. CSS Stylesheets:
- Traditional CSS stylesheets can also be utilized in React applications.
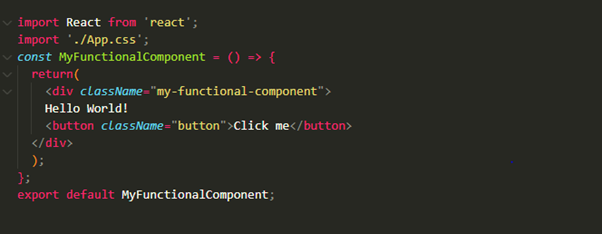
- Import the stylesheet in your component file and apply class names as usual.
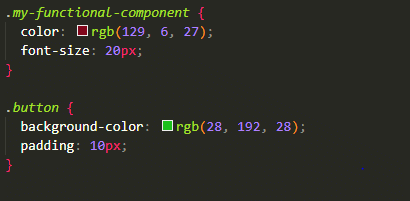
- Create a separate CSS file that contains the styles for your component. For example, let’s call it. App.css.
- In your React component file (e.g., MyFunctionalComponent.js), import the CSS file using the import statement.
3. CSS Modules:
- CSS Modules provide a way to locally scope your styles by automatically generating unique class names.
- React treats each CSS file as a separate module, and the component imports classes with scoped functionality.
- Example: Create a separate module.CSS file containing your component’s styles. For example, let’s call it.
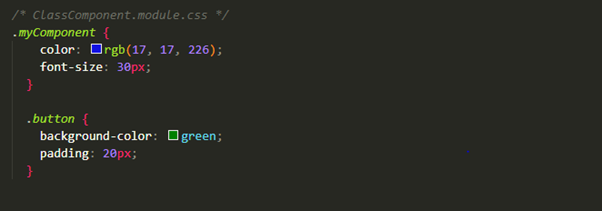
- In your React component file, import the styles using a regular import statement. The imported object contains the locally scoped class names as properties.
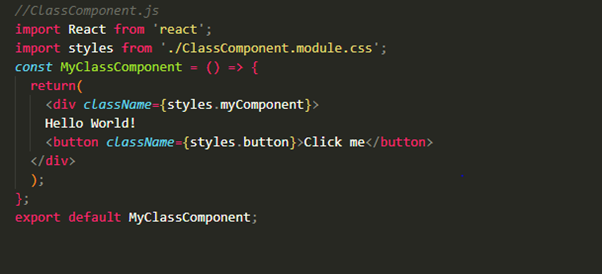
-
Benefits of CSS Modules:
-
-
- Local Scoping: Styles are scoped locally to the component, reducing the chances of naming clashes in larger projects.
- Maintainability: Styles and components are co-located, making it easier to maintain and understand the styling logic for a specific component.
- Explicit Dependencies: Components explicitly import only the styles they need, avoiding global scope pollution.
-
4. CSS-in-JS Libraries:
- Styled Components, Emotion, and JSS libraries enable writing CSS directly in your JavaScript files.
- These libraries often offer features like dynamic styling, theming, and easy integration with React.
- Example using Styled Components: You must install it in your project before using it. You can achieve this by using a package manager such as npm or yarn.

- Create a styled component directly in your React file. Let’s call it MyStyledComponent.js:
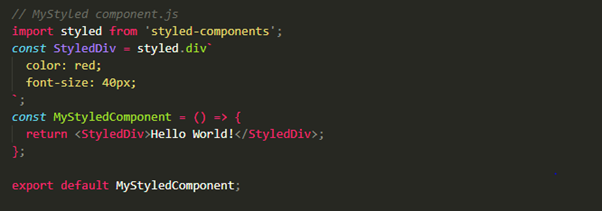
- In this example, we use the styled function from Styled Components to create a new styled component (StyledDiv). The styles are defined within a template literal, and the resulting StyledDiv component can be used like any other React component.
- Now, you can import and use your styled component in another React file. Let’s call it App.js:
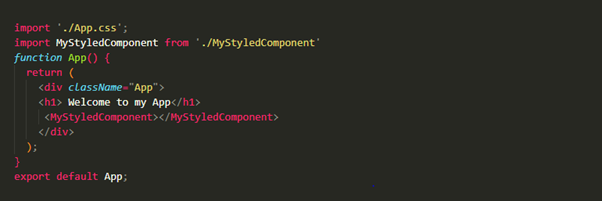
- In this example, MyStyledComponent is imported and used within the App component. The styles defined in StyledDiv will be applied to the div element rendered by MyStyledComponent.
-
Benefits of Styled Components:
- Component-based Styling: Styled Components align with the component-based nature of React, encapsulating styles within each component.
- Dynamic Styling: Easily adapt styles based on component state or props, enhancing dynamic UIs.
- Theming: Styled Components support theming, allowing you to create a consistent design system.
- No Class Name Collisions: The generated class names are unique, eliminating the risk of naming conflicts.
5. clsx Library :
- clsx is designed to facilitate the conditional application of CSS classes in React components.
- It is a lightweight library that adds minimal overhead to your project while providing powerful functionality.
- The primary goal of clsx is to enhance code readability by simplifying the concatenation of class names in a concise and clear manner.
- Example using clsx: Before using ‘clsx’, you need to install it in your project. You can achieve this by using a package manager such as npm or yarn.

- Now, Import clsx in your React component, Use clsx to conditionally compose class names:

- In this example, define the Button component as a functional component that takes two props: isPrimary and isSecondary. Call the clsx function with an object where keys represent class names, and values are boolean expressions. If isPrimary is true, the ‘primary-button’ class is included; if isSecondary is true, the ‘secondary-button’ class is included. The’ default-button’ class is included if neither is true (!isPrimary && !isSecondary).
- The result (buttonClasses) is a string containing the combined class names based on the conditions.
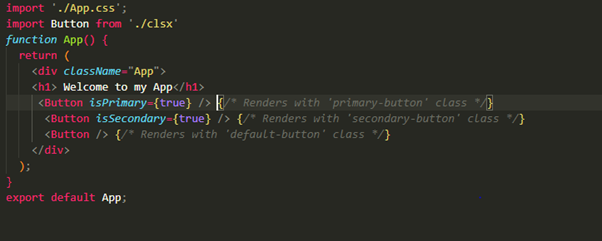
- In this example, the Button component can be used in a parent component (App), and the class names applied to each rendered button will depend on the provided props (isPrimary and isSecondary). The use of clsx makes the class composition more concise and readable.
Conclusion
In React styling, there are numerous ways to do it. Whether you prefer styles directly in components, use CSS modules, or try CSS-in-JS libraries, the choice depends on your project needs and team preferences. Experimenting with different techniques helps create appealing and easily manageable React apps. Whether keeping it simple with inline styles or opting for fancy CSS-in-JS libraries, each way contributes to creating cool and user-friendly interfaces. Happy coding!


Nice
This looks really impressive. And I agree! React’s flexible styling options cater to diverse project needs. Experimenting with different approaches ensures both simplicity and user-friendly interfaces.
Great article. Explaines React styling comprehensively.
Explained in a very efficient manner. Very Helpful
This is a useful post for React developers. Amazing write-up!