Test Data
Virtuoso offers structured tables of data and links them to tests. This means that each test can be run many times, once for each row containing test data that is now present.
We need to first link our journeys and test data tables, then link test steps and test data attributes to use test data. When executed, steps that are not linked to any attribute will utilize their own value. However, a row can have no values for any of the attributes listed, in which case the step related to that attribute will not be done for that row.
How to Create Test Data Table:
To create a test data table, navigate the project dashboard for which project we are managing test data. Move the cursor on Three dots one small flip will open some options. click on the ‘test data’ icon on the left side of the Dashboard. This will open the test data management screen.

On the Test Data Management page, we can add a new test data table.
Click on the “New Data Table” button

Here new flip will appear to get the required data to create a data table.
Table name: It is required to provide a unique table name to identify the data table easily.
Table Description: It is an optional field; we can provide small information to identify the data table.
Data table:
Here we create Test Data using the name ‘Test Data Table’, right now table contains no data. We can add data as per project needs.

Adding and Editing Test Data:
On the left side of the data table screen, a different data table is present. If we want to edit the data table click on the three dots menu icon, edit/import option will display from there we can edit our test data table. The green circle on the test data table indicates that it is already in use.
By clicking the ‘Add new attribute’ button we can add a column and the number of rows can be added by increasing the numbers below the table.

A data table’s values can be directly edited. When we choose a data table, we can delete a row by hovering the mouse pointer over it and a bin icon should appear on the right side. By dragging and dropping the row’s anchor icon on the left after hovering over it, you can also rearrange the row. If there are any unsaved changes in the data table, the Discard and Save buttons will become active.

Managing Test Data Table
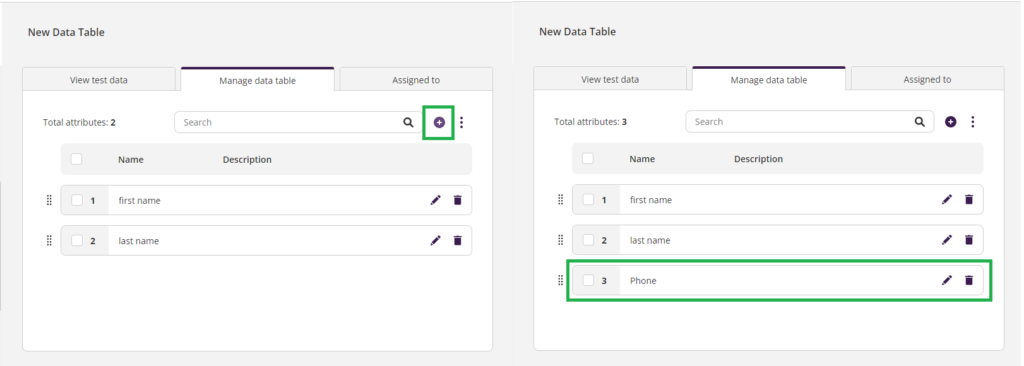
Test data contains Name: A distinct name that makes it possible to recognize the test data attribute; and Description(optional): A small explanation to assist you in recognizing the test data attribute; “Managing data table” tab is the present right side of “view test data” tab. Go to the Manage data table tab, this tab will get open as shown in the below image. From here we can directly delete attributes by clicking the bin icon. And we can edit attributes by clicking the edit button.

Click on the plus sign in the top right corner of the table to add a new attribute. The newly added attribute will be listed at the very end of the list.

Executing Journeys Using Test Data:
Let’s see how to connect test data in this Journey.

Steps For Managing Test Data:
- Select “Manage test data” option from the Journey context menu to start using test data in tests, as shown in the following screenshot:

2. After clicking Manage test data’ option from the Journey context menu, “Manage Journey Data Table” Flip will display. From here select the test data table to use, will select ‘New Test data’, and click on save.

3. To use the test data in Journey, use variable names to those of the attributes. We can utilize an attribute (column) with the name, for instance, by writing $name in the “field” in your steps. All non-alphanumeric characters are automatically changed to the underscore (_). For example, the column “first name” becomes $first_name.

