Overview
In a previous article about Azure B2C, we discussed the basics of Azure B2C and why you may want to consider using it for your software or application. Now, let’s take a look at some examples of the most common use cases.
Implementing Multi-Tenant Applications with Azure B2C
Multi-tenancy is an architecture pattern in which a single instance or deployment of a software application serves multiple customers. Each customer is called a tenant. Tenants can be given the ability to customize some parts of their application, such as the color of the user interface or certain business rules, but they can’t customize the application’s core code. This is very prevalent in SaaS businesses and Business to Business type scenarios.
Below is a step-by-step demo of implementing Multi-Tenancy within an example application. The pattern itself is applicable to most technology stacks, but for this demo I used a Node.Js/Express server for the backend and a static React application for the frontend.
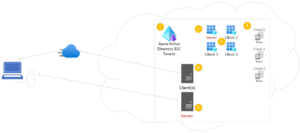
Multi Tenant Architecture
Step 1: Setup the Azure B2C Directory
The first step to implement your multi-tenant application is to setup an Azure B2C Directory. Azure B2C also uses the term “Tenant” to describe a single directory of users – which can get confusing when you are making Multi-Tenant applications where the term “Tenant” refers to the system’s customers. So for clarity sake, we will use the term “Directory” to refer to the Azure B2C instance and “Tenants” will refer to the application’s customers who are going to be interacting with the app in question.
In most cases, it is advised to only use one (1) Azure Active Directory B2C Directory for your application’s Production environment, and one (1) directory for your Non-Production environment(s). Microsoft provides some good documentation here. Azure B2C directories will hold our User Flows, Custom User Policies, and connections to other identity providers that are authorized to connect with our application.
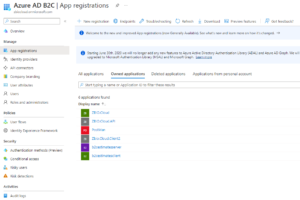
Step 2: Configure Application Registrations
After our B2C directory has been created, it will essentially be empty – and we need to start populating information for the software applications that we plan to integrate with the identity provider. Navigate to the “App Registrations” menu within Azure Active Directory and select the option to create new registrations:
Create one (1) registration for your application backend.
If your software has a microservices architecture, you can choose to split the app registrations up into one registration per code-base OR centralize them under a single registration. In the majority of cases, it is easier to centralize backend applications under a single registration
Create multiple client registrations for each individual “tenant”, “client”, or “site” that will be using your software – e.g. If your application has Ford & General Motors as two different groups of customers accessing your site – each could be provided with their own registration
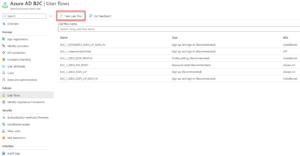
Step 3: Setup UserFlows
After setting up the app registrations, navigate to the “User Flows” menu within Azure Active Directory and select the options to create new flows for the required scenarios (i.e. User SigIn/SignUp, Password Reset, etc.)
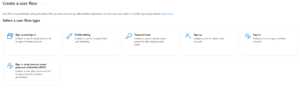
If you want different tenants to have different user experiences for any of the common processes (SignIn/SignUp, PW Reset, etc.), you will need to create additional User Flows that are unique for that client (for example, if one client will allow social logins or logins from a different Oauth identity provider)
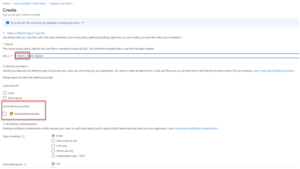
Step 4: Configure Application API Scopes
After the user flows have been provisioned and the app registrations have been created, the server and client registrations need to be connected with different scopes that are available to each tenant.
Start by opening the “Server” app registration and using the “Expose an API” menu to create different scopes for each client that is allowed to send requests to the server’s APIs.
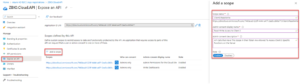
Create different scopes as needed based off of the number of different tenants and the types of permissions different tenant apps may need (For example, if Client 2 has an Angular portal app that only needs to read data and also a .NET MVC web client that needs to both read and write data, create two different scopes for the two client applications).
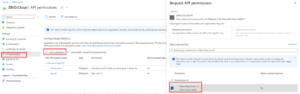
After the scopes have been created in the Server app registration, utilize the “API Permissions” menu on the client app registrations to assign the right scopes to the different tenants:
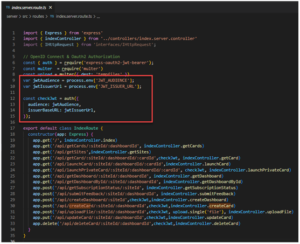
Step 5: Implement API Token Validation
Once the permissions and scopes between the client app registrations and the server/API(s) have been configured, logic can be added to the server-side code base to validate the tokens being sent from the individual tenant apps.
Any JWT validation library of choice can be selected to validate the Issuer of the token as well as the Audience fields are set correctly. For this example I chose the express-oauth2-jwt-bearer library which allows users to pass in the Audience and Issuer values and the library will automatically validate the token against the settings:
The Issuer URL value indicates that the access token being presented to the server is valid and issued from the B2C tenant. The issuer URL is usually of the format: https://{Azure B2C Tenant Domain Name}.b2clogin.com/{Azure B2C Tenant GUID}/{User Flow That Generated the Identity Token}/v2.0/
The Audience value indicates the App Registration that the Access Token was generated for – in this case, the Server’s App Registration Client Id GUID.
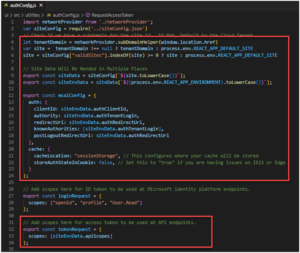
If all clients use a similar Login User Flow OR if separate instances of the Server code base will be deployed for each tenant, both the Issuer and the Audience can be set as static environment variables.
If, however, the different tenants will have different user flow experiences (for example, if Client 1 allows a different Oauth or social login than the other clients), the JWT Audience and Issuer values may be moved to a configuration file as shown below:

In such cases, the token validation should be moved to after the definition of the API routes so that a Tenant or Site identifier can be extracted from a URL route parameter, request header, or request body object to use for selecting the proper Issuer and Audience values for that tenant:

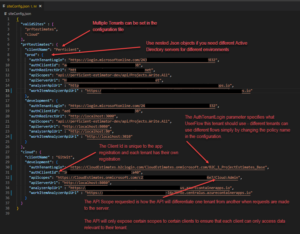
Step 6: Setup Tenant Based Authentication in the Frontend Application(s)
Finally, after the server is prepared to validate the tokens, the last step is to configure the client application(s) to utilize the appropriate flows and request the correct access tokens based on the given tenant. When a single code-base is used to service multiple different tenants, the most common approach is to use different subdomains for each unique client.
The following example uses a subdomain helper to parse the subdomain from active URL and validate it against a list of viable tenants. Once the tenant Id has been identified, the proper User Flow policies and API token scopes can be selected from configuration files.
This example is of a React client application using the Microsoft Authentication Library for Browsers, but the pattern should be similar regardless of the library selected.
With that final step, the Multitenant architecture is achieved! The above solution provides flexible logins for different tenants configured through code, separation of API Scopes and different permissions for different tenants, and configurable user experiences for each client as the log in to the same application.