This blog in our series on Atlassian Optimizing JIRA will cover personalizing JIRA settings to make JIRA best for you. (Read the previous post here on JIRA Best Practices).
Moving on, we will consider optimizing JIRA also by personalizing JIRA settings.
While your JIRA admin or team leader sets up many customizations, there are few important settings which you can control. The Power!
How to access Personal Settings
- At top right, select your profile picture icon
- Select Personal Settings
- Update your preferences & select Save Changes

Personal Setting Features
If you know the feature you do it better!
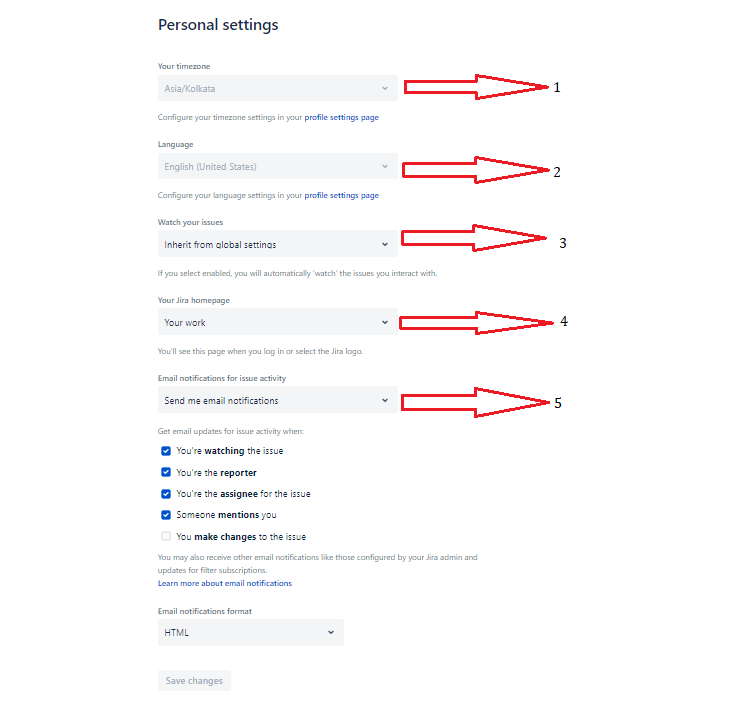
Following features in Personal setting helps you customize JIRA for you:
- Your timezone: Set your date & timezone preferences.
- Language: Change your preferred language.
- Watch your Issues: Become a watcher automatically of your issues (Issues that you create or comment on), you will receive email when someone updates or comments on the issue.
- Your Jira homepage: Choose your preferred homepage ( Your work, Dashboards, Project Directory ). When you click on the JIRA logo on top-left it’ll take you to your selected page.
- Email notification: Choose when & how you receive email notifications.
Tips to optimize Personal Settings
- Stay in loop by enabling “Watch your Issues“ : You will receive timely email notification on your issues (issues that are either created by you or you commented on any issue).
- Set the Jira homepage to “Your Work“ : It shows items you have currently worked on or viewed, thereby, you find your work quickly & effortlessly. Change the homepage to “Your Work”, & you’ll never be too far from your most important projects & tasks.
- Personalize your email preferences : In personal settings, you can change the volume of emails you receive. If you prefer to receive fewer emails, uncheck the boxes for activities you’re not interested in. You can always come back to your settings and update preferences as you wish.
- Manage JIRA emails by custom email filter : You’ll receive too many emails from JIRA. To set up an email filter, you’ll need to do some light research to understand your email client. With a filter, you still get the important emails. But now, they’re labeled, categorized, and not cluttering your inbox. Know that the sender’s email will always be jira@<yourinstance>.atlassian.net
Knowing the features of a tool, makes you win half the battle. Optimizing JIRA with simple customizations to your JIRA settings, you can make work in much better & focused way. A win-win!!
For more details refer, Atlassian JIRA official page.

