
The PnP Provisioning framework is a code-centric and template-based platform for provisioning your site collections. The new provisioning engine allows you to persist and reuse provisioning models in Office 365, SharePoint Online, and on-premises site collections.
This blog will demonstrate how to provision a Team site using PnP PowerShell. In this process, we will make use of an existing SharePoint site to create a reusable template. By using this template, we can create exactly similar sites multiple times for multiple customers.
Knowing Your Prerequisites
For executing certain commands, you should have the PnP PowerShell framework already installed on your computer. If it’s not installed, you can simply install it by executing the following command in the command prompt:
Install-Module -Name PnP.PowerShell
Or you can refer to this link for further directions on the PnP PowerShell installation.
Once you’re done, run Windows PowerShell in “administrator” mode and execute the following command to install the PnP PowerShell module for SharePoint Online:
Install-Module SharePointPnPPowerShellOnline

If you are executing PnP PowerShell commands for the first time in your system, then you may need to grant access to PowerShell to your SharePoint online site. To provide access, execute the following command in Windows PowerShell:
Register-PnPManagementShellAccess
Now you are all set to execute PnP PowerShell commands in your system.
Understanding the Process Overview
The following image shows the basic process that we will follow to provision a website using the PnP Provisioning framework:
- Extracting template
- Customizing artifacts and other configurations in the template
- Applying a template to the new target site

How to Extract the Site Template
As already mentioned, we will use an existing site for setting up our PnP template. The easiest way to a custom provisioning template is to create a fresh new site collection manually in SharePoint Online, configure your artifacts (site columns, content types, lists, and pages), and save the result as a provisioning template.
Once the site is set up, we will extract the template from that site using PnP PowerShell.
Please follow these next steps:
- Open Windows PowerShell in “Administrator” mode
- Connect to the newly created site by executing the following command:
Connect-PnPOnline -Url <sitecollectionUrl>
This command will establish the connection to your site collection from PowerShell. You can access all the artifacts such as lists, libraries, site assets, permissions, site details, and more. for the currently connected site using PnP PowerShell commands.
- You will be prompted to enter credentials, so enter the login credentials for your site.
- In case you’re not given a prompt for entering your credentials, create a credential object and pass it to the “Connect” command:

$user = “<login-username>”
$secpasswd = ConvertTo-SecureString “<password>” -AsPlainText -Force
$mycreds = New-Object System.Management.Automation.PSCredential ($user, $secpasswd)
Connect-PnPOnline -url $siteAdminURL -Credentials $mycreds

- Execute the following command to export the site template in an XML format:
Get-PnPSiteTemplate -Out “D:\PnP-TemplateForSite.xml”
![]()
In this command, you can specify the path for where you should download the template and what to name the template file. In this case, the template will be created in “D:\” drive with the name “PnP-TemplateForSite.xml.”
The template is created at its specific path once the command is executed. This will be a .xml file since we provided the “.xml” extension in a file name. The template will look like the following:
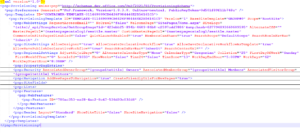
This is what our PnP template will look like. This template contains all details about the PnP provisioning schema version, name, and more. It has different tags for configuring or customizing a website. We can configure the website logo, lists, website members, website fields, website navigations, permissions, and security from this template.
Parameters for custom configuration extraction
We can decide the configurations that we need to extract in the PnP template from the existing site by adding additional parameters in the “Get-PnPSiteTemplate” command. We can use different parameters in the command. For more information on different parameters, you can refer to this link.
Create a New Site or Target Site Using PnP PowerShell
After the template is extracted, we can apply this template to any newly created website. Before we create the template, we will create a new modern site using the PnP PowerShell command below:
New-PnPSite -Type TeamSite -Title “New Target Site”

The code will ask you to set an alias name after executing the command. You’ll provide an alias name and press “enter.” It will then begin creating the website on the connected tenant. As a note, site creation may take some time. After the site is created, the new site URL will display in the Windows PowerShell as shown in the following image:

Applying the PnP Template to the New Target Site
Before applying the extracted provisioning template to the newly created target website, you need to make sure that the new target site is up and running properly. To do this, we’ll first need to connect to the new target site from PnP PowerShell and then we’ll apply the template to it. For this, execute the following commands in Windows PowerShell:
Connect-PnPOnline -Url <targetSiteUrl>
Invoke-PnPSiteTemplate -Path “D:\PnP-TemplateForSite.xml”
The “–Path” argument refers to the source template file that we created in previous steps “PnP-TemplateForSite.xml.” While specifying the file name, make sure it will not have spaces in the file name.
Once the command is executed, you will see the progress for template provisioning to the site as follows.

Applying the template may take 20-30 minutes if the template has too many customizations. This time may vary depending on the complexity of the PnP template we’re applying to the site. When the command execution is completed, you can see that the target site has all the customization and set of artifacts that we configured in the PnP template applied to it.
We can apply the same template to as many sites as we want. This process allows us to automate the creation of multiple identical sites with the same set of lists, libraries, content types, site fields, permissions, and others without taking any extra effort to configure all these things manually for each site.
To Conclude…
In this blog, we learned how to use PnP PowerShell and PnP Provisioning Template to apply a custom template to a newly created site to automate the creation process and apply customized artifacts and configurations. For more information, contact our commerce experts today.