Many of the Episerver projects that we work on have at least one Azure environment. This ranges from production environments to integration environments where continuous deployments occur. We needed a way to stand up new environments quickly and be able to replicate the creation of new environments as needed. We had previously accomplished this using ARM templates but have recently moved to Azure CLI.
ARM Templates vs Azure CLI
I’ve always been a fan of ARM templates and the concept of Infrastructure as code. I’ve also found that ARM templates aren’t easy to deal with. They are often overly complicated, especially when creating dependent resources. Azure CLI is much more straight forward. They are easy to read, easy to maintain, and faster to create. Azure CLI is not perfect, but for the immediate needs, it does a great job. The environment setup script outlined in this post illustrates the ease of using the Azure CLI.
In order to run the commands below, you will need to install the Azure CLI. As of the creation of this post, the Azure CLI tool can be found in the Azure CLI documentation under the install section.
The resources needed for a basic Azure Episerver environment?
Episerver has a nice Azure Environment Setup tutorial for going through the Azure portal to manually create the resources needed for a basic Azure environment. Based on that tutorial, the following resources need to be created:
- Resource Group
- App Service Plan
- Web App
- Database Server
- Database Instance
- Azure Blob Storage
- Azure Service Bus
Creating the Episerver environment
The following code snippets illustrate logging in via the Azure CLI and creating the needed resources. Please see the bottom of the article for a link to the script containing these snippets as well as example variables.
Login into the Azure Tenant
In order to run any commands against your Azure Subscription, you will need to log in to your tenant and select the subscription to run your commands against.
# Log in to Azure
az login
# Select the Subscription
az account set --subscription $SUBSCRIPTION_ID

If you need to get a list of available subscriptions in your tenant you can run the following command after logging in:
az account list --output table
Create the Azure Resources
After logging into our subscription, we can then use the Azure CLI to provision the resources needed.
Resource Group – This is the container to hold related resources for an Azure solution.
# Create the resource group
az group create --name $RESOURCEGROUP_NAME --location $LOCATION
App Service Plan – The App Service plan is used by the web app and defines a set of compute resources for the web app to run.
# Create App Service Plan
az appservice plan create --name $SERVICEPLAN_NAME --resource-group $RESOURCEGROUP_NAME --sku $SERVICEPLAN_SKU
Web App – The App Services that hosts your Episerver web application.
# Create Web App
az webapp create --name $WEBAPP_NAME --resource-group $RESOURCEGROUP_NAME --plan $SERVICEPLAN_NAME
SQL Server – Database Server and Episerver Databases. In addition, you will need to create a Firewall rule so that your web app has access to communicate to your Database server. We will also retrieve the connection string for the database and add it to the connection string section of the web app. The connection string set at the app service level will override settings in the applications web.config file.
# Create SQL Server
az sql server create --name $SQL_SERVER_NAME --location $LOCATION --resource-group $RESOURCEGROUP_NAME --admin-user $SQL_ADMIN_USERNAME --admin-password $SQL_ADMIN_PASSWORD
az sql server firewall-rule create --resource-group $RESOURCEGROUP_NAME --server $SQL_SERVER_NAME -n AllowAllWindowsAzureIps --start-ip-address 0.0.0.0 --end-ip-address 0.0.0.0
# Create CMS DB
az sql db create --resource-group $RESOURCEGROUP_NAME --server $SQL_SERVER_NAME --name $CMS_DB_NAME --edition $SQL_EDITION --collation $SQL_COLLATION --service-objective $SQL_SERVICEOBJECTIVE
# Add the Connection String to your Web App
$CMS_CONNECTIONSTRING="Data Source=tcp:'$(az sql server show -g $RESOURCEGROUP_NAME -n $SQL_SERVER_NAME --query fullyQualifiedDomainName -o tsv)',1433;Initial Catalog='$CMS_DB_NAME';User Id='$SQL_ADMIN_USERNAME';Password='$SQL_ADMIN_PASSWORD';"
az webapp config connection-string set --resource-group $RESOURCEGROUP_NAME --name $WEBAPP_NAME --connection-string-type SQLServer --settings EPiServerDB="$CMS_CONNECTIONSTRING"
Azure Blob Storage – Storage account to store blob assets.
# Create Blob Storage Account and Container - note type is set to custom right now as 'blob' is not a defined type
az storage account create --resource-group $RESOURCEGROUP_NAME --name $STORAGEACCOUNT_NAME  --location $LOCATION --sku $BLOB_SKU
$BLOB_KEY = az storage account keys list --resource-group $RESOURCEGROUP_NAME --account-name $STORAGEACCOUNT_NAME --query [0].value
# Add the Connection String to your Web App
$BLOB_CONNECTIONSTRING="DefaultEndpointsProtocol=https;AccountName=$STORAGEACCOUNT_NAME ;AccountKey=$BLOB_KEY"
az webapp config connection-string set --resource-group $RESOURCEGROUP_NAME --name $WEBAPP_NAME --connection-string-type custom --settings EPiServerAzureBlobs="$BLOB_CONNECTIONSTRING"
Azure Service Bus – Handle event messages such as cache invalidation.
# Create Service Bus
az servicebus namespace create --resource-group $RESOURCEGROUP_NAME --name $SERVICEBUS_NAME --location $LOCATION
# Add the Connection String to your Web App
$SEVICEBUS_CONNECTIONSTRING=$(az servicebus namespace authorization-rule keys list --resource-group $RESOURCEGROUP_NAME --namespace-name $SERVICEBUS_NAME --name RootManageSharedAccessKey --query primaryConnectionString --output tsv)
az webapp config connection-string set --resource-group $RESOURCEGROUP_NAME --name $WEBAPP_NAME --connection-string-type servicebus --settings EPiServerAzureEvents="$SEVICEBUS_CONNECTIONSTRING"
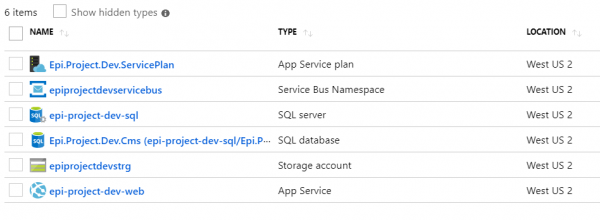
The script takes about 5 minutes to run and, when complete, you can log in to the Azure portal and see the new resources created under your resource group:
The full script to create a basic Azure environment for Episerver can be downloaded from my Episerver-Scripts GitHub Repository.