This is part 5 of a series exploring a case for design thinking in strategy development. (If you are just joining us now, I encourage you to start at the beginning and read part 1 here.)
“What good is an idea if it remains an idea? Try. Experiment. Iterate. Fail. Try again. Change the world.” – Simon Sinek
The first four steps were focused on research and synthesizing data. Now let us dig into ideation, where innovation becomes visible.
Why We Ideate
The main objective of ideation is idea generation, or to create as many ideas as possible. This allows your team to transition from identifying problems to providing possible solutions.
Ideation will help you:
- Ask the right questions + innovate.
- Discover unexpected areas of innovation.
- Create volume and variety in your innovative options.
- Bring together perspectives + strengths of team members.
- Get obvious solutions out of your heads + drive your team beyond them. (“Stage 3 in the Design Thinking Process: Ideate | Interaction Design ….”)
How to Brainstorm Solutions Through Ideation Workshops
For the ideation stage, you will want a sample of voices from across your organization. To begin, schedule a workshop with your strategy team. Ideally, you will want the location to be off-site to limit distractions. If you are away from the office, those interruptions are less likely to happen. Participants should also turn off their phones and leave their laptops at home as these devices can also be distracting.
Note: If this is not realistic for your team, assign one person to be the point of contact and send out a message that all communications must go through that person. They can then determine if an interruption is necessary. Regardless, you will want 100 percent focus.
How to Facilitate Successful Ideation:
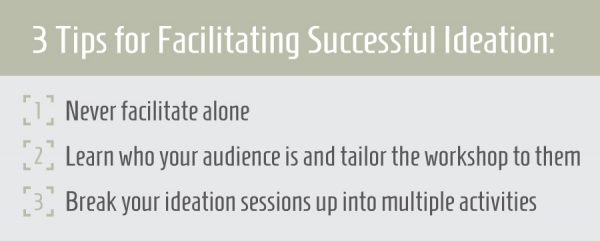
Successful ideation requires good facilitation. Facilitation starts before the ideation session even begins and involves a lot more than acting as a host or note-taker. Here are three tips for facilitating successful ideation:
- Never facilitate alone.
- Learn who your audience is and tailor the workshop to them.
- Break your ideation sessions up into multiple activities.

- Never Facilitate Alone
One of the first lessons I learned was to never facilitate alone. During one of my earliest workshops, I spent two weeks formulating an agenda and planning each activity. Within the first hour of the ideation session, I knew that I was losing my audience, so I called a break and completely scrapped my original agenda. Then I revised my entire workshop within an hour. If I would have had a second facilitator working with me, we could have redirected the conversation and continued as planned.
- Tailor the Workshop to Your Audience
Before you facilitate, learn who your audience is and tailor the session to them. For example, think about the location of the workshop and how it is laid out. When organizing participants into groups, I plan out who is in each group. Room setup is also important and should not be overlooked. I like to set up two seating arrangements, including an area where all participants face the presenter and a separate space for collaboration where all participants face each other. I also ensure that the desired outcome is clear and that everyone agrees before we begin.
- Break the Workshop up into Multiple Activities
Break your ideation workshops up into multiple activities. This inspires engagement and eliminates the possibility of the day becoming stale. (Previously, I mentioned a book called “Gamestorming,” which is a great resource to use when planning activities.) Getting people to move gets the blood pumping to the brain, and that is exactly where we need it. I also like to have back-up activities in case one of the planned activities does not produce the desired results. It is impossible to bring about innovation using the same activities over and over, so each ideation session should be unique to your team. Variety is the spice of life, after all.
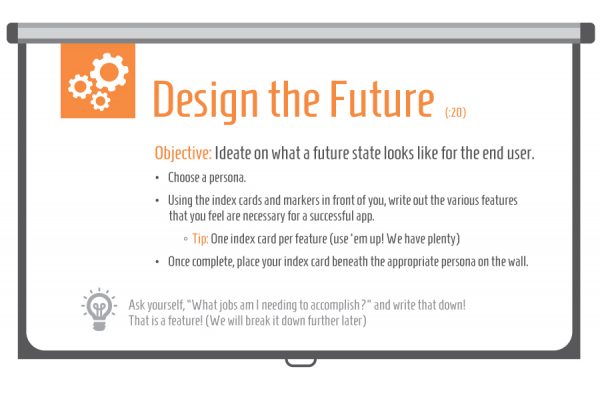
In your presentation, create a slide for each activity. This allows your participants to reference the objective and instructions. Personally, I like to structure all of my activity slides using the same layout so participants can find the information they are looking for at a glance. Here is a sample activity slide layout:

In the upper left corner, I have identified the activity. I also like to point out how long each activity will take right next to the title. Each slide should contain an objective followed by instructions. At the bottom, I include things to consider during the exercise. In rare cases, an activity might require more than one slide when giving more detailed examples, instructions or outcomes. Otherwise, keep each activity contained to one slide.
As you develop your toolset over time, you can simply modify your workshop by deciding which activities you would like to use, then pulling the corresponding slides. You can keep a repository of individual activity slides and add new slides as they are created.
Guidelines for Ideation Activities
While I would advise against setting rules when it comes to brainstorming, here are some guidelines that will help you make the best use of your ideation workshop.
- Have one conversation at a time.
- Set time limits. All activities should be limited in time.
- Don’t judge. There is no such thing as a bad idea, as these may trigger other ideas.
- Encourage crazy ideas. Award a prize to the person with the craziest idea at the end of the session.
- Have fun. Innovation can’t be forced—enjoy the process.
3 Types of Ideation Activities
Brainstorm:
- Start with your problem statements and the “How Might We” (HMW) questions you wrote in the previous stage.
- Focus on one problem at a time.
- Write down, draw or act out ideas.
- Build on other ideas (1+1=3).
- Brainstorming sessions can be as short as 15 minutes or as long as two hours. Choose a time limit that works best for your organization.
Braindump:
- Start with your problem statements and the HMW questions you wrote in the previous stage.
- Ask participants to write their ideas on sticky notes. This should be done individually and silently.
- Limit writing time to 10-15 minutes.
- Once completed, have each participant present their ideas to the group and stick them on the wall. Hold any discussion until all participants are done.
- Group duplicates together.
- Vote on which ideas to develop further. Use the voting methods below.
Brainwriting:
- Start with your problem statements and the HMW questions you wrote in the previous stage.
- Ask participants to jot down their ideas on index cards.
- Limit writing time to 3-5 minutes.
- After time is up, have participants pass their cards to the next person and expand upon the idea.
- Participants should pass ideas 3-10 times. This should be done silently.
- Once completed, have each participant present their cards.
- Use the voting methods below to select which ideas to expand upon.
Choosing Ideas
Toward the end of your ideation workshop, you will inevitably have more solutions than you will know what to do with. This is why you must complete each activity by voting on which solutions should be carried to the next stage and which should remain in a backlog. (Keep old ideas, as you never know when they will become the perfect solution to an existing problem.)
Note: Of course, you can choose to eliminate an idea at any time. For example, you might want to avoid redundancy, or perhaps your team has collectively chosen to no longer pursue an idea.
Here are some methods that you can use to choose which ideas to pull into the next stage:
- Dot Voting: One of the most popular methods of idea selection is voting. To do so, provide each participant 3-4 dot stickers. Then ask participants to place a dot next to their favorites. The ideas with the most dot stickers advance to the next stage. You will need to determine if you have a minimum vote threshold that must be met for an idea to proceed. You should pull more than one idea forward, as you will want to prototype multiple ideas.
- Four Categories Method: In this method, divide ideas into 4 categories: 1) Most Rational, 2) Most Delightful, 3) Daring and 4) Long Shot. Then have the team select a few ideas from each category. This method ensures that you cover more ground and include different types of ideas. The Interactive Design Foundation has created a template on how to use this method. This can be combined with the dot voting method to choose the winners from each category.

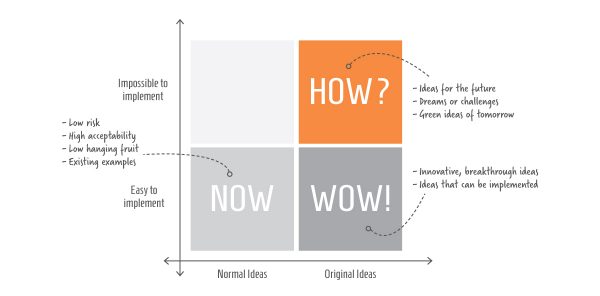
- Now How Wow Matrix: Draw a 2×2 matrix. The X axis denotes the originality of the idea and the Y axis shows the ease of implementation. Label the quadrants as:
- Now/Blue Ideas – Normal ideas that are easy to implement. These are low-hanging fruit and solutions to fill existing gaps in processes. These typically result in incremental benefits.
- How/Yellow Ideas – Original ideas that are impossible to implement. These are breakthrough ideas in terms of impact, but absolutely impossible right now due to current technological or budgetary constraints.
- Wow/Green Ideas – Original ideas that are easy to implement. Wow ideas are those with potential for orbit-shifting change and that are possible right away.
Place the ideas in the corresponding quadrant. Each player is given sticker dots (3 for each quadrant for a total of 9) that they can use to vote on which ideas are the best in each quadrant. The ideas with the most votes move on to the next stage.
I have just provided a few examples of voting methods. However, there are many more out there. Find the ones that work best for your organization and determine how many ideas will move forward to the next stage. Keep in mind that when you pull an idea forward, you must be ready to take immediate action with prototyping that idea, which requires resources. Be conscious of the resources you are willing to invest into the ideas and let that be your guide.
Acting on Ideas
Once you have completed your ideation workshop, you need to act on these ideas.
- Create a team for each idea that will move on to the next stage. Each team should be diverse and have a team lead. I recommend that each executive be assigned to a team, but not necessarily be the team lead. This is an opportunity to let other employees shine.
- Ideally, each team should have a small budget and be timeboxed on how long they have to create their prototype – remember that creating constraints spurs innovation. Keep the timeline and budget the same for each team.
- Then, the ideation group should meet weekly to discuss each team’s progress.
Up Next: Prototyping Methods
In Part 6, we will explore the various methods of prototyping. Check back soon for more information, and feel free to ask us if you have any questions.

