Introduction
OBIEE has a set of styles and skins to make the displaying of data visually appealing. This gives the user the ability to select styles as per their need. Generally, in OBIEE 12c, the default UI Skin and Style is called ‘Alta’. In 11g, it is ‘blafp’. Customers most often want to see their organization’s BI data with their company logo, colours, styles etc. Not surprisingly, customizing the OBIEE user interface is one of the most common activities. Now, modifying any existing skins and styles is not suggested as it might run into problem at a later stage for recovery if something gets corrupted after customization. So it is always advisable to deploy a different set of skin and style first, make it customized as per needs and in case it gets corrupted sometime later, one can always go back and point the OBIEE to the old existing skins and styles. This article talks only about the deployments steps of custom skins and styles from one environment to another.
So this skins and styles are to be stored under OBIEE 11g analyticsRes directory. This directory will be where custom modifications will be made to the skins and styles. Changes are not to be made to the base skins and styles. If modifications were made to the base res directory, they would be overwritten during any future upgrades. Below shows the custom directories where skins and styles are and will be kept:
Type of Directory Directory Skin/Styles Stored
Custom Skin/Style Directory $MIDDLEWAREHOME/$OBbifoundation/OracleBIPresentationServicesComponent/coreapplication_obips1/analyticsRes
Where:
$MIDDLEWAREHOME– Represents the location to the OBIEE Middleware directory
To setup to be able to use this custom directory, do the following:
A. Copy the base skins and styles directories beneath the analyticsRes directories
B. Deploy the analyticsRes directory within the weblogic server
C. Deploy custom skin/styles.
These steps are highlighted in details below.
Deployment Steps
A. COPY Base Skins/Styles directories from analyticsRes directory
This section describes copying the oracle released styles and skins to a custom target directory. In this case, analyticsRes is being chosen. However, this can really be any shared directory that is available on the filesystem.
- Let us assume, all customization was made to the OBIEE development environment. A zip file was created in DEV which contains the skins and styles for the custom deployment.
- In the Current environment, there is an analyticsRes directory that already exist. However, there are no skins and styles beneath it.
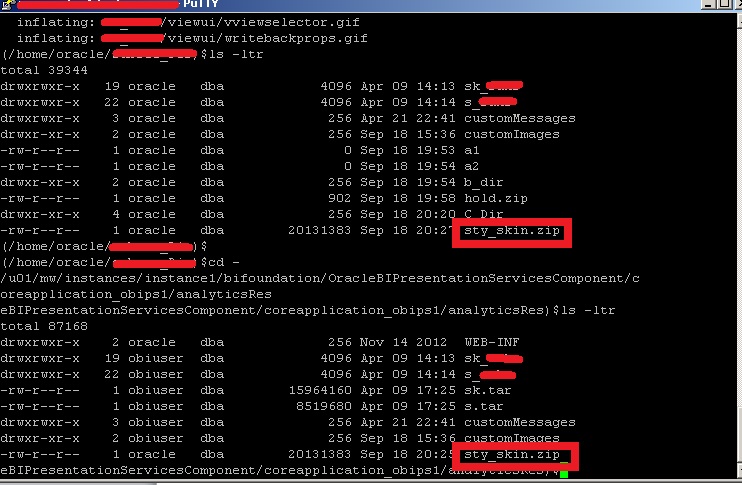
- Copy the following directories from the Dev environment analyticsRes directory. See the name of the Custom Skin/Style Directory directory where analyticsRes dir is located:
sty_skins.zip
See the file and the location where stored on DEV environment.

Copy the zip file over to the demo environment under the custom directory of analyticsRes.
- Log on to the target obiee environment (i.e. QA).
- Navigate to the analyticsRes directory according to the location designated above as, Custom Skin/Style Directory.
- Place the copied files into the customskins/styles directory (analyticsRes) on the target server.
- It shows on the aix server as:
- See above of this article where the custom directory is identified for the environment.

- Unzip the file under analyticsRes directory: unzip sty_skin.zip
- The s_****, sk_**** and some custom directories will be created under analyticsRes directory. This will contain the customizations that were made in DEV.
B. Deploy custom target directory to weblogic server
This section describes the steps to deploy the custom directory to the weblogic server. This directory will be made available to the OBIEE directory for retrieving custom skins and styles files. In this case, we are using the analyticsRes directory as the custom target directory. However, you can use any other directory that is accessible.
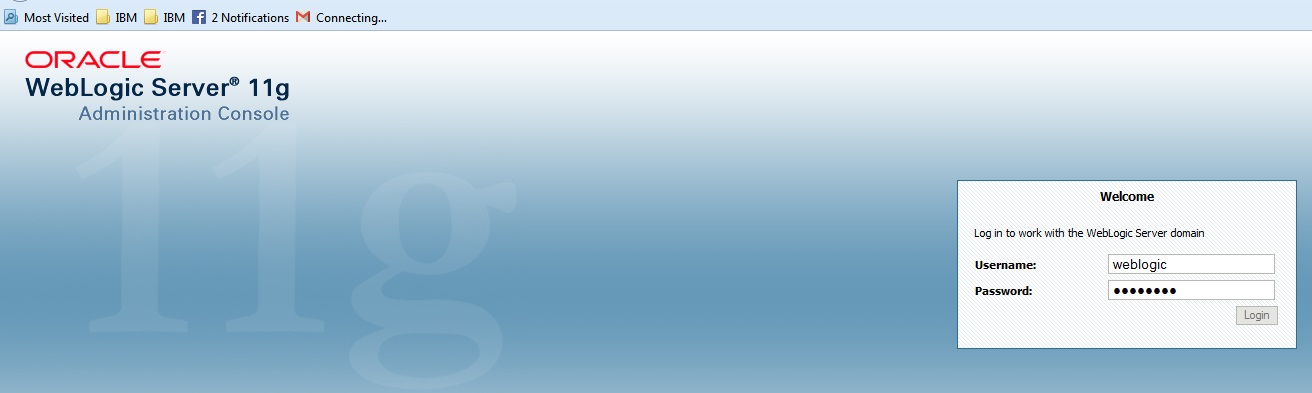
- To expose this directory, you must open the WebLogic Administration Console. Open a browser window and in the address bar, enter http://<hostname>:port/console/login/LoginForm.jsp. For example: http://localhost:7001/console/login/LoginForm.jsp). The WLS Login window appears. Login as a Weblogic administrator.
- Click Lock and Edit button to modify the deployment directories/applications.

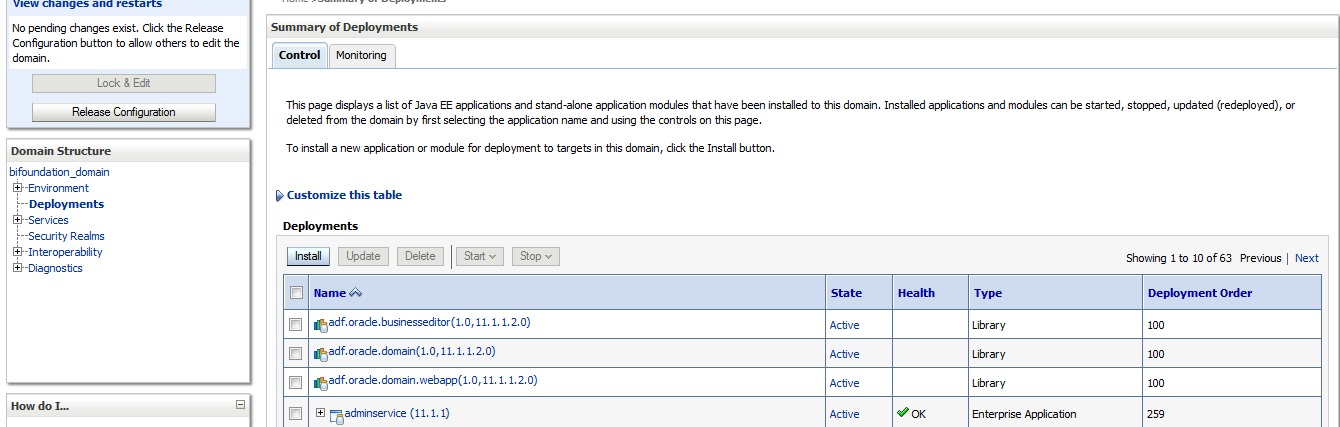
- Select Deployments under domain structure.
- If not already showing, click the Control tab in the Summary of Deployments pane and the Deployment tables/applications will be displayed. The Install button is enabled.
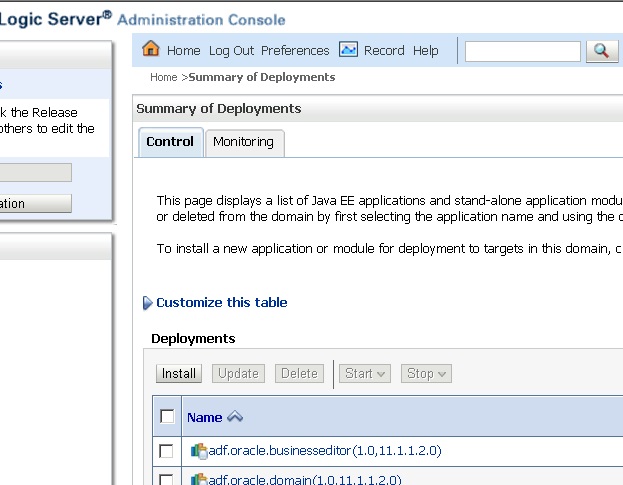
- Click the Install button to create and make available the custom target directory.
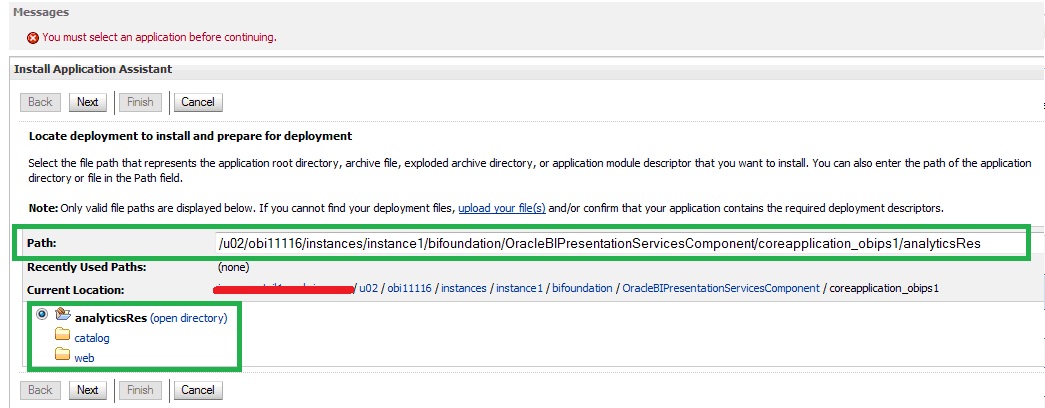
- The Install Application Assistance appears:

/u01/mw/instances/instance1/bifoundation/OracleBIPresentationServicesComponent/coreapplication_obips1
- Select the option button for analyticsRes or whichever custom directory that you have chosen to use, if different.
- Click Next after choosing analyticsRes as the option.
- The Choose Targeting Style pane displays:
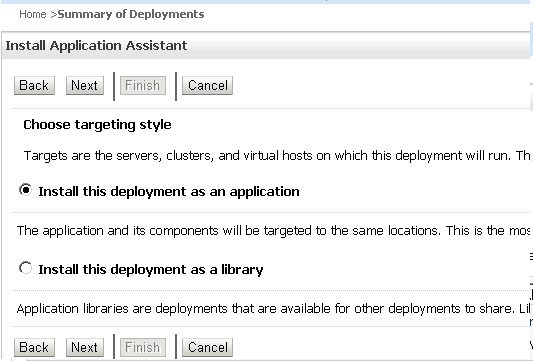
- Choose option, Install this deployment as an application. Then click Next
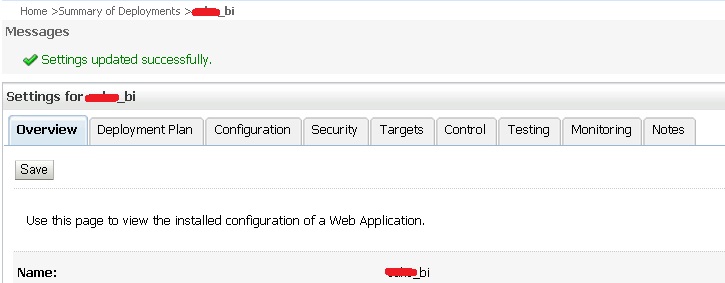
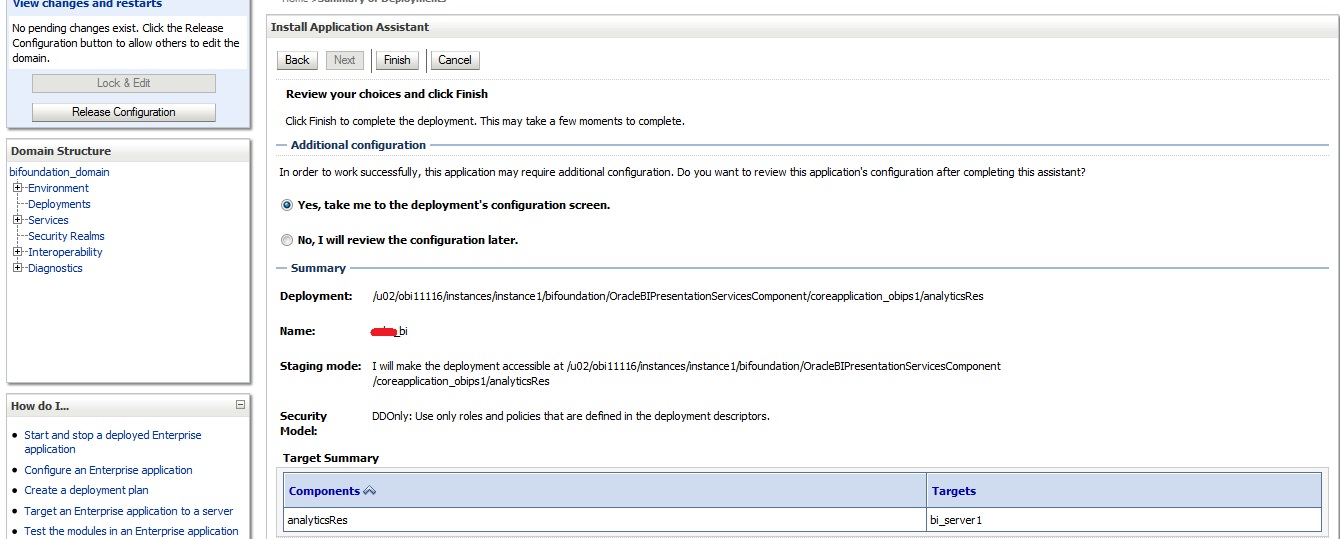
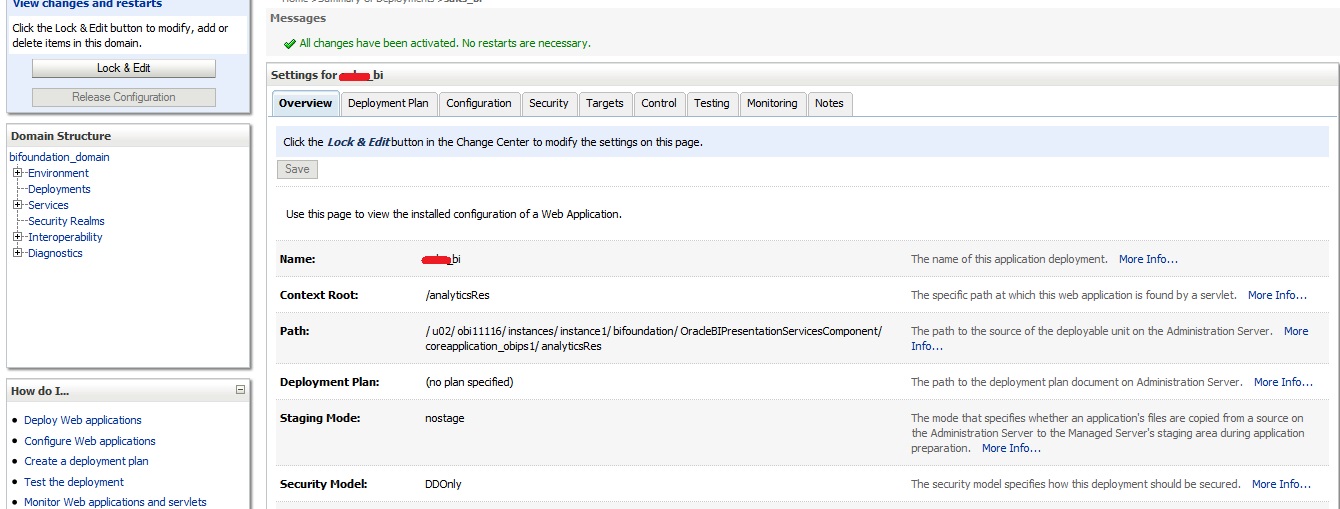
- In the General section of the page, you can choose a different name for the deployment. Such as: ****_bi:

- Scroll down to the “Optional Settings – Source accessibility” section of the same pane. Select the radio button for I will make the deployment accessible from the following location and accept the default path.

- Click Next. The Review your choices screen displays.

- Click Finish when no further changes are needed.
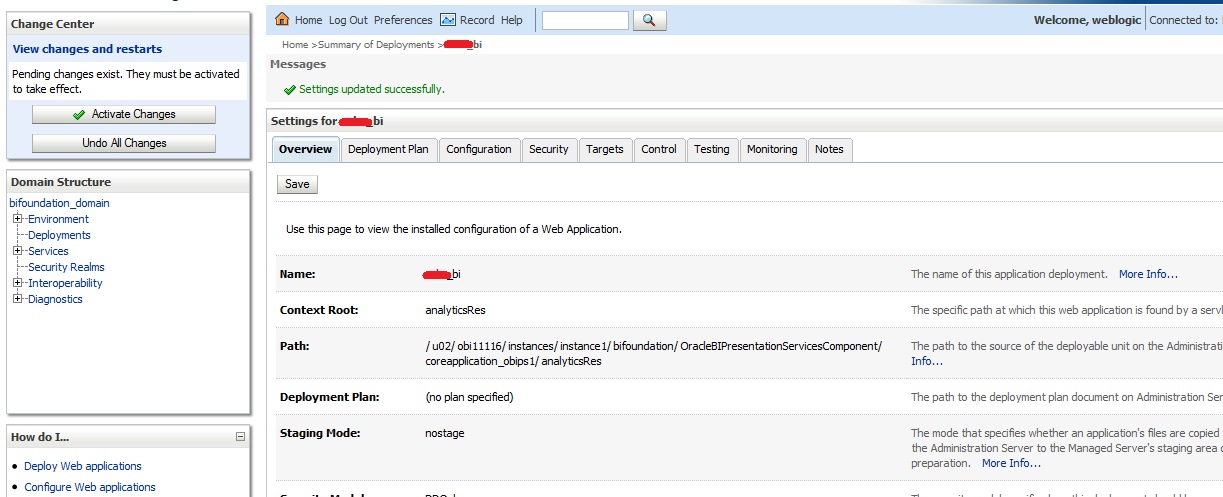
- Click Save.

- Message displays of, “Settings updated successfully”.
- In the Change Center pane on the left, click Activate Changes.

- A confirmation message displays indicating that all changes were activated.


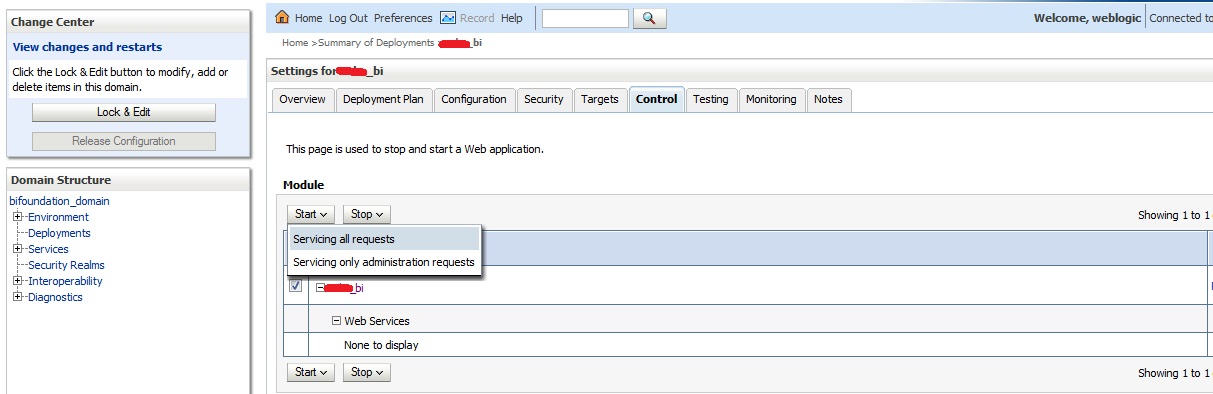
- Click the Control tab and then select the check box for the analyticsRes application. Notice that the state for analyticsRes appears as Prepared. You need to start the application.

- Click Start and then select Servicing all requests
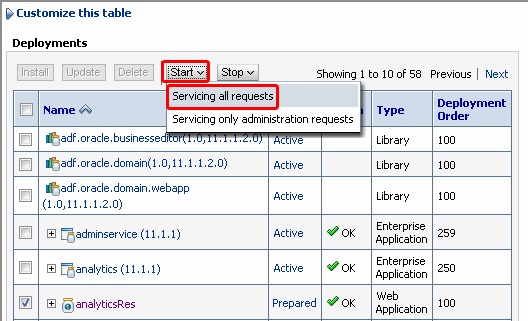
- Click Yes in the Start Application Assistant pane.

- The “Summary of Deployments” pane reappears with a confirmation message. Note that analyticsRes now shows a state of Active.

C. Deploying a Custom Skin
After exposing the analyticsRes file to WLS successfully, you can now use this directory to develop custom skins. To customize the skin for Oracle BI EE, perform the following steps:
Backup the instanceconfig.xml file. The file is located in the bi config directory. Such as:
/u01/mw/instances/instance1/config/OracleBIPresentationServicesComponent/coreapplication_obips1
cp instanceconfig.xml instanceconfig.xml_mmddyyyy
The next step is to basically let Presentation Services know that the new Styles/Skins are available from the new biee11g directory.
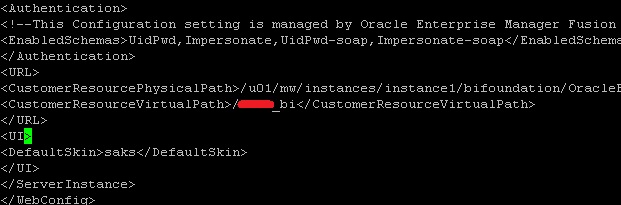
This is done by adding the following tags to the instanceconfig.xml file after the xml tag, </Authentication> and before the tag, </ServerInstance>.
<URL>
<CustomerResourcePhysicalPath>/u01/mw/instances/instance1/bifoundation/OracleBIPresentationServicesComponent/coreapplication_obips1/analyticsRes</CustomerResourcePhysicalPath>
<CustomerResourceVirtualPath>/****_bi</CustomerResourceVirtualPath>
</URL>
<UI>
<DefaultSkin>****</DefaultSkin>
<DefaultStyle>****</DefaultStyle>
</UI>
CustomerResourcePhysicalPath is a tag that specifies the actual target directory name. CustomerResourceVirtualPath provides the URLPrefix that will be added for sourcing all the files. For example, “/****_bi”. After updating, it will look similar to the following:
Restart BI Presentation Services
Make all of your custom changes and restart the Presentation Services in Enterprise Manager. After the restart, the customizations will have taken affect.
- Step 1: Login to Demo environment’s Weblogic Console.
- Step 2: Click on Lock and Edit in Change Center Pane and then click on Deployments in Domain Structure Pane

- Step 3: In the Summary of Deployment Section -> Control Tab click on Install button.
- Step 4: Put the following path and press Enter. Select analyticsRes directory radio button and proceed to Next.
- Step 5: Select the “Install this deployment as an application” option and click on Next.

- Step 6: Select bi_server1 option from Clusters Section and click on Next.

- Step 7: In the Install Application Assistant pane -> General Section name the deployment as ****_bi. Also select the DD only option for Security section

In the source accessibility section select “I will make the deployment….” Option and click on Next.

- Step 8: In the next page select “Yes, take me to the deployment’s configuration screen” option, check if the target component is analyticsRes or not, check the Deployment path and Name and click on Finish.
- Step 9: In the overview tab check for the Context Root and Name and if they seem to be correct then click on Save.

- Step 10: The page will show a message “Settings updated successfully”. Then click on Activate Changes on top left.
- Step 11: Another message “All changes have been activated. No restarts are necessary” will be displayed.
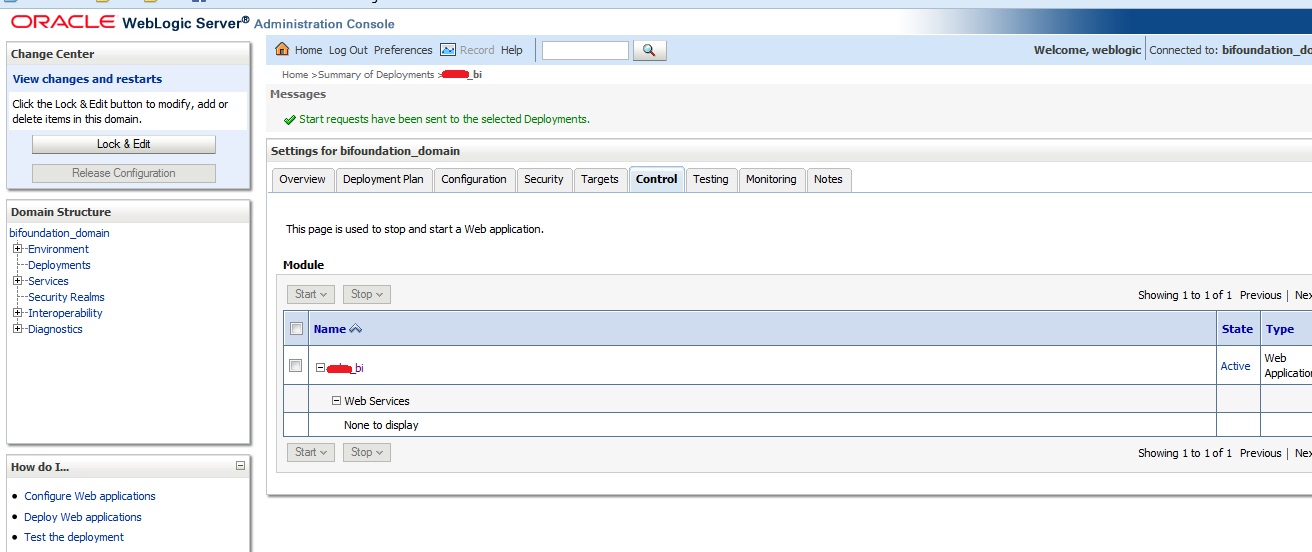
- Step 12: Click on Control tab, select ****_bi module and click on Start-> Servicing all requests. Before this the state should be prepared.
- Step 13: Click on Yes in the Start Application Assistant Pane.

- Step 14: After the message “Start requests have been sent to the selected Deployments” has been shown the state would change to Active from Prepared.