Welcome to part 4 of our Direct Routing for Microsoft Teams Deep Dive series! If you are just joining us for the first time, I recommend going back to look at the previous blog articles on this topic. In this article we’ll be discussing the SIP syntax, user provisioning, voice routing basics, and lastly some basic and advanced configuration scenarios involved in Direct Routing for Microsoft Teams.
SIP syntax
Typically the certified SBC vendor (AudioCodes, Ribbon, etc.) will provide you with the necessary components for the configuration of the SBC. However, I’ll just be touching on some of these components just in case. When looking at the SIP syntax from the SBC to O365, the SBC must present the Contact Header with the valid SBC FQDN (matching the certificate) in the SIP Invite and Options messages. As you will see in the diagram below, the bottom field “Contact” the “@sbc1.contoso.com” piece is what must match the SBC FQDN. We utilize this contact header to define the FQDN of the SBC and to ensure we have a match to the certificate for a secure TLS connection.
Note: Sending Record-Route is not recommended. If Record-Route header is presented, the FQDN of the SBC in Record-Route MUST match the SBC FQDN in the Contact header.
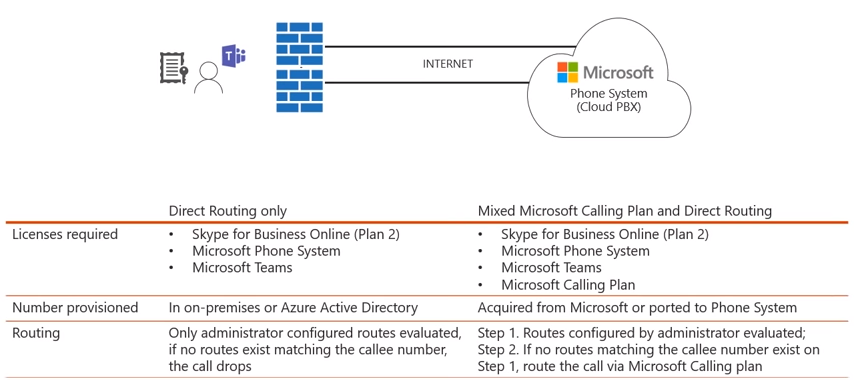
Now that we have our SBC paired with O365, we can start provisioning our users. As you may remember from part 1 of this series, we mentioned that you can provision users with either Direct Routing only or a combination of Microsoft Calling Plan and Direct Routing. In the diagram below you’ll see both scenarios for user provisioning.
In the Direct Routing only scenario the user must have at least the Skype for Business Online Plan (Plan 2) license, Microsoft Phone System, and Microsoft Teams. When it comes to provisioning the user with a phone number they have the option of using on-premises Active Directory. This is assuming you have Active Directory synced up to O365 using Azure AD Connect. The other option you have is to provision the user directly within Azure Active Directory. From a routing perspective, when the user attempts to make an outbound call only the administrator configured routes will be evaluated. If there is no route that exists that matches the number that the user is attempting to dial the call will just simply drop.
In the Mixed Microsoft Calling Plan and Direct Routing scenario you will need at least a Skype for Business Online (Plan 2) license, Microsoft Phone System, Microsoft Teams, and a Microsoft Calling Plan Add-on. The Calling Plan add-on includes the ability to dial either domestically or internationally, so this should be taken into consideration when making your routing decisions which we will be touching on shortly. From a number provisioning perspective, since the user is assigned a Microsoft Calling Plan the number will be acquired from Microsoft or it could be a number you port into Phone System in O365. Several steps happen when attempting to make an outbound call:
- We evaluate the routes that are configured by the administrator
- If there is no matching route for the number that the user is attempting to dial, we check against the user’s calling plan
- If it is a domestic call or international call we’ll check the corresponding calling plan assigned to the user and route as appropriate
Now that we’ve discussed the provisioning aspect, let’s talk about the voice routing configuration of Direct Routing.
Voice routing basics
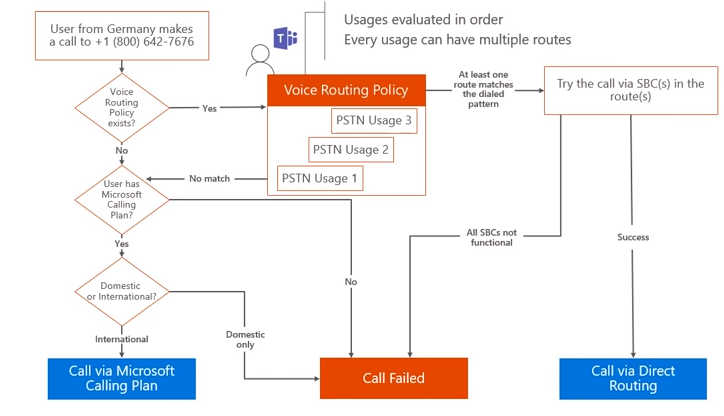
In the example below, let’s say we have a Teams user in Germany whom makes a call to a +1(800) number.
In this scenario this would be considered an international call for the user from Germany since this is a US based telephone number being dialed. The first check in voice routing is to see if a voice routing policy exists and is assigned to that particular Teams user. If there is not, the next check is to see if the user has a Microsoft Calling Plan assigned to them. If there is no Microsoft calling plan assigned, then the call will fail. This is due to the fact that this user does not have the correct permissions to make this type of call. However, if the user does have a Microsoft Calling Plan the next determination will be the type of calling plan available to this user (domestic or international). So in this scenario, if the user only had a domestic calling plan this call would fail since this user is making an international call from Germany to the US. If the user has a calling plan that includes international calling, then this call will succeed via the Microsoft Calling Plan. Taking a step back now, if we determined that a Voice Routing Policy does exist for this particular user, then we would look through the voice routing policy and evaluate the usages in order. If you’re not familiar with the term “usage” this just means the container for a pattern match and route that we want to take. So given that the user does have a voice routing policy, the next question you would want to investigate is whether or not they have a usage that corresponds with the number they are attempting to dial. Let’s say that although they have a voice routing policy there is no voice route that starts with “+1” thus there is no match. If there is no match we then fallback into checking for Calling Plan and if they don’t have a Calling Plan the call will fail. On the other hand, if the user has at least one route that matching the dialing pattern we will then attempt to try the call via the SBC that are attached to the corresponding routes. As you may remember from the previous blog, we will go through our PSTN Hub component to see if our corresponding SBC is healthy. If the corresponding SBC is healthy then we can send the call to that SBC and the call will be successfully delivered via Direct Routing. However, if the SBC is not healthy (no longer sending SIP Options), they are deemed as non-functional and the call will fail. Now that we’ve covered the voice routing aspect let’s finish up with the simple configuration for Direct Routing.
Basic Configuration
In the cmdlet below we are going to configure a single SBC and we will configure it so it has a single voice route that will route all calls to this SBC.
Step 1: Pair SBC to O365
New-CsOnlinePSTNGateway -FQDN sbc1.contoso.com -SipSignalingPort 5068 -Enabled $true
Note: This is the minimum set of parameters that will need to be configured
Step 2: Configure PSTN Usages
Recall that PSTN usages are just containers for a series of routes. So this command is building the container (called “Unrestricted”) for us.
Set-CsOnlinePSTNUsage -Identity Global -Usage @{Add=”Unrestricted”}
Once we have created the container/PSTN usages we then need to add routes into the usage.
Step 3: Build Routes
New-CsOnlineVoiceRoute -Identity “Unrestricted” -NumberPattern “.*” -OnlinePSTNGatewayList sbc1.contoso.com -Priority 1 -OnlinePstnUsages “Unrestricted”
In the cmdlet above we have given the online voice route a name (“Unrestricted”). Remember that we make our routing decisions based on the destination phone number being called. In the example above, we have used “.*” for our number pattern meaning this will match any digit pattern dialed. So any number that is called is going to be routed to the gateway or SBC that we determine. In this case the “OnlinePSTNGatewayList” will be where we intend to route this call. In this scenario, since we only have one SBC we will only have one item listed. You can also set priority, and again since we only have one SBC this will have a priority of “1”. The last piece of this cmdlet is the “OnlinePstnUsages” parameter which places the route into the container/PSTN usage which we have called “Unrestricted”.
Step 4: Create Voice Routing Policy
Since you can’t assign a PSTN usage directly to a user, you must create a voice routing policy to assign to the user. In the cmdlet below we created a new voice routing policy called “Unrestricted” and then we used the “-OnlinePstnUsages” parameter to indicate which usage(s) should be included in this voice routing policy.
New-CsOnlineVoiceRoutingPolicy “Unrestricted” -OnlinePstnUsages “Unrestricted”
This voice routing policy only has one usage (“Unrestricted”) and inside that usage we only have one route, which indicates to send any call to the gateway sbc1.contoso.com.
Step 5: Assign Voice Routing Policy
Once the voice routing policy has been created you can assign the policy to users by using the cmdlet below:
Grant-CsOnlineVoiceRoutingPolicy -Identity “Brian Siefferman” -PolicyName “Unrestricted”
Advanced Configuration
In life (and work) I like to follow the KISS principal. If you haven’t heard of the KISS (Keep It Simple, Stupid) principal, it’s an acronym coined by the U.S. Navy in 1960. I’d say I follow this principal with about 90% of everything I do. However, sometimes the most simple solution, doesn’t make it the best solution. For example, in the previous scenario having only one SBC in place works as a great proof of concept or initial test and deploy. However, it is always recommended to have some sort of high availability (HA) and disaster recovery (DR) components in play which will introduce some complexity. So that said, let’s take a look at a scenario where we have multiple SBC’s with HA and DR.
Multi-SBC configuration with HA and DR scenario
In this scenario let’s say we have 2 SBC’s located in our Redmond datacenter (sbc1.contoso.com & sbc2.contoso.com). As you may recall, first we must pair these devices to O365. So your syntax should look something like this:
New-CsOnlinePSTNGateway -FQDN sbc1.contoso.com -SipSignalingPort 5068 -Enabled $true
New-CsOnlinePSTNGateway -FQDN sbc2.contoso.com -SipSignalingPort 5068 -Enabled $true
The next step is to configure/build your PSTN usages. In this scenario we are going to create a PSTN usage called “US and Canada”.
Set-CsOnlinePstnUsage -Identity Global -Usage @{Add=”US and Canada”}
In essence, anything that contains a “+1” will be contained within this usage.
From a routing perspective, the next piece of syntax will build the routes so that any number that the user is dialing that starts with “+1425” or “+1206” followed by an additional 7 digits will route to these (sbc1.contoso.com & sbc2.contoso.com) particular SBC’s. As in the previous scenario, we would use the “New-CsOnlineVoiceRoute” cmdlet to fulfill this requirement.
New-CsOnlineVoiceRoute -Identity “Redmond 1” -NumberPattern “^\+1(425|206)(\d{7})$” -OnlinePstnGatewayList sbc1.contoso.com, sbc2.contoso.com -Priority 1 -OnlinePstnUsages “US and Canada”
Now, let’s say we added two more SBC’s to the mix (sbc3.contoso.com & sbc4.contoso.com) in our Bellevue datacenter to serve as our backup/passive route. So just like with our first two SBC’s, the first step will be to pair them to O365.
New-CsOnlinePSTNGateway -FQDN sbc3.contoso.com -SipSignalingPort 5068 -Enabled $true
New-CsOnlinePSTNGateway -FQDN sbc4.contoso.com -SipSignalingPort 5068 -Enabled $true
Next, we’ll configure our voice routes similar to as we did earlier.
New-CsOnlineVoiceRoute -Identity “Redmond 2” -NumberPattern “^\+1(425|206)(\d{7})$” -OnlinePstnGatewayList sbc3.contoso.com, sbc4.contoso.com -Priority 2 -OnlinePstnUsages “US and Canada”
Note: You may have noticed we skipped creating a PSTN usage. This is because we will be utilizing the one that has already been created (“US and Canada”).
As you can see in the cmdlet above, we have created the voice route for our backup location and defined it as “Redmond 2” which will be utilizing the same number pattern. However, this will instead apply to SBC3.contoso.com and SBC4.contoso.com. In addition, we have set this with a priority of “2” as this is our backup site. So to sum it all up, when a user that is assigned a voice policy that includes these usages and includes these routes to dial “+1425” or “+1206” numbers we will first send these calls to SBC1 or SBC2. Only if both SBC1 and SBC2 are down would we then utilize the priority 2 route and send the calls to SBC3 or SBC4.
So this works great if those users want to dial either +1425 or +1206 numbers, but what if they wanted to dial any other variation of numbers such as a +1312 or +1800 number? Well, this wouldn’t match any of the routes here and that could be bad unless we add another pair of SBC’s. In the next scenario we’ll be adding 2 more SBC’s (sbc5.contoso.com & sbc6.contoso.com) to our Chicago datacenter. Our intent is to have any other number in US and Canada to go to our Chicago SBC’s. To accomplish this, we’ll need to start by pairing the SBC’s to O365 like we did before.
New-CsOnlinePSTNGateway -FQDN sbc5.contoso.com -SipSignalingPort 5068 -Enabled $true
New-CsOnlinePSTNGateway -FQDN sbc6.contoso.com -SipSignalingPort 5068 -Enabled $true
Then we will construct a new voice route. In this case, we will call it our “Other +1” route and the number pattern will be broader than our number patterns assigned to SBC’s 1-4. As you will see in the cmdlet below, the number pattern starts with “+1” followed by any 10 digits.
New-CsOnlineVoiceRoute -Identity “Other +1” -NumberPattern “^\+1(\d{10})$” -OnlinePstnGatewayList sbc5.contoso.com, sbc6.contoso.com -Priority 3 -OnlinePSTNUsages “US and Canada”
So, essentially any number that starts with +1 followed by 10 digits (for example, +13124567890) will route to the PSTN gateway list of sbc5.contoso.com or sbc6.contoso.com as long as it does not start with either +1425 or +1206. When there are multiple SBC’s within the same gateway list it will distribute calls accordingly. Only when both SBC’s are down will we evaluate another route.
Here’s a fun scenario. Say one of your users attempts to call a +1425 number but for some reason all the SBC’s in Redmond and Bellevue are down (maybe your intern accidentally touches something he/she wasn’t supposed to 😉 ). If SBC’s 1-4 are all offline, and the user is trying to call that +1425 number, it will still match that “Other +1” voice route thus the call can still utilize SBC5 and SBC6 as a backup route. So take it easy on your intern, after all the best way to learn is by making mistakes 🙂 .
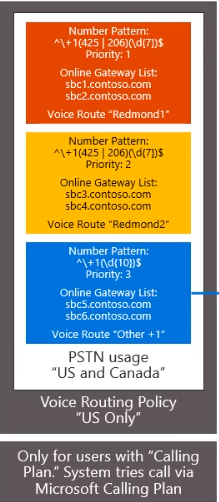
So to make all of this work, you may remember that we are not able to assign PSTN usages directly to users, thus we must create a voice routing policy. In this scenario, we are building a voice routing policy called “US Only” and we want this voice routing policy to include the usage of “US and Canada” and this container/usage will contain the 3 routes (Redmond 1, Redmond 2, and Other +1) as seen in the diagram below.
We will then grant/assign the voice routing policy to the specified user. This will allow the us to make the appropriate routing decision for the user. The cmdlet will look similar to the one below.
Grant-CsOnlineVoiceRoutingPolicy -Identity “Brian Siefferman” -PolicyName “US Only”
Let’s say we left the configuration for this user at that. If Brian (yes I’m referring to myself in 3rd person :-P) wanted to call someone in Germany (+49 number) to express his frustration with Germany losing in the World Cup group stages :-(, unfortunately his call would fail. This is because there is no route in the list that matches that destination. As you may recall it is possible to configure a user with both Direct Routing and Calling Plan. If Brian had a Calling Plan assigned which included international dialing capabilities, we could then attempt to route his call through the Microsoft Calling Plan infrastructure.
Today we have discussed a plethora of information on Direct Routing, from SIP syntax and user provisioning to basic and complex voice routing scenarios. In the last part of this blog series “Direct Routing for Microsoft Teams: Deep Dive” we will discuss migrations from Cloud PBX with Skype for Business clients either utilizing on-premises Lync or Skype for Business server. I hope you have found this helpful, and I look forward to seeing you in the final blog for this series.


