
Oracle is doing a great job in continuously upgrading the PBCS / EBPCS based applications. Being a EPBCS consultant I always follow their latest updates to make sure we use it in our implementation or support process. This Blog is specific to two recent update which is really useful
Below is the link for Oracle EPBCS latest update release :
Update 1 : Running Rule usage report
Most of the time we have trouble finding the Rules and the association of rules to the artifacts like Forms, Menu, Rulesets and Task List. Oracle EPBCS latest update has come out with an easy solution to get the association by running a system Rules Usage report. Report
How to run?
Blog is explained based on Simplified User Interface as workspace is no more supported by Oracle.
- Navigate to Navigator > Monitor and Explore > System Reports
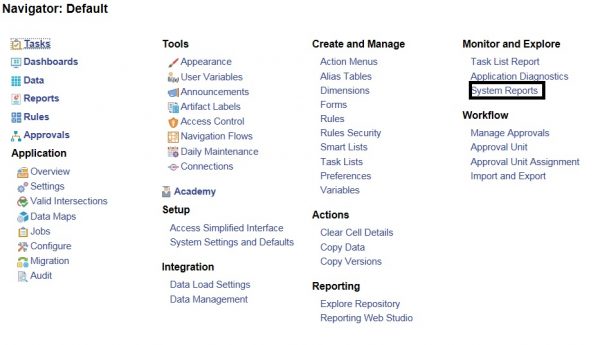
- Select the tab Rules Details
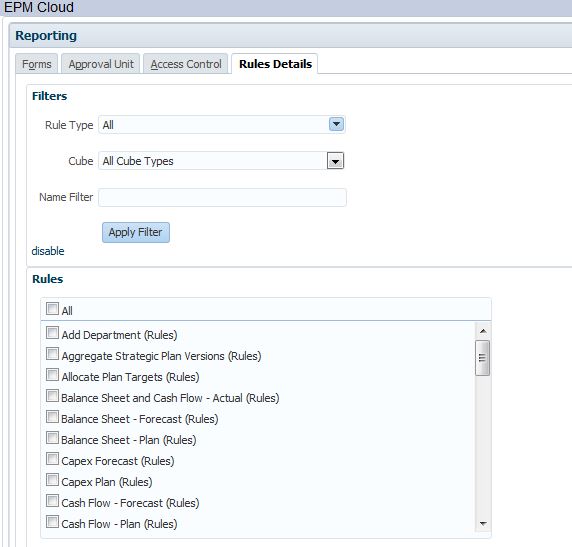
- Select the RuleType.
- Rules name can be filtered in the Name Filter text box.
- Select the Format for the report.
- click on Create Report.
How to read?
Report displays the details of the rules selected before submitting the Create Report.

Basically Report can be split into 3 sections:
Rule Details
- First 3 columns explains the rule name, rule type and Cube.
Primary Association
- Shows the direct association of the rule with Form, Task, Menu Item and Ruleset.
Secondary Association
- Shows the association of artifacts displayed on Primary association which will be either Task list or Menu.

Update 2 : Adding data to suppressed rows in the form
Users can now add data for the members which are suppressed in rows due to missing data. Rows and Columns are suppressed in data forms to make sure the size of the form is not big and it loads faster in web browsers and SmartView. Earlier planning versions, Users are provided with a menu which is attached to the form which internally invokes a business rule to create a row in the form. But after this release users can add new rows for the members which are suppressed. Below are the steps explained to use this functionality in data forms.
Steps to be followed:
- Navigate to Create and Manage > Forms
- Select the form.Open the form in Edit mode.
- Click on Layout .
- Make sure the rows are suppressed in the Grid Properties
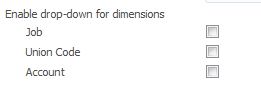
- Click on the Rows and check the dimension for which drop-down has to be enabled. All the dimension selected in the row will be displayed.
- Save the form

Steps to Enter Data
- Navigate to the Data form.
- Click on the drop-down arrow on the row members.
- Select the suppressed member and enter the data.
- Submit the data.
Note :Please note the form should have un-suppressed data to use this functionality.