Working with large enterprise clients usually requires a different approach. When it comes to security and defining permissions, a more sophisticated approach is often required.
Recently, one of our projects required different levels of content authoring security roles. Most content authors would have very limited permissions when creating and editing content. They could add/edit only certain page types and populate only page-level fields. Although we could create such permissions and security roles for this group of authors, the user experience was not optimal. It would require too many clicks and scrolling on the page looking for editable fields. The ideal user experience for content authors should look something like this:
- Login into Sitecore
- Click the button and open form
- Populate required fields
- View the page in preview mode
The content authors were familiar and comfortable with this scenario in their prior custom CMS; so we recreated the same user-flow with Sitecore. To get started, you need to be able to work with SPEAK components. So start by installing Sitecore Rocks.
1. Create a new Launchpad Button
Using Sitecore Rocks and the SPEAK library you can create a simple launchpad button that will open a popup dialogue/form for creating new pages. The new launchpad buttons will have custom templates since they behave differently than default buttons. In Visual Studio, from the Sitecore Explorer dialogue, connect to the core database and navigate to Sitecore/Client/Applications/Launchpad/PageSettings/Templates. Find the Launchpad-Button template; duplicate it and name it LaunchPad-Button – Popup.
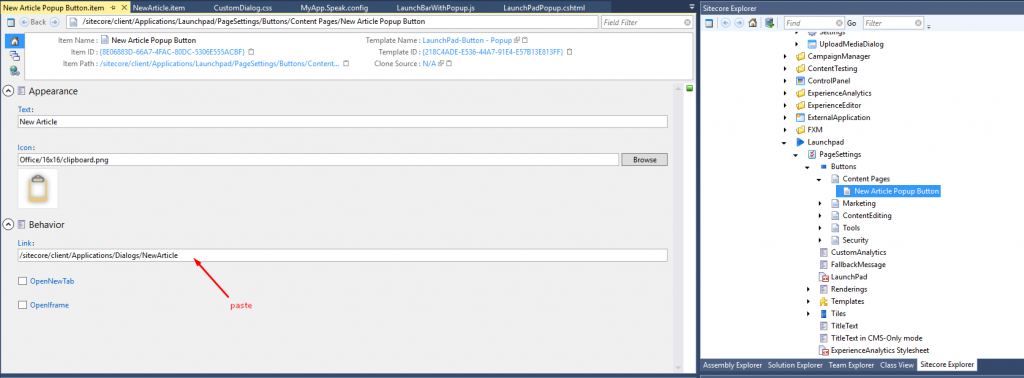
Next, navigate to /Sitecore/Client/Applications/Launchpad/PageSettings/Buttons where Sitecore’s initial screen launchpad buttons are defined and create a new Launchpad-Group (in our case Content Pages). Finally, create your new LaunchPad-Button – Popup (in our case New Article Popup Button) under your newly created launchpad button group.
2. Create a new SPEAK dialogue
In Sitecore Explorer, connect to the core database and navigate to /Sitecore/Client/Applications/Dialogues. Here, you will need to create a new SPEAK-Dialogue Page item and select /Sitecore/Client/Speak/Layouts/Layouts/Speak-Layout Layout, followed by adding additional renderings. In this example, we added Dialogue, Dialogue Header, Text Rendering for Title Label, TextBox Rendering and the Save button.
su_note note_color=”#dbd9d9″ radius=”0″ Under new dialog create PageSettings item and add Page-Stylesheet File component. Set a path to your custom CSS file. In this example, /Sitecore/Shell/Client/Applications/Dialogues/CustomDialogue.css [/su_note].
You also need to add a PageCode component that will reference the code handling the dialogue logic. In this case, clicking the button click will invoke an ajax request, which will then use information from the dialogue form to create a new page in a predefined location and put it in the correct workflow state.
3. Connect Launchpad Button with new dialogue
Double-click on the dialogue and copy it to the Item Path clipboard. Then, double-click the to button and paste it to the Link property.
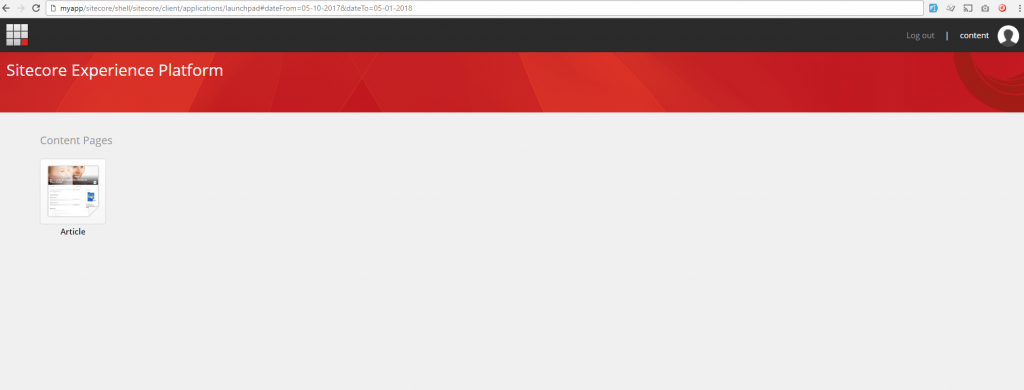
If you built the solution now and logged into Sitecore, you would see a new button. Clicking on the button would open a SPEAK dialogue in the same window. This is the default behavior. To open it in a new tab or iframe, you just need to change the button properties. However, in this example, we will need to define the custom behavior in order for it to open as a popup.
4. Custom LaunchBar Rendering
Navigate to /Sitecore/Client/Applications/Launchpad/PageSettings/Renderings and duplicate the LaunchBar item; name it LaunchBar – Popup. Replace the existing path with the path to your custom .cshtml. For example: (/Sitecore/shell/client/MyApp/LaunchPad/Layouts/Rendering/LaunchPadPopup.cshtml). The difference between the default Sitecore rendering and a new custom one is:
- Custom one will load additional js file (code line 16)
- Launchpad buttons with template “LaunchPad-Button – Popup” will be rendered with additional properties (code lines 86 and 121)
@using Sitecore.Configuration
@using Sitecore.Data.Items
@using Sitecore.LaunchPad
@using Sitecore.Links
@using Sitecore.Mvc
@using Sitecore.Resources
@using Sitecore.Web
@using Sitecore.Web.UI
@using Sitecore.Web.UI.Controls.Common.UserControls
@model Sitecore.Mvc.Presentation.RenderingModel
@{
var rendering = Html.Sitecore().Controls().GetUserControl(Model.Rendering);
rendering.Class = "sc-launchpad";
rendering.SetAttribute("data-sc-component", "LaunchBarWithPopup");
rendering.Requires.Script("client", "LaunchBarWithPopup.js");
var database = Factory.GetDatabase("core");
if (database == null)
{
return;
}
var root = database.GetItem("{C625DB2F-6DB2-4645-B7F7-733ABFC2CAC6}");
if (root == null)
{
return;
}
var groups = LaunchPad.GetControlGroups(root);
var grids = new List<List<List<Item>>>();
foreach (var group in groups.Where(g => g.Count > 0))
{
var grid = new List<List<Item>>();
var width = group.Count % 3 == 0 ? group.Count / 3 : group.Count / 3 + 1;
for (var y = 0; y <= group.Count / width; y++)
{
var row = new List<Item>();
for (var x = 0; x < width; x++)
{
var index = x + y * width;
if (index >= group.Count)
{
break;
}
var item = group.ElementAt(index);
row.Add(item);
}
if (row.Count != 0)
{
grid.Add(row);
}
}
if (grid.Count == 0)
{
grid.Add(new List<Item>());
}
grids.Add(grid);
}
var externalApp = database.GetItem("{E5AB0B90-D057-43AF-90CC-69B58C9A5CB0}");
string externalAppLink = null;
if (externalApp != null)
{
externalAppLink = LinkManager.GetItemUrl(externalApp);
}
var groupItems = LaunchPad.GetGroupItems(root).Where((o, i) => groups[i].Count > 0).ToArray();
var htmlAttributes = rendering.HtmlAttributes;
var popupTemplateId = new Sitecore.Data.ID("{218C4ADE-E536-44A7-91E4-E57B13E813FF}");
}
<div @htmlAttributes>
@<em>&amp;amp;lt;div class="row"&amp;amp;gt;
&amp;amp;lt;div class="col-xs-12 col-sm-12 col-md-12 col-lg-12"&amp;amp;gt;</em>@
@for (var index = 0; index &amp;amp;lt; grids.Count; index++)
{
var grid = grids[index];
var className = index == 0 ? "first" : index == grids.Count - 1 ? "last" : string.Empty;
&amp;amp;lt;div class="sc-launchpad-group @className"&amp;amp;gt;
&amp;amp;lt;header class="sc-launchpad-group-title"&amp;amp;gt;@groupItems[index]["title"]&amp;amp;lt;/header&amp;amp;gt;
@foreach (var row in grid)
{
&amp;amp;lt;div class="sc-launchpad-group-row"&amp;amp;gt;
@foreach (var item in row)
{
var icon = Images.GetThemedImageSource(item["Icon"], ImageDimension.id48x48);
&amp;amp;lt;a href="@(item["OpenIframe"] == "1" ? Html.Raw(WebUtil.AddQueryString(externalAppLink, "id", item.ID.ToString())) : Html.Raw(Html.Encode(item["Link"])))" class="sc-launchpad-item" @(item["OpenNewTab"] == "1" ? "target=_blank" : "") title="@item["Text"]"
data-popup="@(item.TemplateID == popupTemplateId ? "1" : "0")"&amp;amp;gt;
&amp;amp;lt;span class="icon"&amp;amp;gt;
&amp;amp;lt;img src="@icon" width="48" height="48" alt="@item["Text"]" /&amp;amp;gt;
&amp;amp;lt;/span&amp;amp;gt;
&amp;amp;lt;span class="sc-launchpad-text"&amp;amp;gt;
@item["Text"]
&amp;amp;lt;/span&amp;amp;gt;
&amp;amp;lt;/a&amp;amp;gt;
}
&amp;amp;lt;/div&amp;amp;gt;
}
&amp;amp;lt;/div&amp;amp;gt;
}
&amp;amp;lt;/div&amp;amp;gt;
Custom javascript that is loaded in launchpad will trigger “showPopup function” when custom button is clicked.
define(["sitecore", "jquery"], function (Sitecore, $) {
var viewSelf;

var model = Sitecore.Definitions.Models.ControlModel.extend({
initialize: function (options) {
this._super();
}
});

var view = Sitecore.Definitions.Views.ControlView.extend({
events: {
'click .sc-launchpad-item[data-popup=1]': 'showPopup'
},
initialize: function (options) {
$(".launchpad-editorial.disabled").removeClass("disabled");
viewSelf = this;
this._super();
},
showPopup: function (e) {
var $link = $(e.target || e.srcElement).closest('a');
if ($link.attr('data-popup') !== "1") {
return;
}

e.preventDefault();
var url = $link.attr('href');

viewSelf.app.Frame1.viewModel.$el.unbind('load.launchbar').bind('load.launchbar', this.onPopupLoaded);
viewSelf.app.Frame1.set('sourceUrl', url);
viewSelf.app.Frame1.viewModel.height("600");
viewSelf.app.Frame1.viewModel.width("800px");
viewSelf.app.Frame1.trigger('loaded');
},

onPopupLoaded: function () {
viewSelf.app.Frame1.viewModel.$el.unbind('load.launchbar');
}
});

Sitecore.Factories.createComponent("LaunchBarWithPopup", model, view, "div[data-sc-component='LaunchBarWithPopup']");
});
Now, go back to Sitecore Explored and replace the LaunchBar rendering with your custom LaunchBar -Popup:
- Navigate to /Sitecore/Client/Applications/Launchpad and right click to chose Design Layout
- Click the Add Rendering button on the top left
- Add LaunchBar -Popup to the same placeholder where LaunchBar is
- Remove LaunchBar rendering
- Add Frame component and set property width and height to 800 and 600
- Custom js will use it to load dialogue in it
5. Register source folder
If you reload launchpad at this point you should be able to see html changes for your custom button and a console error for the missing custom javascript resources. To get the custom script files resolved in launchpad you need to create a new pipeline and define the correct source folder path.
&amp;amp;lt;configuration xmlns:patch="http://www.sitecore.net/xmlconfig/"&amp;amp;gt; &amp;amp;lt;sitecore&amp;amp;gt; &amp;amp;lt;pipelines&amp;amp;gt; &amp;amp;lt;speak.client.resolveScript&amp;amp;gt; &amp;amp;lt;processor type="Sitecore.Resources.Pipelines.ResolveScript.Controls, Sitecore.Speak.Client"&amp;amp;gt; &amp;amp;lt;sources hint="raw:AddSource"&amp;amp;gt; &amp;amp;lt;source folder="/sitecore/shell/client/MyApp" deep="true" category="myapp" pattern="<em>.js,</em>.css" /&amp;amp;gt; &amp;amp;lt;/sources&amp;amp;gt; &amp;amp;lt;/processor&amp;amp;gt; &amp;amp;lt;/speak.client.resolveScript&amp;amp;gt; &amp;amp;lt;/pipelines&amp;amp;gt; &amp;amp;lt;/sitecore&amp;amp;gt; &amp;amp;lt;/configuration&amp;amp;gt;
6. Configure security roles
Finally, create and configure user roles and deny read access to all buttons in launchpad except the custom one you created.
Now when you login to Sitecore in launchpad, you should be able to see your custom launchpad button and a dialogue box for creating new article page.
Custom Launchpad buttons and Experience Editor Ribbon Buttons save time for content authors and improve their experience especially when editing long and complex pages. Launchpad buttons allow them to focus only on those page types they are allowed to create or edit and ribbon buttons and dialogues give them options to edit fields without going back to launchpad.
Until next time. Happy coding.
Marijana


